


4
www.larsonelectronics.com
6.
Click the
or
button to position the
>
marker at either SAVE/EXIT or EXIT, and then click the
Iris +
button.
NOTE
SAVE/EXIT
: Use this option if you want to retain the setting. It can be changed at any time.
EXIT
new setting is lost.
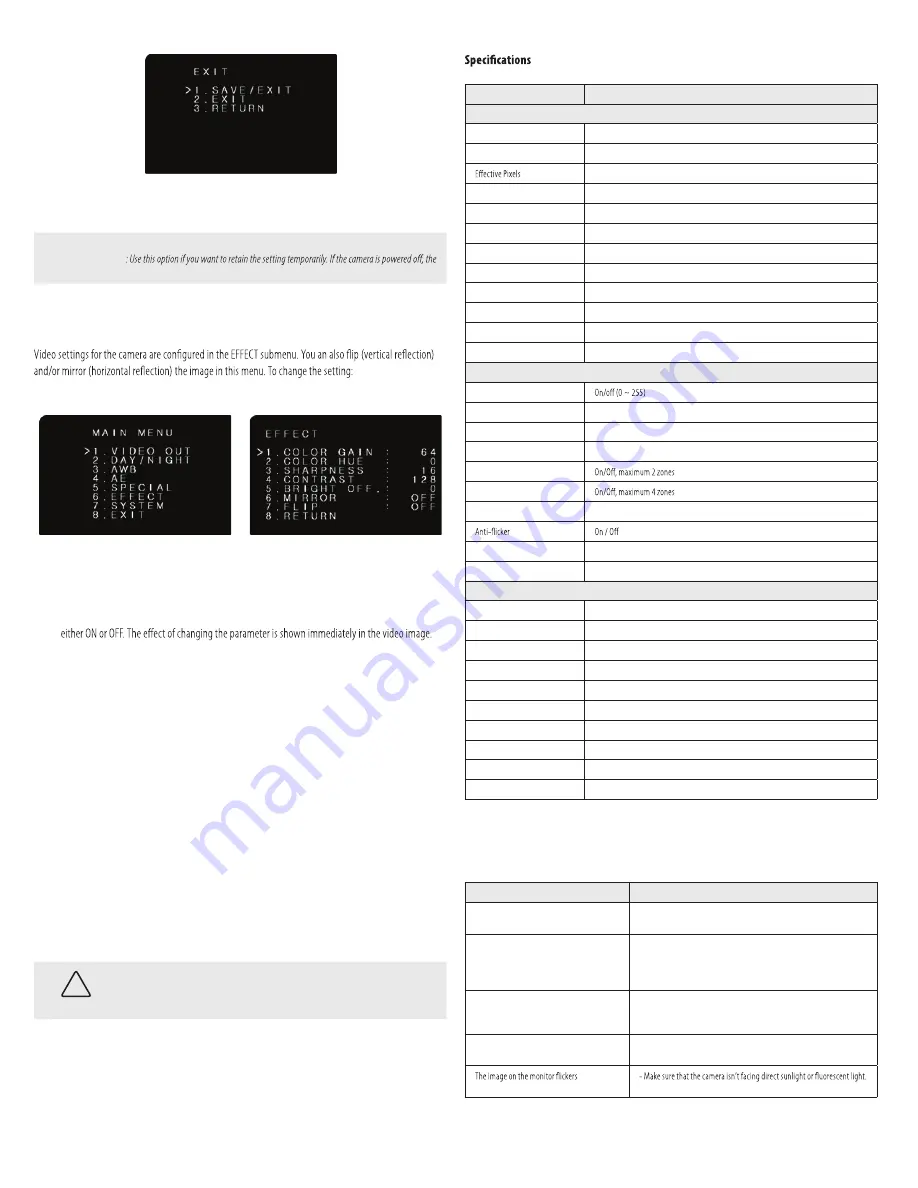
Example 2: Change the camera video settings
1.
Open the OSD Main Menu (see “Step 3. Open the OSD menu” on page 2).
2.
Click the
button to position the
>
marker at EFFECT, and then click the
Iris +
button to open the
EFFECT submenu.
3.
Click the
or
button to position the
>
marker at the parameter you want to change, and then
click the
or
button to decrease or increase the setting. The FLIP and RETURN options are
4.
Repeat the previous step to change other parameter values if necessary.
5.
Click the
button to position the
>
marker at RETURN, and then click the
Iris +
button to return
to the previous menu (MAIN MENU).
6.
Click the
button to position the
>
marker at EXIT, and then click the
Iris +
button to open the
EXIT submenu.
7.
Click the
or
button to position the
>
marker at either SAVE/EXIT or EXIT, and then click the
Iris +
button.
Cleaning
Clean the camera dome with an approved glass cleaning solution and a lint free cloth.
•
Dust can be removed from the unit by wiping it with a soft damp cloth. To remove stains, gently rub
the surface with a soft cloth moistened with a mild detergent solution, then rinse and dry it with a
soft cloth.
•
Remove all foreign particles, such as plastic or rubber materials, attached to the camera housing.
These may cause damage to the surface over time.
CAUTION
Do not use benzene, thinner or other chemical products on the camera assembly; these may
dissolve the paint and promote damage of the surfaces. Before using any chemical product,
carefully follow the accompanying instructions.
Model
EXPCMR-ALG-1080P-12V
Camera
Image Sensor
1 / 2.7" Progressive Scan CMOS
Signal System
NTSC
1930(H) * 1088(V)
Min. Illumination
0.1 lux @ (F1.2, AGC ON), 0 lux with IR
Shutter speed
1/30 s to 1/50,000 s
Lens
3.6 mm lens, angle of View: 90°
Lens Mount
M12
Day & Night
ICR
Synchronization
Internal synchronization
Video Frame Rate
1080p @ 30 fps
HD Video Output
1 Analog HD output
S / N Ratio
More than 52 dB
Menu
Camera ID
AGC
Support
D/N Mode
Color / BW/ Auto / EXT
White Balance
Auto / User / Push / 8000 K / 6000 K / 4200 K / 3000 K
Privacy Mask
Motion Detection
BLC
Support
Language
English / Chinese
Function
Digital noise reduction, Mirror
General
Working Temperature / Humidity
14 °F ~ 122 °F (-10 °C ~ 50 °C)
Humidity
90% or less (non-condensing)
Power Supply
12 Vdc
Power Consumption
Max. 3W
Weather Proof Ratings
IP66
IR Range
Up to 65 ft (20 m)
Communication
Up the coax (OSD control through the HD-TVI DVR)
Protocol:
Coaxitron
Dimensions
Φ2.76” × 5.89” (Φ70 × 149.5 mm)
Weight
0.79 lbs (360 g)
Troubleshooting
Problem
Possible Cause
Nothing appears on the screen
- Check the power connection.
- Check the video signal cable connection to the monitor.
The video image is dim or not clear.
- If the camera lens is dirty, clean it with a soft, clean cloth.
- Adjust the monitor controls, if necessary.
- If the camera is facing a very strong light, change the camera position.
- Adjust the lens focus.
The screen is dark.
- Adjust the contrast control of the monitor.
- If you have an intermediate device, set the impedance (75 Ω /Hi-Z)
properly, and check the cable connections.
The camera is not working properly and the
surface of the camera is hot.
- Verify that the camera is correctly connected to an appropriate regulated
power source.
If necessary,change the camera position.
EXPCMR-ALG-1080P-12V


