background image

DRAGON

56

English

X

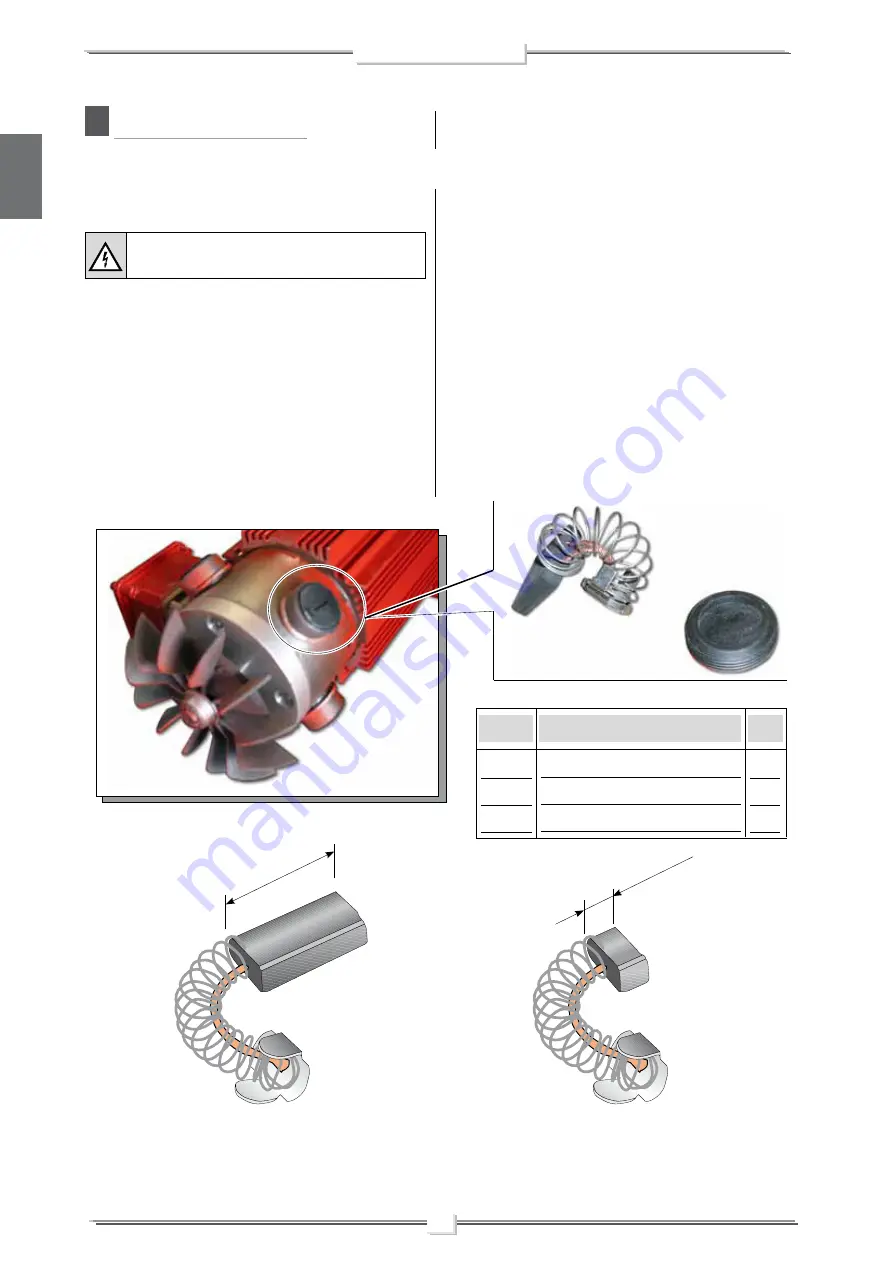
ELECTRIC MOTOR

WARNING

: Always indicate code and quantity for each part required.

• 

Periodically check on the wear of the pinion 

(at least every 

1000 working hours).

• 

Periodically  check  the  perfect  connection  among  all  the 
electrical components 

(at least every 200 working hours)

.

• 

The length of the brush contact must be higher than 

9 mm


to guarantee a good working of the rotary group.

*Length of new brush

**Minimum length of the brush
   Replace

Code

Description

Brush 220V 50Hz

Brush 110V 60Hz

Brush holder plug

20280

20281

20282

Q.ty

4

4

4

DISCONNECT THE POWER SUPPLY BEFORE CHE-
CKING OR REPLACING THE BRUSHES.

24 mm*

9 mm**

Summary of Contents for NEW EXCALIBUR top finish

Page 1: ...FACTURER DIRECT LINE Tel 39 0341 621256 Fax 39 0341 621234 CUSTOMERS TECHNICAL SERVICE AIRLESS PISTON PUMPS THOR 220V 50Hz long pump unit Rif 20705 THOR 220V 50Hz short pump unit Rif 20700 JOLLY Rif 5...

Page 2: ...ies Short Dragon 220V 50Hz without accessories Long Dragon 220V 50Hz without accessories Rigid Dragon 220V 50Hz without accessories Short petrol powered Dragon without accessories Long petrol powered...

Page 3: ...r with long fiber n 1 Roller with medium fiber Flexible hose mt 2 3 16 M16x1 5 PLA 1 4 BASE SUPER FAST CLEAN Art K11446 K11441 K11436 cm 240 180 130 PLA M16x1 5 BASE SUPER FAST CLEAN Art K11445 K11440...

Page 4: ...51 52 53 54 55 56 Cover cap Union Seal Package pressing kit Complete tank 100Lt O ring Lower cap seal Nut Chain Ring Cap holding chain Adjustment cylinder Adjustment spring Cap Complete tank Cleaning...

Page 5: ...GON 60 English 100 LTANK ACCESSORY KIT 8 3 29 A 9 36 47 48 49 4 34 5 35 30 31 6 50 43 11 10 52 51 12 33 8 9 37 38 39 7 13 44 14 32 54 53 45 15 40 41 42 17 18 16 19 20 22 24 21 23 25 26 27 28 55 1 46 2...

Page 6: ...DRAGON 59 English KIT KIT KIT Code 30193 COMPLETE GASKET KIT Code 30174 SLEEVE PISTON KIT Code 30160 FOOT VALVE SEAL KIT KIT Art 30194 PUMP REPAIR KIT COMPLETE...

Page 7: ...25 20 SFC25 40 SFC25 60 SFC27 20 SFC27 40 SFC27 60 SFC27 80 SFC29 20 SFC29 40 SFC29 60 SFC29 80 SFC31 40 SFC31 60 SFC31 80 SFC33 40 SFC33 60 SFC33 80 SFC39 40 SFC39 60 SFC39 80 SFC43 40 SFC43 60 SFC43...

Page 8: ...X 850 MX 1100 MX 1100 ER Code 20101 FILTER PISTON GUNSTOCK FILTERS Code 11039 Green 30M Code 11038 White 60M Code 11037 Yellow 100M Code 11019 Red 200M Code 11000 AT 300 M16x1 5 Code 11090 AT 300 1 4...

Page 9: ...onnection among all the electrical components at least every 200 working hours The length of the brush contact must be higher than 9 mm to guarantee a good working of the rotary group Length of new br...

Page 10: ...Clean Sleeve Prick punch complete Trigger gun Safety lever Brake Washer Trigger Pin Pin Pin Nut M3 Washer Gun body Pins Spring Bauer 11x6x0 6 Wedge Sleeve sealing Screw press sleeve Plate M3 nut Spri...

Page 11: ...AGON 54 English 10 A 1 2 8 3 18 16 9 4 7 17 19 20 21 6 15 11 12 13 14 5 5a 5b 5c 5d 5h 5e 5b 5h 5a 5f 5g 5g O W HIGH PRESSURE GUN AT 300 WARNING Always indicate code and quantity for each part require...

Page 12: ...EMBLY OFTHE CLUTCH UNIT ATTENTION Checkforproperclearance 0 5 0 05mm between the anchor and the rotor when assembling the clutch unit FITTING CLEARANCE 0 5 0 05mm FITTING CLEARANCE 0 5 0 05mm ANCHOR R...

Page 13: ...MBLY Ref 30175 ASSEMBLY Ref 30679 CARRIAGE ASSEMBLY Ref 30680 WARNING Always indicate code and quantity for each part required Pos Nut Washer Screw Extension cables Filter Code Description 1 2 3 4 5 Q...

Page 14: ...5 26 27 28 29 30 31 32 33 34 35 36 Screw Tie rods Washer Nut Guard Screw Motor tongue Screw Reduction gear flange Snap ring for holes Radial bearing Hydraulic buffer assembly Support plate Washer Self...

Page 15: ...8 Complete Liner box Ref 30689 Dragon Support kit gasoline Ref 30641 Complete reduction gear Ref 30652 Basic clutch unit Ref 30654 21 26 23 3 22 3 23 10 21 6C 15 16 17 20 4 5 6B 14 13 12 10 3 9 8 7 24...

Page 16: ...60 Guard Washer Self tightening nut Alternator belt Screw Alternator pulley Alternator Screw Alternator fulcrum Alternator plate Safety shields Drain pipe 1 collar Washer Washer Safety cover Support p...

Page 17: ...1A 1B 23 5 21 20 19 18 24 17 18 24 22 5 25 26 24 2 47 35 32 33 5 30 32 33 31 33 32 35 39 25 38 30 40 37 36 11 43 42 46 24 23 48 41 49 50 35 57 56 38 53 55 25 54 25 50 51 35 9 4 44 45 24 23 60 58 59 58...

Page 18: ...4 Tightening plate Dissipator Anti vibration washers Washer Screw Transparent sheet Knob Technical data label 1 1 3 3 3 1 1 1 30350 30357 5933 20355 20354 96028 20365 18483 18493 20352 8011 34009 3400...

Page 19: ...46 English O ELECTRICAL CONTROL EXPLODED VIEW WARNING Always indicate code and quantity for each part required T Complete 220V 50Hz box Ref 20350 110V 60Hz Ref 20350 110 14 8 5 6 3 12 6 7 2 4 13 1 9...

Page 20: ...sition Carriage in compact position CARRIAGE Pos Complete carriage Carrying handle Pipe cap Bushing Carriage Code Description 1 2 3 4 Q ty 1 2 2 1 Pos Code Description Q ty 5 6 7 8 Split pin Wheel sto...

Page 21: ...n tube Dispersion pin Code Description 1 2 3 4 5 6 7 8 Q ty 1 1 1 1 1 1 1 1 Pos Code Description Q ty 9 10 11 12 13 14 15 Bell Tube Tube coupling Complete jointed fi tting Sealing washer Ball seat Del...

Page 22: ...tion Q ty 24 25 26 27 28 29 30 31 32 33 34 35 36 37 38 39 40 41 42 43 44 45 46 Positioning peg Bush Spring Complete rod Ring Or Valve casing Or Filter tank Sieve spring Filter sieve Sieve holder Or No...

Page 23: ...AULIC BLOCK REF 30400 WARNING Always indicate code and quantity for each part required 9 45 40 45 37 42 41 43 39 18 36 35 34 33 32 38 18 37 44 17 14 15 19 13 12 5 11 10 1 7 6 9 45 8 16 31 30 29 22 27...

Page 24: ...t casing Seal Upper pump unit casing Upper guide band Upper gasket Tightening ring nut Stuffing nut Long jacket assembly Adapter OR Upper guide band Seal Foot valve seal kit Complete seal kit Jacket p...

Page 25: ...WARNING Always indicate code and quantity for each part required 25 24 22 23 29 21 27 7 20 19 18 17 15 14 13 11 12 11 10 9 7 6 5 3 2 28 Ref 30100 1 LONG PUMP 4 30 26 16 8 CORRECT FITTING LIP CORRECT F...

Page 26: ...OR Ball guide Closing ball Ball seat holder Seal Assembled valve 90 bend Suction pipefitting Seal sleeve Jacket assembly Stem assembly Foot valve unit Foot valve seal kit Complete seal kit Jacket pist...

Page 27: ...e code and quantity for each part required Ref 30150 SHORT PUMPING ELEMENT Coupled to suction circulation hose kit Ref 30175 2 3 4 5 6 7 8 10 11 13 14 15 14 16 18 20 21 24 Tightening pin Ref 20144 COR...

Page 28: ...idsuctiontubeforsolvent basedpaint Suctionfilterforsolvent basedpaint Jacket unit Rod unit Suction kit for solvent based paint Suction connector for water based paint Rigid suction tube for water base...

Page 29: ...IGID PUMPING ELEMENT WARNING Always indicate code and quantity for each part required 2 3 5 6 7 8 10 11 13 14 15 14 16 18 20 21 24 Tightening pin Ref 20144 CORRECT FITTING LIP CORRECT FITTING 19 Ref 3...

Page 30: ...1 1 1 1 1 2 1 1 2 Pos Code Description Q ty 18 19 20 21 22 23 24 25 26 27 28 29 30 31 32 33 34 35 36 37 38 39 Inspection hatch Tin plate door Screw Reduction unit cover Cover assembly Eyebolt Fixing...

Page 31: ...COMPLETE ELECTRO MECHANICAL UNIT 21 31 18 26 25 14 14 4 5 22 20 3 15 30 7 6 Plug extractor ref 20213 Earth cable ref 5010 29 5 4 12 13 35 3 2 8 29 1 37 27 33 3 32 34 23 Supplied for lifting 6 7 9 10 1...

Page 32: ...iage page 45 Circulation system unit Page 44 Basic hydraulic block ref 30400 Page 42 O M Complete electro mechanical Unit Page 34 O U Liner type machines Page 47 O V Petrol powered Dragon Page 50 O Y...

Page 33: ...livery pipe is not correctly aligned unscrew the pump casing until the connectionisinthecorrectpositionbeforetighteningbyusing the ring nut N35 and the pin N36 supplied Ref 20144 When refitting the pu...

Page 34: ...ush Insert the sleeve L31 into the lower pump unit L32 Screw on the complete foot valve L29 with the sleeve as sembly L30 Inordertoguaranteeaproperseal tightenthefoot valve L29 fully using a 50 mm spa...

Page 35: ...then loosen it by one turn Remove the sleeve cylinder seal L30 and replace it with a new one RemovetheOR L25 L26 L28 fromthebodyofthefootvalve L29 and from the ball seat holder L27 and if necessary r...

Page 36: ...d L24 located below the seal L23 and insert a new band in the same position The positioning of the seal L23 equires special care during assembly Assistinsertionbyapplyingleveragetotheoutsideofthering...

Page 37: ...r to remove the O Ring L19 and replace it making sure it is aligned correctly as illustrated Use a screwdriver to remove the two open ring guide bands L15 and replace them Use a size 24 spanner to uns...

Page 38: ...NTENANCE Replacement of upper and lower gaskets 20 minutes Lock the pump unit into a vice and unscrew it with a 50mm wrench Release the pump unit from the body of the suction valve Grip the stem valve...

Page 39: ...urebeforegoingonwiththeoperations follow the correct procedure of decompression The gaskets are self adjusting If a leak occurs they must be replaced Disconnect the product feed hose L1 from the pump...

Page 40: ...ert the gun clamp K4 Clamp inserted Clamp released Makesurethattheelectricalsystemisearthedand complies with regulations WARNING If the equipment is still under pressure after performing the operation...

Page 41: ...r of the gun butt is too fine The nozzle is worn The gaskets of the pumping group are worn Suction or delivery valve dirty Drain valve defective Material leaking from the O Ring Check the correct conn...

Page 42: ...box clean in order to guarantee correct heat exchange with the ambient air We suggest cleaning using a jet of compressed air PRESSURE SWITCH SEAL CHECK Check that no material is escaping from the safe...

Page 43: ...k that it is tightened all the way The supplied pin I3 ref 20144 also serves the purpose of closing and opening the pump unit s locking ring nut I4 This ring nut must always be closed in order to act...

Page 44: ...he rubber hose H7 and take away the bucket of water H6 Now point the spray gun H4 into the container H5 and press the trigger to recover any cleaning liquid left Run the pump s washing cycle until cle...

Page 45: ...n Open the circulation safety valve H3 to discharge the pressure in the circuit Lift the suction hose and replace the bucket of product with an empty bucket H6 Connect a rubber hose H7 to a water tap...

Page 46: ...ipment Take the cleaning liquid and store it in suitable containers Makesurethatthemachinesucksincleanwashing liquid Allow the cleaning liquid to discharge into anothercontaineranddonotmixitwiththecle...

Page 47: ...crete andnottosurfacesthatwillinsulate the container from the earth Hold the spray gun against the edge of the metal contained H5 Makesurethatthemachinesucksincleanwashing liquid Allow the cleaning li...

Page 48: ...y gun trigger down Open the recirculation safety valve H3 to release the pressure in the circuit Lift the suction hose and replace the bucket containing the product with a bucket of cleaning liquid ma...

Page 49: ...the maximum pres sure available releasing the gun trigger sudden increases of pressure can occur In this case the safety valve G5 opens automatically eliminating part of the product from the recircula...

Page 50: ...en the recirculation safety valve G2 Make sure that the product circulates regularly from the circulation hose G5 Close the recirculation safety valve G2 Themachinecontinuestosuckupproductuntilithasfi...

Page 51: ...arth on the pump unit Use the tooling after performing all the SETTING UP ope rations above described Dip the suction pipe G1 into the product tank REMOVE THE FILTER F9 FOR DENSE PRO DUCTS Never use p...

Page 52: ...p away from the pump in order to avoid the contact between the solvent fumes and the electric motor For disposing of the washing liquid see the re quirements laid down in the Standards in force in the...

Page 53: ...ed is positio ned correctly in order to earth the pump unit in the equipment properly Ensure the gun is without nozzle F3 Check the switch F5 is on the OFF 0 position before connecting the cable to th...

Page 54: ...e means of a specific clamp F4 in order to protect the operator against any risk of static or electric shock Should anyone use an extension cable between the tooling and the socket it must have the sa...

Page 55: ...ches is suggested NEVER use sealants on fittings threads It is ADVISED to mount a high pressure manometer at the pump outlet see on page Accessories to read the product pressure Itisrecommendedtouseth...

Page 56: ...he product in the hose can create static electricity through discharges andsparks Itissuggestedtoearththeequipment The pump is earthed through the earth cable of the supply The gun is earthed through...

Page 57: ...sure that the machine is earthed Replace it Wait until the equipment has stopped completely before using it for a new job Solution D TRANSPORT AND UNPACKING The packed parts should be handled as indic...

Page 58: ...beswitchedoffandonagainusing switch 1 Eachtimethemachineisswitchedoff theconden sers remain charged for about 5 minutes Toavoidriskofshock whenremovingtheelectrical box wait until the condensers have...

Page 59: ...1 Suction filter Pressure gauge Airless manual gun AT 300 Trigger safety clamp Description POS 12 13 14 15 Earth cable with clamp Control equipment ON OFF switch Flexible pipe connection Description 1...

Page 60: ...7 DESCRIPTION OFTHE EQUIPMENT Electric motor Pressure transmitter Pumping group High pressure flexible pipe of compen sation 3 8 Description Recirculation tube Recirculation safety valve Line filter o...

Page 61: ...L OF THE SOUND PRESSURE MINIMUM WIDTH MINIMUM HEIGHT MAXIMUM HEIGHT MINIMUM ENCUMBRANCE 230V C A 50Hz 9 Kw casynchronous 2 4 kW 230 bar 5 L min M16 x 1 5 M 66 Kg 60dB A A 560 mm B 945 mm C 1040 mm D 7...

Page 62: ...mp outlet and then sent to the gun through the flexible hose An electronic device located next to the reduction box is used to regulateandcontrolthepressureofthematerialleavingthepump When the pump re...

Page 63: ...cates wound and finger squashing risk due to movable parts in the equipment Tenersi lontano dalle parti in movimento Do not use the equipment without the proper protection Before any inspection or mai...

Page 64: ...ring p 23 PROBLEMS AND SOLUTIONS p 24 CORRECT PROCEDURE OF DECOMPRESSION p 25 REPLACEMENT OF THE PUMPING GROUP S GASKETS p 26 Pit stop maintenance p 27 Lower seal p 27 Upper seal p 29 SPARE PARTS COM...

Page 65: ...manual without prior notice This manual is to be considered as an English language translation of the original manual in Italian The manufacturer shall bear no responsibility for any damages or inconv...

Page 66: ...OPERATING AND MAINTENANCE INSTRUCTION OPERATING AND MAINTENANCE INSTRUCTION ENGLISH P A I N T S P R A Y I N G E Q U I P M E N T Ed 007 11 11 ELECTRIC PISTON PUMP...

Reviews: