


Please note! In the absence of sufficient installation staff you may need to use a crane to
attach the Tube slide to a tall structure.
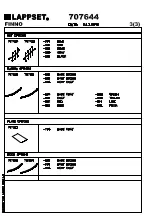
1. Use the parts list and the markings on the components to make sure that you have all of
the necessary parts.
2. Choose a location for the product, taking into account the safety margins specified in the
mounting instructions: leave 2 metres in front of the slide's end and 1 metre on both
sides. The curve of the Tube slide must correspond to a total fall height of 1 metre.
Prepare the ground for anchoring the end piece.
3. Assemble the tubular components in accordance with the instructions on pages 4 and 5,
taking into account the positioning of transparent elements.
4.
Join the components together following the numbering in the instructions. An example of
how to assemble the tube is shown on page 6. Make sure that none of the transparent
elements are used for the sliding surface.
5. Pre-assemble the top deck and position it at the upper end of the slide as shown in the
instructions. Fix the steel anchors on the bottom of the slide (part No 905850) into place
as instructed and attach to the bottom end of the tube.
6.
Lift the tube up against the structure and fix into place using the mountings provided. Fill
the area in front of and underneath the slide with sand.
7.
Follow the instructions in the supplement to mount support posts if required.
8. Inspect the installation thoroughly using the checklist provided. Document the completed
checklist carefully. Remember to stop children from using the product until it has been
fully built and safety-tested and all mounting equipment has been cleared away.
TUBE
REF:
DATE:
2
LAPPSET
C
o
p
yr
ig
h
t
La
p
p
se
t
G
o
u
p
L
td
28.4.2008
Summary of Contents for CLIMBING ADVENTURE
Page 6: ......
Page 7: ......
Page 8: ......
Page 9: ......
Page 10: ......
Page 11: ......
Page 12: ......
Page 13: ......
Page 14: ......
Page 15: ......
Page 16: ......
Page 17: ......
Page 18: ......
Page 19: ......
Page 20: ......
Page 21: ......
Page 22: ......
Page 23: ......
Page 24: ......
Page 25: ......
Page 26: ......
Page 27: ......
Page 28: ......
Page 29: ......
Page 30: ......
Page 31: ......
Page 32: ......
Page 33: ......
Page 34: ......
Page 35: ......
Page 36: ......
Page 37: ......
Page 38: ......
Page 39: ......
Page 40: ......
Page 41: ......
Page 42: ......
Page 43: ......
Page 44: ......
Page 45: ......
Page 46: ......
Page 47: ......
Page 48: ......
Page 49: ......
Page 50: ......
Page 51: ......
Page 52: ......
Page 53: ......
Page 54: ......
Page 55: ......
Page 56: ......
Page 57: ......
Page 58: ......
Page 59: ......
Page 60: ......
Page 61: ......
Page 62: ......
Page 63: ......
Page 64: ......
Page 65: ......
Page 66: ......
Page 67: ......
Page 68: ......
Page 69: ......


