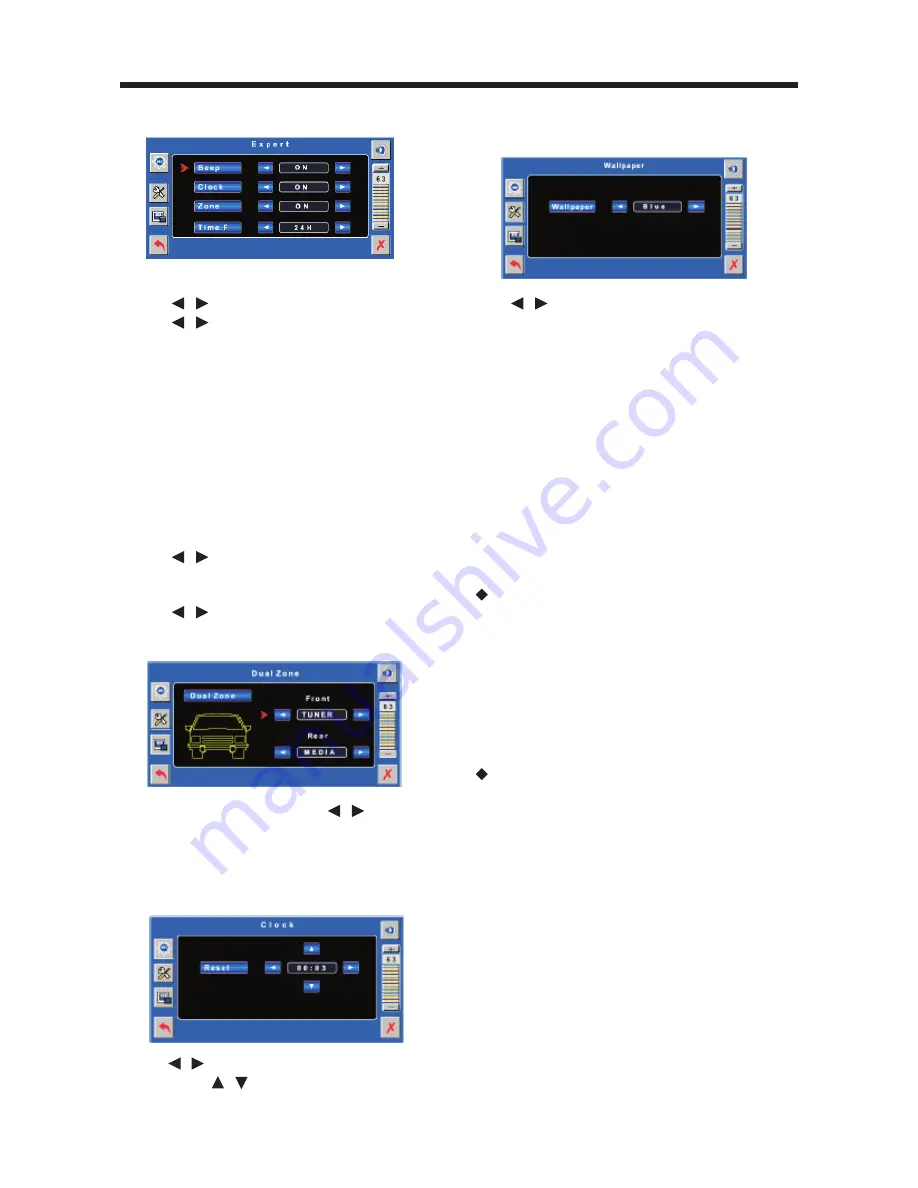
Lanzar SDBT75NU Owner'S Manual Download Page 18

OPERATION

19

A: Expert menu

In expert menu, the following operation
will be allowed:
-  Use 

 / 

 to select Beep on or off.

-  Use 

 / 

 to turn the Clock display on

or off.
Note: With the expert menu on, when
select clock on, the current time will be
displayed on the up right of the screen,
and you can see the time is changing.
When exit the expert menu the clock
will be displayed on the up right of the
screen.
When select clock off, the current clock
will be stopped, when you exit the
expert menu, the clock display will be
turned off.

-  Use 

 / 

 to turn the Zone on or off.

(only in radio mode, you can change
Zone to ON.)

-  Use 

 / 

 to select the mode of time

between 12H/24H per day.

B: Dual Zone

For the front speaker, use 

 / 

 to select

corresponding items.
How to operate dual zone, please refer
to the following Smart Mode Operation
section.
C: Clock adjustment

Using 

 / 

 to select the hour and minute.

Then using 

 / 

 to change the value of

the hour and minute.
Note: Tap the Reset bar on the screen will

reset the time to “00:00”.
D: Wallpaper selection

Use 

 / 

 to select the wallpaper among:

Blue, Black and Cyan.

3) DVD SETUP

Please refer to the 

DISC (DVD, VCD, CD,

MP3) OPERATION 

part in this instruction

manual.

4) DEFAULT

Tap the DEFAULT bar on the SETUP menu,
you will be asked “Are you sure to load
factory default setting?”, if you want to
select default setting, tap ENTER bar on
the screen or press OK
button on the remote control to confirm,
and “Load factory ok ! ” will appear on
the screen.


Note (FOR THE UNIT WITH TEL-

MUTE AND BRAKE FUNCTION)

1) When there is an incoming call, the unit

will be in mute state, and “TEL MUTE”
appears on the screen display.

2) If the brake wire isn’t connected to the

ground (when driving, in BRAKE OFF),
the picture will not be shown on the
screen in DVD/AV mode for safety
purpose. Only the audio will be heard.

 Smart Mode Operation

Shortly press S-M button on the remote
control or S (Smart MODE) button on  the
front panel to enter Smart Mode.
1) When the current mode is TUNER,BT

press S-M or S to enter smart mode,
the front zone mode is TUNER, the rear
zone mode can be switched among
MEDIA, AV1 IN and AV2 IN. In this time,
the front speaker’s audio is RADIO, the
rear speaker’s audio will be muted. And
AV OUT is DVD, AV1 IN or AV2 IN.

2) (Only for the unit with navigation

function.)
When the current mode is NAVI, Press
S-M or S to enter smart mode, the front
zone mode is NAVI, the rear zone mode
can be switched between TUNER and
DVD.  In this time, if there is no
navigation sound, the front/rear

Summary of Contents for SDBT75NU

Page 1: ...ertical Adjustable And Horizontal Rotatable Panel 7 0 Inch Touch Screen Monitor Multi subtitle audio Languages Function Multi angle Function Smart Mode Function Parental Control Bluetooth Function Rem...

Page 2: ...e moisture This could cause electrical shorts fire or other damage When Parked Parking in direct sunlight can produce very high temperatures inside your vehicle Give the interior a chance to cool down...

Page 3: ...tion 6 The Player 9 Electrical Connection 11 Remote Control 13 Preparing the Remote Control 15 Loading a disc 15 Ejecting a disc 15 Operation 16 Basic Operation 16 Disc DVD VCD CD MP3 Operation 20 Rad...

Page 4: ...S DEVICE IS INTENDED FOR CONTINUOUS OPERATION This product incorporates copyright protection technology that is protected by method claims of certain U S patents and other intellectual property rights...

Page 5: ...l record cleaners as they may mar the surface of the disc Note A disc may become somewhat scratched although not enough to make it unusable depending on the way it is handle and conditions in the usag...

Page 6: ...Rear mount installation utilizing threaded screw holes at the sides of the unit chassis For details refer to the following illustrated installation methods INSTALLATION DIN FRONT MOUNT Method A Insta...

Page 7: ...nding of the unit Note to install the short threading terminal of the mounting bolt to the back of the unit and the other long threading terminal to the dashboard INSTALLATION 9 Reconnect the cable to...

Page 8: ...en the screws on each side 2 Fasten with the supplied truss screws 5x5mm or flush surface screws 4x5mm depending on the shape of the screw holes in the bracket Note 1 The outer trim ring sleeve and th...

Page 9: ...9 THE PLAYER FRONT VIEW Closed Position Open Position 1 2 3 4 5 6 7 8 9 10 11 12 13 14 15 16 17 18 19 20 21 22 23 24...

Page 10: ...5 LOC 6 MO ST 7 Cursor Buttons Pick up 8 ENT Pick up 9 Eject 10 MENU 11 S Smart MODE 12 MUT 13 VOL 14 MODE 15 DSP 16 Open Close 17 USB Interface 18 AV IN 19 Reset Button 20 Remote Sensor 21 BACK Hang...

Page 11: ...E RROUT RED PRE RLOUT WHITE COAXIAL ORANGE SUBWOOFER WHITE TELEPHONE MUTE ORANGE BRAKE PINK BLACK REMOTE SENSOR CONNECTOR Green Green Black White White Black Gray Gray Black Violet Violet Black 4 spea...

Page 12: ...13 REMOTE CONTROL LOCATION AND FUNCTION OF KEYS 36 1 21 3 20 18 11 8 31 30 24 32 27 10 25 2 7 34 33 29 22 19 16 17 12 14 13 4 15 9 26 35 23 28 5 6...

Page 13: ...elected item Optional 15 Changing for slow forward reverse playback motion on DVD disc 16 Press to play the disc 17 Press to search forward rapidly to search reverse rapidly In FM mode use to search t...

Page 14: ...Control Point the remote control towards the remote control signal receiver on the player front face Operation angle About 30 degree in each the direction of the front of the remote sensor REMOTE CONT...

Page 15: ...the unit Please wait for several seconds the panel will slide out automatically Screen Ajustment Angle Slide Picture 1 Method A Adjust the angle slide picture When the monitor stops moving touch the s...

Page 16: ...el 7 Inch TFT Monitor Display When the monitor stretches out the 7 inch TFT Monitor display can show the current state of the unit Volume Level Adjustment Press VOL buttons on the remote control or ic...

Page 17: ...oud ON or OFF C Bass Adjustment Use to adjust the bass level between 14dB 14dB D Subwoofer Selection Only for the unit with subwoofer function Use to select subwoofer on or off E Fader Balance Adjustm...

Page 18: ...this instruction manual 4 DEFAULT Tap the DEFAULT bar on the SETUP menu you will be asked Are you sure to load factory default setting if you want to select default setting tap ENTER bar on the scree...

Page 19: ...ollows DVD VCD CD MP3 Slow Motion Playback For DVD Only Press on the remote control during play Each time the button is pressed the speed of slow forward reverse changes according to the disc as follo...

Page 20: ...ted continuously 1 Press A B button first at the start of the required passage REPEAT A 2 Press A B button secondly at the end of the passage REPEAT A B 3 Then the unit will repeat playing the passage...

Page 21: ...h time the button is pressed the audio soundtrack language changes on sequential order Notes The language number is different according to the disc Some discs only contain one soundtrack language Mult...

Page 22: ...d time will exit the menu and the unit will resume to normal play When you want to return to program play press PROG to enter program interface and select PLAY then use OK button to confirm it will be...

Page 23: ...rental level assigned to the disc The range of parental controls is from 1 to 8 The player can be set in a similar way If the player s parental level is set to 8 it will play all discs If the player s...

Page 24: ...red memory location button for several seconds The current listening station will be stored into the number button Or tap CH character on the screen then press and hold M1 6 button bars on the screen...

Page 25: ...le battery you should remove the battery from the MP3 player then connect it to the USB interface Otherwise it may cause battery burst USB PLAY OPERATION On the front panel of the unit there is an USB...

Page 26: ...ming tap to pick up the phone or to hung up the phone c Tap icon on the screen to check the information of call records And the following picture will appear on the screen Tap DIALED LIST bar to check...

Page 27: ...a Phone Call In auto answer mode when a call coming the unit will answer the call automatically In manual answer mode when a call coming tap to pick up the phone Tap to hung up the phone Switch the P...

Page 28: ...u can get an optimum picture effect COMPLETELY DISTORTED PICTURE The disc format is not according to the TV set used PAL NTSC DISC DOES NOT PLAY Ensure the disc label is upwards Clean the disc Check i...

Page 29: ...25 dB AM Frequency Coverage 530 to 1710 KHz Sensitivity S N 20 dB 36 dBu Image Rejection 45 dB DVD Signal System Compositive video 1 0Vp p 75 Discs Played 1 DVD VIDEO disc 5 12 cm single sided single...

Reviews: