Lantronix Xpress-Pro SW 94000 User Manual Download Page 59

5: Menu-Driven Console Management 

XPress-Pro SW 94000 User Guide  

59


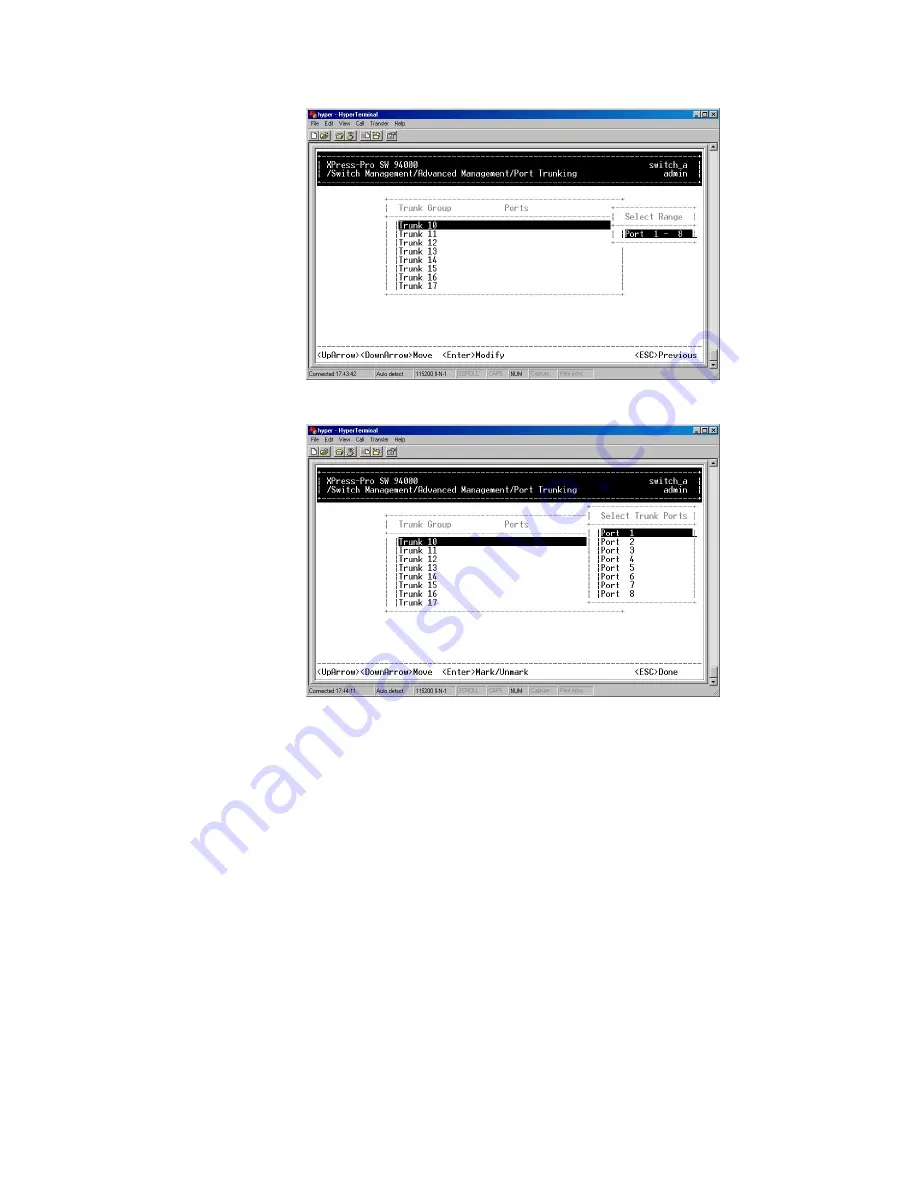
3.  Press <Enter> to select each trunk port.  


4.  Press <Esc> when completed with selecting ports. 

Port Mirroring 

1.  Move to highlight Port Mirroring from Advanced Management screen, and press 

<Enter>

.


Summary of Contents for Xpress-Pro SW 94000

Page 1: ...Part Number 900 507 Revision A May 2007 XPress Pro SW 94000 User Guide ...

Page 2: ...on UNIX is a registered trademark of The Open Group Windows 95 Windows 98 Windows 2000 and Windows NT are trademarks of Microsoft Corp Netscape is a trademark of Netscape Communications Corporation Contacts Lantronix Corporate Headquarters 15353 Barranca Parkway Irvine CA 92618 USA Phone 949 453 3990 Fax 949 453 3995 Technical Support Online www lantronix com support Sales Offices For a current li...

Page 3: ...____________ 14 VLAN CONFIGURATION_________________________________________________ 14 Intra VLAN Communication _______________________________________________ 15 Inter VLAN Communication _______________________________________________ 15 GVRP____________________________________________________________ 15 IGMP Snooping and IP Multicast Filtering ________________________________ 15 Switch Managemen...

Page 4: ...7 Switch Management Screen __________________________________________ 28 Navigating Through the Console Interface____________________________________ 29 Performing Basic Management Activities_________________________________ 29 To Perform Basic Management Activities ____________________________________ 29 Performing Advanced Management Activities _____________________________ 35 To Perform Advance...

Page 5: ..._________________ 101 SNMP Agent and MIB 2 RFC 1213 ___________________________________ 101 RMON MIB RFC 1757 and Bridge MIB RFC 1493 ______________________ 102 RMON Groups Supported _______________________________________________ 102 8 Specifications and Standards 104 A Connector Pinouts 106 ...

Page 6: ... SNMP RMON web based management functions Xpress Pro SW 94000 switch brings the answer to complicated hardened networking environments To get the most out of this manual you should have an understanding of Ethernet networking concepts In this manual you will find Features on the switch Illustrative LED functions Installation instructions Management Configuration SNMP Specifications ...

Page 7: ...ights Basic Features Provide Eight 10 100BaseTX ports Eight 10 100BaseTX ports one 100BaseFX port Six 10 100BaseTX ports two 100BaseFX ports Four 10 100BaseTX ports four 100BaseFX ports Eight 10 100BaseTX ports one 10 100 1000BaseTX port Eight 10 100BaseTX ports one 1000BaseSX LX port 100BaseFX Multi mode fiber using SC or ST connector up to 2km single mode fiber using SC or ST connector up to 75k...

Page 8: ...d Max current consumption 24VDC 0 77A Power consumption 18 48W Max Power Supply Redundant DC Terminal Block power inputs Support DIN Rail installation Front panel port status LEDs Management Support VLAN Port based VLAN 802 1Q tagged VLAN Trunking Port based Trunking Port Security Limit number of MAC addresses learned per port Load Static MAC addresses stay in the filtering table Port Mirroring Po...

Page 9: ...232 cable Telnet remote access SNMP agent MIB 2 RFC1213 Bridge MIB RFC1493 RMON MIB RFC1757 statistics history alarm and events VLAN MIB 802 1Q RFC2674 Private MIB Java applet based MIB browser Web browser support based on HTTP server and CGI parser TFTP software upgrade capability Front Panel Display c Power Status PWR1 PWR2 These LEDs come on when the switch is properly connected to power and tu...

Page 10: ...ing Transmitting or receiving data ACT stands for ACTIVITY ACT Yellow Off Neither transmitting nor receiving data Physical Ports The Xpress Pro SW 94000 switch provides Eight 10 100BaseTX ports Eight 10 100BaseTX ports one 100BaseFX port Six 10 100BaseTX ports two 100BaseFX ports Four 10 100BaseTX ports four 100BaseFX ports Eight 10 100BaseTX ports one 10 100 1000BaseTX port Eight 10 100BaseTX por...

Page 11: ...SW 94000 switch receives a frame it classifies the frame in one of two ways If the frame is untagged the Xpress Pro SW 94000 switch classifies the frame to an associated VLAN If the frame is tagged the Xpress Pro SW 94000 switch uses the tagged VLAN ID to identify the broadcasting domain of the frame Learning After VLAN classification the Xpress Pro SW 94000 switch checks the source MAC address VL...

Page 12: ...MULTICAST SWITCHING For multicast switching the Xpress Pro SW 94000 switch checks whether the received frame is a BPDU If a BPDU is received the Xpress Pro SW 94000 switch forwards the frame to the CPU for processing by the spanning tree protocol Otherwise the Xpress Pro SW 94000 switch performs the following processes VLAN classification Same as for unicast switching Learning Same as for unicast ...

Page 13: ...rs VLANs can also define a network by department For example a company might have one VLAN for its Engineering Department another for its Marketing Department and another for its Account Payable Department VLANs can also be set up according to the organization structure within a company For example the company president might have his her own VLAN the executive staff might have a different VLAN an...

Page 14: ... defined using a static binding between a VLAN and its associated ports The switch s forwarding decision is based on the destination MAC address and its associated port ID Therefore to make valid forwarding and flooding decisions the switch learns the relationship of the MAC address to its related port and thus to the VLAN at runtime Remote VLAN Learning In addition to providing network management...

Page 15: ...oup Management Protocol IGMP runs between hosts and their immediately neighboring multicast routers The protocol s mechanisms allow a host to inform its local router that it wants to receive transmissions addressed to a specific multicast group Routers periodically query the LAN to determine if known group members are still active If there is more than one router on the LAN performing IP multicast...

Page 16: ...IP multicast packets Since IGMP is not concerned with the delivery of IP multicast packets across sub networks an external IP multicast router is needed if IP multicast packets have to be routed across different sub networks Switch Management Administration console via RS 232 serial port The Xpress Pro SW 94000 switch provides an onboard serial port which allows the switch to be configured via a d...

Page 17: ...al devices should not exceed the electromagnetic field RFC standards Make sure that the Xpress Pro SW 94000 switch receives adequate ventilation Do not block the ventilation holes on each side of the s Xpress Pro SW 94000 witch or the fan exhaust port on the rear of the Xpress Pro SW 94000 switch The power outlet should be within 1 8 meters of the Xpress Pro SW 94000 switch DIN Rail Mounting Fix t...

Page 18: ...e receptacle on the topside of the Xpress Pro SW 94000 switch 2 Connect the power cord to the AC to DC power adapter and attach the plug into a standard AC outlet with the appropriate AC voltage Redundant DC Terminal Block Power Inputs There are two pairs of power inputs for use with redundant power sources You only need to have one power input connected to run the Xpress Pro SW 94000 switch ...

Page 19: ...WR1 or PWR2 fails 1A Caution The relay output is normal open position when there is no power to the Xpress Pro SW 94000 switch Please do not connect any power source to this terminal to prevent shorting your power supply Power on Self test POST The Xpress Pro SW 94000 Switch performs its Power On Self Test POST when the power is switched on During the POST the Xpress Pro SW 94000 switch CPU will P...

Page 20: ...ram appears where you can initiate tests or obtain system information Note that user intervention is not required when a test runs unless an error occurs If an error occurs during testing you are given the choice of continuing the diagnostics or skip the error Connecting to Your Network Cable Type Length It is necessary to follow the cable specifications below when connecting the Xpress Pro SW 940...

Page 21: ...s for each type of port in use Note To connect two regular RJ 45 ports between switches or hubs you need a cross over cable 3 Consult Table 3 in previous section for cabling requirements based on connectors and speed 4 Connect one end of the cable to the Xpress Pro SW 94000 switch and the other end to a desired device 5 Once the connections between two end devices are made successfully turn on the...

Page 22: ...n Console Access Web Management Access SNMP Access Standards Protocols and Related Reading Management Access Overview The Xpress Pro SW 94000 switch gives you the flexibility to access and manage the Xpress Pro SW 94000 switch using any or all of the following methods The administration console and web browser interface support are embedded in the Xpress Pro SW 94000 switch software and are availa...

Page 23: ...eed only know the community name Administration Console The administration console is an internal character oriented menu driven user interface for performing system administration such as displaying statistics or changing option settings Using this method you can view the administration console from a terminal personal computer Apple Macintosh or workstation connected to the Xpress Pro SW 94000 s...

Page 24: ... that you have entered as output on the modem port The Xpress Pro SW 94000 switch echoes characters that it receives as input on the modem port to the current administration console session The console appears to be directly connected to the external modem Web Management The Xpress Pro SW 94000 switch provides a browser interface that lets you configure and manage the switch remotely After you set...

Page 25: ...ess Pro SW 94000 switch are public Protocols The Xpress Pro SW 94000 switch supports the following protocols Virtual terminal protocols such as Telnet A virtual terminal protocol is a software program such as Telnet that allows you to establish a management session from a Macintosh a PC or a UNIX workstation Because Telnet runs over TCP IP you must have at least one IP address configured on the Xp...

Page 26: ...anagement architecture of the Xpress Pro SW 94000 switch adheres to the IEEE open standard This compliance assures customers that the Xpress Pro SW 94000 switch is compatible with and will interoperate with other solutions that adhere to the same open standard ...

Page 27: ...ogging on to the switch At the screen prompt Switch Console Login Password Login name Enter the console interface factory default console name admin Password Enter the factory default password no password press Enter directly Or enter a user defined password if you followed the instructions later and changed the factory default password Factory Default Password no password press Enter directly Not...

Page 28: ...agement Refer to performing basic management activities Advanced Management Refer to performing advanced management activities Logout Highlight this option and press Enter to log out Save Settings Highlight this option and press Enter to save the current settings and remain in the configuration program ...

Page 29: ...ress this key To Up Arrow or K Move the highlight one line up in a menu box Down Arrow or J Move the highlight one line down in a menu box Tab Move the highlight between screens Enter Select the highlighted option Esc Move to a previous menu Note Remember to release the Caps Lock key if you press K or J and cannot move the highlight on the screen Performing Basic Management Activities Basic manage...

Page 30: ...in Password and press Enter if you want to change it 5 Move to highlight guest Password and press Enter if you want to change it 6 Move to highlight Statistics Collection and press Enter if you want to change it Disabled or Enabled 7 Move to highlight Reboot On Error and press Enter if you want to change it Disabled or Enabled 8 Move to highlight Remote Telnet Login and press Enter if you want to ...

Page 31: ...LAN Port from Basic Management screen and press Enter 2 Speed Flow Control is highlighted Press Enter if you want to set speed or flow control on port 3 Move to highlight each port and press Enter to configure individually 4 Port Setting Options screen appears Highlight Speed Flow Control and press Enter ...

Page 32: ...ght a desired setting from Speed Options and press Enter Note In the Speed Options HD denotes half duplex and FD denotes full duplex 6 Press Esc to previous screen Highlight Flow Control and press Enter 7 For Flow Control move to highlight a desired setting from the Flow Cntl Options and press Enter ...

Page 33: ...ontrol move to highlight Up or Down from Admin Status Options 10 The port is set as Admin Down to stop TX RX transmission 11 To allow TX RX transmission on the port move to highlight Up from the options in step 9 12 Press Esc to a previous screen as shown in step 1 13 Move to highlight Physical Address to view physical port address ...

Page 34: ...rate 3 Move to highlight Flow Control and press Enter if you want to change the current flow control method 4 Move to highlight Modem Control and press Enter to decide a console modem connection Disabled or Enabled 5 When a modem connection is enabled move to highlight Modem Setup String and press Enter Decide whether you want to use Default or Custom Setup String Note Default Setup String configu...

Page 35: ...ss Enter The Advanced Management screen appears 15 Move to highlight a desired option and press Enter Or press Esc to exit L2 Switching DataBase View and change VLAN MAC address IP multicast group and port perspectives IP Networking View and change IP settings and ping settings Bridging View and change the aging period for a MAC address and the flood limit for all ports Static Filtering View add d...

Page 36: ...ommunicates with all other private VLAN ports and is the port you use to communicate with routers servers and administrative workstations An isolated port has complete Layer 2 separation from other ports within the same private VLAN with the exception of the promiscuous port Community ports communicate among themselves and with their promiscuous ports These ports are isolated at Layer 2 from all o...

Page 37: ...n Console Management XPress Pro SW 94000 User Guide 37 Community VLAN used by a group of community ports to communicate among themselves and transmit traffic to outside the group via the designated promiscuous port ...

Page 38: ... the isolated VLAN s and bind the promiscuous port and isolated port s to the isolated VLAN s 3 Create the community VLAN s and bind the promiscuous port and community ports to the community VLAN s 4 Associate the primary VLAN to the promiscuous port 5 Associate the isolated VLAN s to the isolated port s 6 Associate the community ports to the community VLAN s 1 Highlight the VLAN PVID Perspective ...

Page 39: ...to be all untagged so it can by default be easily used as a simple 802 1D bridging domain The default VLAN s domain shrinks as untagged ports are defined in other VLANs 3 Press Shift and on keypad to enter New VLAN Settings Enter new VLAN ID and VLAN name Note Remote is appended to the VLAN ID automatically if the VLAN is learned from a remote switch 4 Press Esc and appears the following screen Pr...

Page 40: ...ure when you select Tagged Ports and Forbidden Ports in step 4 Note If you added untagged ports and want to now add tagged ports or forbidden ports or vice versa repeat steps 4 and 5 7 Press Esc to a previous screen as shown in step 1 8 Delete VLAN highlight a VLAN ID and press to delete it Note that you cannot delete the default VLAN 9 Press Esc to a previous screen as shown in Step 1 when comple...

Page 41: ... highlight VLAN Activities and press Enter to view or search activity information 12 Return to Step 9 Move to highlight VLAN Settings and press Enter The screen appears as shown in Step 3 for adding or deleting switch ports 13 Highlight the VLAN PVID Perspective and press Enter ...

Page 42: ...D and press Enter 18 Press Enter to enter TPID value IP Multicast Group Perspective 1 Move to highlight L2 Switching DataBase from Advanced Management screen and press Enter 2 Move to highlight IP Multicast Group Perspective from L2 Switching DataBase screen and press Enter 3 Move to highlight an address to view information associated with this IP multicast group MAC Address Perspective 1 Move to ...

Page 43: ...the switching database Port Perspective 1 Move to highlight Port Perspective from L2 Switching DataBase screen and press Enter You can view Per Port VLAN activities and Per Port statistics and set Per Port MAC Limit here 2 Per Port VLAN Activities is highlighted Press Enter 3 Move to highlight a port and press Enter E g select Port 1 to view corresponding VLAN Activities ...

Page 44: ... by MAC address individually 5 Press Esc to return to a previous screen as shown in step 1 6 Move to highlight Per Port Statistics and press Enter 7 Move to highlight a port and press Enter E g select Port 1 to view corresponding VLAN Activities Press R to reset counter for this port ...

Page 45: ...5 Menu Driven Console Management XPress Pro SW 94000 User Guide 45 8 Move to highlight Per Port MAC Limit and press Enter 9 Move to highlight a port and press Enter ...

Page 46: ...Networking from Advanced Management screen and press Enter 2 Highlight IP Settings from IP Networking and press Enter The screen shows a list of VLAN IDs IP addresses subnet masks proxy ARPs currently defined 3 Move to highlight the row that contains the parameters you want to change and then press Enter ...

Page 47: ... Table from IP Networking and press Enter 5 Press Shift and on keypad to enter Internet Address and Physical Address in the Static ARP Specifications 6 Highlight Default Gateway from IP Networking and press Enter 7 Enter Default Gateway and Metric in the Default Route Specifications ...

Page 48: ...nagement XPress Pro SW 94000 User Guide 48 8 Highlight DHCP Gateway Settings from IP Networking and press Enter Ping Settings 1 Move to highlight Ping from IP Networking and press Enter 2 Move to highlight Host and press Enter ...

Page 49: ... Advanced Management screen and press Enter 16 Move to highlight Aging Time and press Enter Enter a decimal number as bridge aging period in seconds Or enter 0 for no aging 17 Move to highlight Flood Limit for All ports and press Enter Choose Unlimited or enter a decimal number as flood limit in packets per second Or enter 0 for no limit 18 Move to highlight Broadcast Limit and press Enter Choose ...

Page 50: ... 94000 User Guide 50 2 Move to highlight Source or Destination MAC addresses Out Filters for static filtering and press Enter 3 Press on keypad to add a specific MAC address to be filtered Press to delete a specific MAC address from being filtered ...

Page 51: ...t before doing so MAC Address In Filters 1 Move to highlight MAC Address In Filters from Static Filtering screen and press Enter 2 Move to highlight a port and press Enter 3 Press Shift and on keypad to add a specific MAC address to be filtered Press to delete a specific MAC address from being filtered Press S to search through current list of MAC addresses in the static filtering database Note No...

Page 52: ...ptions Decide to have it Disabled or Enabled 4 Move to highlight Bridge Priority and press Enter Type a decimal number for the bridge priority and press Enter 5 Move to highlight Hello Time and press Enter Type a decimal number for the hello time and press Enter 6 Move to highlight Max Age and press Enter Type a decimal number for the max age 7 Move to highlight Forward Delay and press Enter Type ...

Page 53: ...administration status and press Enter 12 Move to highlight a port if you want to Enable or Disable its administration status and press Enter Spanning Tree Path Costs 1 Move to highlight Spanning Tree Path Costs if you want to change the path cost and press Enter 2 Move to highlight All Ports or each port individually and press Enter For new path cost type a decimal number and press Enter Spanning ...

Page 54: ...er A low value gives the port a greater likelihood of becoming a Root port Protocol Migration 1 Move to highlight Protocol Migration if you want to change the Protocol Migration per port and press Enter 2 Move to highlight each port individually and press Enter to Enable or Disable Protocol Migration Edge Port 1 Move to highlight Edge Port if you want to change the Edge Port Setting per port and p...

Page 55: ... Port Setting Point To Point Link 1 Move to highlight Point To Point Link if you want to change the Point To Point Link Options per port and press Enter 2 Move to highlight each port individually and press Enter to choose Enable Disable or Auto Point To Point Link SNMP Functions 1 Move to highlight SNMP from Advanced Management screen and press Enter ...

Page 56: ...p to four more trap host IP addresses 7 Move to highlight Cold Start Trap and press Enter Decide to have it Disabled or Enabled 8 Move to highlight Warm Start Trap and press Enter Decide to have it Disabled or Enabled 9 Move to highlight Link Down Trap and press Enter Decide to have it Disabled or Enabled 10 Move to highlight Link Up Trap and press Enter Decide to have it Disabled or Enabled 11 Mo...

Page 57: ...tocols 1 Move to highlight Other Protocols from Advanced Management screen and press Enter 2 Move to highlight GVRP and press Enter Decide to have it Disabled or Enabled 3 Move to highlight Mode and press Enter Decide to have it Disabled or set in either Passive or Active mode ...

Page 58: ...hlight Concentration Mode and press Enter Decide to have it Disabled or Enabled Port Trunking 1 Move to highlight Port Trunking from Advanced Management screen and press Enter 2 Move to highlight a trunk group to which you want to assign ports and press Enter to enter Select Range ...

Page 59: ...agement XPress Pro SW 94000 User Guide 59 3 Press Enter to select each trunk port 4 Press Esc when completed with selecting ports Port Mirroring 1 Move to highlight Port Mirroring from Advanced Management screen and press Enter ...

Page 60: ... want to mirror to and press Enter 5 Press Enter to enter Mirror From Options listing the ports that can be mirrored from 6 Move to highlight the port you want to mirror from and press Enter 7 Move to select Mirror Mode From Mode Options decide whether the port to be mirrored from will be receiving or transmitting 8 Press Esc when completed QoS Setup 1 Move to highlight QoS Setup from Advanced Man...

Page 61: ...rwarding and press Enter 5 Move to highlight ToS VLAN Tag Preference and press Enter Highlight the VLAN Tag or ToS then press Enter 6 Move to highlight ToS for Xmit and press Enter Highlight the desired setting then press Enter 7 Move to highlight ToS for Drop and press Enter Highlight the desired setting then press Enter 8 Move to highlight WRED Drop Priority Setting and press Enter Move to highl...

Page 62: ... specify the QoS VLAN priority 2 Move to highlight any VLAN Priority Index and press Enter Move to highlight Drop Priority or Transmit Priority and press Enter in the VLAN Priority Setting screen 3 Press Esc when completed ToS 1 Move to highlight TOS and press Enter to specify the ToS priority 2 Move to highlight any ToS Priority Index and press Enter Move to highlight Drop Priority or Transmit Pr...

Page 63: ...Queue Setting and press Enter 2 Press Esc when completed Fixed Priority 1 Move to highlight Fixed Priority and press Enter to specify the Fixed Priority 2 Move to highlight any port in the ToS Priority screen and press Enter Move to Fixed Drop Priority Transmit Priority or Priority 3 Press Esc when completed ...

Page 64: ...rol or Port Number and press Enter 3 Press Esc when completed File Transfer The TFTP protocol is used to upload software to the switch and download software from the switch A VLAN with the proper IP address and routing path to the TFTP server must be configured for the switch to access the specified TFTP server 1 Move to highlight File Transfer from Advanced Management screen and press Enter ...

Page 65: ...the file you intend to receive and press Enter 4 Move to highlight IP Address and press Enter Type the IP address from where the file will be obtained 5 Press Esc when completed A dialog box appears to ask if you want to transfer file now 6 Highlight Yes and press Enter to start file transfer Or move to highlight No and press Enter to deny it Or press Esc to exit 7 Move to highlight Send File Via ...

Page 66: ...ears to ask if you want to transfer file now 11 Move to highlight Yes and press Enter to start file transfer Otherwise highlight No and press Enter to deny it 12 Press Esc to a previous screen 13 In File Transfer screen obtained via console port move to highlight Send File Via Kermit and press Enter 14 Move to highlight a file type you intend to send and press Enter A dialog box appears to ask if ...

Page 67: ...e the current settings and remain in the configuration program highlight Save Settings from Switch Management and press Enter Restore Default Settings To restore the factory default settings highlight Restore Default Settings from Switch Management and press Enter The Xpress Pro SW 94000 switch will be rebooted after confirming Yes as to restore the default settings Reboot To reboot the Xpress Pro...

Page 68: ... web browser This chapter describes how to configure the Xpress Pro SW 94000 switch using its web based browser interface Logging on to the switch Switch IP Address In your web browser specify the IP address of the Xpress Pro SW 94000 switch Login ID Enter the factory default login ID admin Password Enter the factory default password no password press Enter directly Or enter a user defined passwor...

Page 69: ... the screen These parameters can also be displayed by clicking Basic Setup button and select General in sub menu File Save settings configured in the browser interface upload software via TFTP download software via TFTP reboot the switch logout of the browser interface Basic Setup Perform general LAN port and console port activities Advanced Setup Perform MAC Address Management IP Networking Port ...

Page 70: ... Receive File Via TFTP 1 Click Receive File Via TFTP on the File display Notes The TFTP protocol is used to upload software to the Xpress Pro SW 94000 switch A VLAN with the proper IP address and routing path to the TFTP server must be configured for the Xpress Pro SW 94000 switch to access the specified TFTP server 2 For File Name type the name of the file you intend to receive 3 For IP Address t...

Page 71: ...d Now Reboot 1 Click Reboot on the File display 2 When you click it a message asks Are you sure you want to save setting click OK to save it or Cancel to abort it 3 Click Logout on the File display 4 When you click it a message asks Are you sure you want to save setting click OK to save it or Cancel to abort it Performing Basic Setup Activities To perform Basic Setup Activities 1 Click the Basic S...

Page 72: ...erface 2 Click in System Name text box on the field of Basic Setup General 3 Type a system name if it is blank or replace the current system name with a new one 4 Click in Location text box on the field of Basic Setup General 5 Type a location name if it is blank or replace the current location name with a new one 6 To enable or disable statistics collection at the Xpress Pro SW 94000 switch click...

Page 73: ...om Remote Telnet Login drop down menu 9 Click Update Setting A confirmation window appears LAN Ports Configuration 1 To access the LAN configuration parameters click Basic Setup button first and then point to LAN Ports and click a suitable option 2 Click Port Status to view the Speed Type Link Status Speed Status Duplex Status and Flow Control Status for all ports Note The information displayed au...

Page 74: ...port in UP state In this state packets can be switched to and from the port 6 Click the drop down menu under Speed Duplex Options if you want to change the line speed and duplex settings Note Auto allows the Xpress Pro SW 94000 switch to automatically ascertain the line speed and duplex mode All the other selections force the port to use a specific line speed and duplex mode HD denotes half duplex...

Page 75: ...propriate speed from Baud Rate drop down menu on the field of Basic Setup Console Port Configuration Note Auto allows the Xpress Pro SW 94000 switch to autobaud between 9600bps and 115 200bps All the other selections force a specific console baud rate 3 Click a flow control method from Flow Control drop down menu 4 Click an appropriate option from Modem Control drop down menu to disable or enable ...

Page 76: ...ced Setup button at the upper field of the main display the menu options appear MAC Address Management 1 From the Advanced Setup menu point to MAC Address Management to view VLANs and their associated MAC addresses Per VLAN View 1 Click Per VLAN View first and click on the port that you want to view 2 Close the VLAN Activities window when finished viewing ...

Page 77: ...type the MAC address that you want to view Then click on the Get Information button 5 Close the Individual MAC View window when finished viewing IP Networking 6 To access the IP networking parameters click the Advanced Setup button and Point to IP Networking from the selection menu IP Settings 1 Click IP Settings to access IP settings A list of VLAN IDs appears along with their corresponding IP ad...

Page 78: ...pe a new address Alternatively you can use the Delete IP button to delete the IP address Note No precautionary message appears before you delete the IP address Be sure you want to delete it before doing so The IP address is not deleted until you click Update Setting 4 To change the IP Subnet Mask click in the text box and type a new address 5 To change the Frame Type click a value from the drop do...

Page 79: ...etting A confirmation window appears Click to close the confirmation window Default Gateway 1 Click Default Gateway to access Default Gateway settings 2 To set the Default Gateway click in the text box and type a new Default Gateway 3 To set the Metric click in the text box and type a new Metric 4 When you finished with these settings click Add button Alternatively you can use the Delete button to...

Page 80: ...tive 1 To access Port Perspective click the Advanced Setup button and then click Port Perspective from the selection menu 2 To access Port Perspective VLAN Activities click the Per Port VLAN Activities from the selection menu Click a port to view Port Perspective VLAN Activities ...

Page 81: ...er Guide 81 3 To access Per Port Statistics click the Per Port Statistics from the selection menu Click a port to view statistic data Bridging 1 To access bridging parameters click the Advanced Setup button and then click Bridging from the selection menu ...

Page 82: ... text box and type a decimal number as flood limit in packets per second 6 Click the drop down list for Set Limit or Unlimited 7 Click the text box and type a decimal number as broadcast limit in packets per second 8 Click the drop down list for Set Limit or Unlimited 9 Click the text box and type a decimal number as multicast limit in packets per second Static MAC Filters 1 To access the Static M...

Page 83: ...rce MAC address for static filtering 3 The Static Source MAC Filter window appears Click in the Source MAC Address Filter text box and type a unique MAC source address you want to add Then click the Add button 4 A confirmation window appears Close the confirmation window 5 If you no longer need a source MAC address click Delete MAC Addr button to delete it in Step 2 ...

Page 84: ...on window Destination MAC Address Filters 1 Click the Advanced Setup button and point to Static MAC Filters in the selection menu Click Destination MAC Address Filters 2 Click Add MAC Addr button to add a destination MAC address for static filtering Refer to Step 2 4 in Source MAC Address Filters section for similar procedure 3 Click Delete MAC Addr button to delete a destination MAC address for s...

Page 85: ...wser Management XPress Pro SW 94000 User Guide 85 MAC Address In Filters 1 Click MAC Address In Filters Click a port to add or delete In Filters MAC Address 2 Click Add MAC Addr button to add an In Filters MAC Address ...

Page 86: ... no longer need an In Filters MAC Address click Delete MAC Addr button to delete it in step 2 6 The Delete MAC Address In Filter window appears Click the Select a MAC Address drop down list and select the In Filters MAC Address you want to delete Then click the Delete button 7 A confirmation window appears Close the confirmation window IP Multicast Group 1 To view the IP multicast group addresses ...

Page 87: ...e Advanced Setup button and point to VLAN PVID Perspective in the selection menu VLAN Setting 1 Click VLAN Setting 2 Click on a VLAN ID whose VLAN configuration you want to change 3 The VLAN Setting window appears Add or delete switch ports for VLAN ID 1 For each switch the port options include Tagged Ports Untagged Ports or Forbidden Ports ...

Page 88: ...extbox and specify a new VLAN ID number from 2 4094 7 Click in the VLAN Name textbox and type a name for this newly created VLAN 8 Assign switch ports to this VLAN For each switch the port options include Tagged Ports Untagged Ports or Forbidden Ports 9 Click Add Now button 10 Click on the Delete VLAN button to delete a VLAN VLAN ID 1 is the default VLAN and cannot be deleted ...

Page 89: ...nu to select a VLAN ID which you want to delete 13 Click the Delete button Note No precautionary message appears before you delete a VLAN Be sure you want to delete it before doing so TPID 1 Click TPID TPID Setting 1 Click TPID Setting 2 Click in the TPID textbox and type an address for TPID PVID Setting 1 Click PVID Setting ...

Page 90: ...t to assign VLAN ID to this port RSTP Rapid Spanning Tree Protocol 1 To view the rapid spanning tree protocol parameters click the Advanced Setup button and point to RSTP in the selection menu 2 To view and or change the RSTP configurations click Configurations from the above screen ...

Page 91: ... 7 For Forward Delay click in the text box and type a decimal number between 4 and 30 8 For STP Version specify whether you want to choose STP Compatible or RSTP by clicking the drop down list 9 For Tx Hold Count click in the text box and type a decimal number between 1 and 10 10 For Path Cost Default specify whether you want to choose 16 bit or 32 bit by clicking the drop down list 11 Click Updat...

Page 92: ...t box and type a decimal number as a new priority value 5 For Admin Path Cost click in the text box and type a decimal number as a new admin path cost value 6 For Point to Point Link specify whether the Point to Point Link is Enable Disable or Auto by clicking the drop down list 7 For Edge Port specify whether the Edge Port is Enable or Disable by clicking the drop down list 8 For Protocol Migrati...

Page 93: ...unity Name click in the text box and type a trap community name 6 For each Trap Host IP Address click in the text box and type a IP address for trap host 1 5 7 For Cold Start Trap specify whether it is Disabled or Enabled by clicking the drop down list 8 For Warm Start Trap specify whether it is Disabled or Enabled by clicking the drop down list 9 For Link Down Trap specify whether it is Disabled ...

Page 94: ...or GVRP specify whether it is Disabled or Enabled by clicking the drop down list 3 For IGMP specify whether it is Disabled or Passive or Active by clicking the drop down list 4 For Concentration Mode specify whether it is Disabled or Enabled by clicking the drop down list 5 Click Update Setting when completed A confirmation window appears Close the confirmation window Port Trunking 1 To use the sw...

Page 95: ...5 The Trunk Group 1 window appears 2 Click the drop down menu to select a desired range 3 Click to assign ports to the trunk group QoS 1 To use the Xpress Pro SW 94000 switch s QoS capability point to the Advanced Setup button and point to QoS in the selection menu ...

Page 96: ...e Forwarding 4 Use the ToS VLAN Tag drop down list to select the priority you want to use 5 Use the ToS for Xmint drop down list to select the Bits of ToS you want to use 6 Use the ToS for Drop drop down list to select the Bits of ToS you want to use 7 Under WRED use the drop down list boxes to select the High drop percentage for level 1 Low drop and high drop percentages for level 2 The low drop ...

Page 97: ...ck User Define Port Well Known Port or Range Logic Port 3 Click Update Setting when completed A confirmation window appears Click to close the confirmation window VLAN 1 Point to Advanced Setup point to QoS and Click VLAN 2 For each VLAN priority use the right drop down list to select a Transmit Priority for that VLAN and use the right drop down list to select a High or Low Drop Priority for that ...

Page 98: ... Priority for that Type of Service and use the right drop down list to select a High or Low Drop Priority for that Type of Service 3 Click Update Setting when completed A confirmation window appears Click to close the confirmation window Tx Queue Setting 1 Point to Advanced Setup point to QoS point to Tx Queue Setting and Click Port 9 Tx Queue Setting Fixed Priority 1 Point to Advanced Setup point...

Page 99: ...te Control 1 Point to Advanced Setup point to QoS and Click Rate Control 2 Use the Rate Control drop down list to enable or disable rate control 3 Click a port number under Port Set the Egress Rate and Ingress Rate for the port 4 Click Update Setting when completed A confirmation window appears Click to close the confirmation window Port Mirroring 1 To use the Xpress Pro SW 94000 switch s mirrorin...

Page 100: ...ffic will be mirrored to this port 2 In the Mirror From column select a mirror from port by clicking the drop down list Data traffic will be mirrored from this port 3 In the Mirror Mode column specify whether the mirrored from port will be receiving or transmitting data by clicking the drop down list 4 Click Update Setting when completed A confirmation window appears Close the confirmation window ...

Page 101: ...statistics that the RMON probe gathers The workstation can reside on the same network as the probe or it can have an in band or out of band connection to the probe The Xpress Pro SW 94000 switch provides RMON capabilities that allow network administrators to set parameters and view statistical counters defined in MIB II Bridge MIB and RMON MIB RMON activities are performed at a Network Management ...

Page 102: ...stics Group RMON Alarm Group allows a network administrator to define alarm thresholds for any MIB variable An alarm can be associated with Low Threshold High Threshold or both A trigger can trigger an alarm when the value of a specific MIB variable exceeds a threshold falls below a threshold or exceeds or falls below a threshold RMON Event Group allows a network administrator to define actions ba...

Page 103: ...ress Pro SW 94000 User Guide 103 The dot1dStatic Group contains objects that describe the entity s destination address filtering status This group is applicable to any type of bridge which performs destination address filtering ...

Page 104: ... duplex Performance 148 80pps for 10Mbps 148 800pps for 100Mbps 1 488 000pps for 1000Mbps Cable 10BaseT 100BaseTX 1000BaseT 100BaseFX 1000BaseSX LX 2 pair UTP STP Cat 3 4 5 2 pair UTP STP Cat 5 4 pair UTP STP Cat 5 Up to 100m 328ft MMF 50 or 62 5µm SMF 9 or10µm MMF 50 or 62 5µm SMF 9 or10µm LED Indicators Per unit Power status PWR1 PWR2 Per port 10 100TX 100FX Green LNK Link ACT Activity Yellow 10...

Page 105: ... Standards IEC 61000 4 3 Burst Standards IEC 61000 4 4 Surge Standards IEC 61000 4 5 Induced Conducted RFE Standards IEC 61000 4 6 Magnetic Field Standards IEC 61000 4 8 Voltage Dips Standards IEC 61000 4 11 Environmental Test Standards Vibration Resistance IEC 60068 2 6 Shock IEC 60068 2 27 Free Fall IEC 60068 2 32 ...

Page 106: ... Ports Uplink port 1 Input Receive Data Output Transmit Data 2 Input Receive Data Output Transmit Data 3 Output Transmit Data Input Receive Data 4 NC NC 5 NC NC 6 Output Transmit Data Input Receive Data 7 NC NC 8 NC NC The following table lists the pinout of 10 100 1000BaseTX ports Pin Ports 1 A 2 A 3 B 4 C 5 C 6 B 7 D 8 D A Connector Pinouts ...

Reviews: