


14
❏
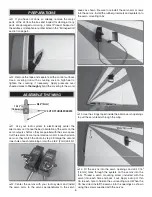
8. Install a muffl er onto the engine. We used a Bisson pitts
muffl er (BISG4046).
❏
9. Cut the fuel tubing coming from the tank to the proper
length and connect the pressure and carb lines to the engine.
The fi ll line (if installed) should be plugged with the included
fuel line plug. A plywood fi ll line clip is included and is glued
together as shown. Be sure to fuel proof the clip with lacquer,
epoxy, or CA glue. Glue the clip in the location shown and
route the fi ll line through the clip.
❏
10. Cut fi ve arms from a six-armed servo arm included
with your throttle servo. Center the servo with your radio
system (50% throttle) and install the arm inline with the
middle case. Install a screw-lock pushrod connector into the
outer hole in the remaining arm and secure it in place with
a nylon screw-lock connector retainer. Loosely install a 4-40
set screw into the screw-lock pushrod connector. Install the
throttle servo onto the throttle servo tray using the hardware
supplied with the servo.
❏
11. Drill a 3/16" [4.8mm] hole in the fi rewall inline with the
throttle arm on the carburetor. An extra long drill bit is very
useful for this step (drill bit HIGR102 is shown) Be sure that
you do not drill into the fuel tank (if in doubt, unstrap the tank
from the tray and move it aside when drilling the hole).
❏
12. Insert the included outer pushrod tube through the
fi rewall leaving it approximately 1-1/4" [32mm] from the
throttle servo arm. Mark the tube 1/4" [6mm] in front of
the fi rewall and cut it to length. Sand the pushrod where it
passes through the fi rewall and clean it with alcohol.
Summary of Contents for MARINER 40 MK II ARF
Page 24: ......


