background image

DO NOT RETURN PRODUCT TO THE STORE.

IF YOU HAVE QUESTIONS OR HAVE

TROUBLE WITH ASSEMBLY, PLEASE CALL

1-800-321-3473 FOR ASSISTANCE.

NO DEVUELVA EL PRODUCTO A LA TIENDA. SI

TIENE PREGUNTAS O PROBLEMAS DURANTE EL

ARMADO, LLAME AL 1-800-321-3473 PARA

OBTENER AYUDA.


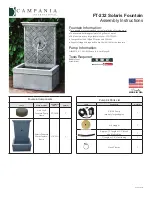
STEP 5:   ASSEMBLE THE HANDLE TO THE

 FRONT SCREEN

Remove the holding plate and hexnut from 
the door handle assembly.   Insert the 
threaded end of the handle into the door.  
Slide the holding plate onto the handle so it 
locks in place.   Secure using the hexnut. 

Retire la placa de celebración y la tuerca 
hexagonal de la manilla de la puerta.   Insertar el 
extremo roscado de la empuñadura en la puerta.  
Deslice la placa de sujeción en el mango de modo 
que quede bloqueado en su sitio.   Apretar usando 
la tuerca hexagonal.

PASO 5:   ENSAMBLE LAS LA MANIJA A LA PANTALLA
FRONTAL

4

STEP

PASO


STEP 4:   ASSEMBLE THE DOOR SCREEN TO

 SIDE SCREENS

Align the door screen [ E ] tabs with the 
threaded holes on the side panels [ C ] and 
assemble using (4) 15MM bolts [ X ].   Now 
tighten all wingnuts and bolts in STEPS 2, 3 
and 4 securely.

Alinear la pantalla de la puerta [ E ] lengüetas con 
los orificios roscados en los paneles laterales [ C ] 
y ensamblar usando (4) pernos 15MM [ X ].  
Ahora apriete todas las tuercas de mariposa y 
pernos en los pasos 2, 3 y 4 firmemente.

PASO 4:   ENSAMBLE LAS PANTALLA DE PUERTA DE LA
PANTALLA LATERAL

PAGE 5

HARTFORD ASSEMBLY

INSTRUCTIONS

INSTRUCCIONES DE ENSAMBLAJE

HARTFORD

X

E

E

5

STEP

PASO

K

E

HOLDING PLATE

CELEBRACIÓN DE

LA PLACA

HEXNUT

TUERCA

HEXAGONAL

Summary of Contents for Hartford 25805

Page 1: ...ions for Model 25805 25806 Instrucciones de armado y uso para el modelo 25805 25806 PLEASE READ ALL RULES FOR SAFE OPERATION AND HELPFUL HINTS BEFORE USING POR FAVOR LEA TODAS LAS REGLAS DE SEGURIDAD OPERACIONAL Y CONSEJOS ÚTILES ANTES DE USAR ...

Page 2: ...NUNCA USE DEBAJO DE RAMAS DE ÁRBOLES BAJAS ENREJADOS OBJETOS SALIENTES DE CUALQUIER CLASE INCLUIDOS PORCHES CUBIERTOS ADVERTENCIA NUNCA USE GASOLINA ALCOHOL NI LÍQUIDOS VOLÁTILES PARA ENCENDER O REAVIVAR FUEGOS PARA LOGRAR UNA MAYOR VIDA ÚTIL DEL PRODUCTO MANTENGA EL FUEGO A UN NIVEL RESPETABLE NO LO SOBRECARGUE NO PERMITA QUE LA MADERA TOQUE LA PANTALLA CHISPERO NUNCA LA USE SIN EL CONTENEDOR PAR...

Page 3: ... continuación Tenga cuidado ya que algunas piezas pueden tener bordes afilados LISTA DE PARTES 1 BASE 1 BASE A 1 TOP 1 TAPA B x 16 x 8 2 SIDE SCREENS 2 PANTALLA LATERAL C 1 DOOR SCREEN 1 PANTALLA DE LA PUERTA E 1 BACK SCREEN 1 PANTALLA HACIA ATRÁS D 4 LEGS 4 PIERNAS G 1 TOP CAP 1 TAPA SUPERIOR H 1 FIREBOWL 1 RECEPTÁCULO DE FUEGO J 1 DOOR HANDLE ASSEMBLY 1 MANILLA DE LA PUERTA K 16 M6 x 15MM BOLTS ...

Page 4: ...OBTENER AYUDA STEP 3 ASSEMBLE THE BACK SCREEN TO SIDE SCREENS Align the back screen D tabs with the threaded holes on the side panels C and assemble using 4 15MM bolts X Handtighten the bolts only leave loose for aid in the following steps Alinear la pantalla de vuelta D lengüetas con los orificios roscados en los paneles laterales C y ensamblar usando 4 pernos 15MM X Apriete a mano los pernos sol...

Page 5: ...rta Deslice la placa de sujeción en el mango de modo que quede bloqueado en su sitio Apretar usando la tuerca hexagonal PASO 5 ENSAMBLE LAS LA MANIJA A LA PANTALLA FRONTAL 4 STEP PASO STEP 4 ASSEMBLE THE DOOR SCREEN TO SIDE SCREENS Align the door screen E tabs with the threaded holes on the side panels C and assemble using 4 15MM bolts X Now tighten all wingnuts and bolts in STEPS 2 3 and 4 secure...

Page 6: ...n los pasadores 4 roscados Use 4 tuercas de mariposa Y para ensamble Apretar las tuercas de mariposa de forma segura PASO 6 ENSAMBLE LA PARTE SUPERIOR PARA LAS PANTALLAS STEP 7 PLACE THE TOP CAP Place the top cap H onto the top B Use a press and twist motion until the top cap is fully connected to rim Coloque la tapa superior H en la parte superior B Use una prensa y vuelta de tuerca movimiento ha...

Page 7: ...BOWL Place the firebowl J inside the fireplace and align with the cavity on the base A Always make sure the firebowl is flush with the surface of the base Colocar el cuenco de fuego J en el interior de la chimenea y se alinean con la cavidad en la base A Siempre asegúrese de que el cuenco de fuego es a ras de la superficie de la base PASO 8 COLOQUE EL RECIPIENTE DE FUEGO PAGE 7 HARTFORD ASSEMBLY I...

Page 8: ...Made in China Hecho en China 2016 Landmann USA LA ADICIÓN DE 2 3 KGS DE ARENA EN LA PARTE INFERIOR DEL BRASERO EXTENDERÁ LA VIDA ÚTIL DEL BRASERO MANTENGA EL BRASERO PROTEGIDO DE LA LLUVIA Y DE LA INTEMPERIE GUARDE EL BRASERO EN UN LUGAR SECO PROTEGIDO DE LA INTEMPERIE NO PERMITA QUE EL BRASERO SE LLENE CON AGUA NO ARROJE CENIZAS EN LUGARES DONDE PUEDA INICIARSE UN INCENDIO DESECHE LAS CENIZAS EN ...

Reviews: