background image

1

Assembly Instruction for

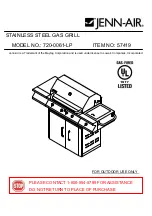
flat bed BBQ Art.-No. 0054

0 0 5 4 U K     1 0 / 0 4 b t - r k

IMPORTANT:
READ ALL INSTRUCTIONS AND OPERATIONS
BEFORE OPERATING THIS UNIT.

FOLLOW THE CORRECT LIGHTING AND USAGE
PROCEDURES. HANDLE METAL PARTS WITH CARE
TO AVOID INJURIES. FOLLOW ALL STEPS IN

ORDER. NEVER ALLOW CHILDREN TO OPERATE
THIS UNIT.

Summary of Contents for 54

Page 1: ...054UK 10 04bt rk IMPORTANT READ ALL INSTRUCTIONS AND OPERATIONS BEFORE OPERATING THIS UNIT FOLLOW THE CORRECT LIGHTING AND USAGE PROCEDURES HANDLE METAL PARTS WITH CARE TO AVOID INJURIES FOLLOW ALL STEPS IN ORDER NEVER ALLOW CHILDREN TO OPERATE THIS UNIT ...

Page 2: ...his appliance outdoors Do not attempt to move this appliance during operation Never leave fuel cylinder attached to regulator if disconnected from burner tube Attention Some parts of this appliance become very hot take special care when children or elderly are present For your safety Do not store or use gasoline or methylated fuels or any other flammable vapours and liquids in the vicinity of this...

Page 3: ...x 64 x 49 cm Burner set adjustable Ignition Piezo Ignitor Lava rocks 1 Bag The capacity of a 15 kg Butane Gas Bottle is sufficient for a heating period of approx 12 5 hours with full power You have purchased a high quality LANDMANN Gas Appliance This appliance has been made with regard to the European Gas Standard EN 498 and bears the certification no CE 0085 The gas hose assembly that is enclosed...

Page 4: ...nual Ignition With all the gas controls in the OFF position turn the gas cylinder valve on the regulator to the on position Lift out one of the cast iron cooking grills and holding a lighted taper or gas match alongside the burner push in and turn the gas control knob for that burner to HIGH The burner will light in seconds Replace the cast iron cooking grille Once the first burner is alight adjac...

Page 5: ...1 8 R Clip 3 9 Knob 3 10 Cross Lighting tube 2 11 Front panel 1 12 Regulator 1 13 Hose 1 14 Gas control bar 1 15 Valve with ignitor 1 16 Valve 2 17 Drip pan 1 18 Drip pan handle 1 19 Gas Hose connection 1 20 Screw Ø4x10 with washer 2 Self tappers 21 Bolt M6x12 1 22 Nut M6 1 23 Screw Ø5x6 1 24 Screw Ø4x10 with washer 2 25 Lava rocks 1 Bag 26 Lava rock grid 1 ...

Page 6: ...6 3 2 4 6 8 7 19 13 12 5 20 10 21 22 14 11 9 24 16 15 23 18 17 1 25 26 ...

Page 7: ...7 4 Mounting steps ...

Page 8: ...ng medium or clean dry sand This must be kept clean and loose in order to absorb fat drippings If this is not done it may be possible for the fat drippings to ignite and burn Check regularly that the absorbing medium is loose and clean Lining the tray with aluminium foil before filling can assist in removal of the fat soaked absorbing medium DO NOT USE SAWDUST OR OTHER FLAMMABLE MATERIAL IN THE GR...

Page 9: ...to the gas bottle valve and tighten firmly Note Before attempting to light your barbecue you must refer to your lighting instructions and warning safety points Check the hose before each use searching for cracking cuts or any abrasions If the hose is found to be faulty in any way do not attempt to use your barbecue When changing your gas bottle ensure that there are no sources of ignition close by...

Page 10: ...ver valve it is only necessary to switch off the empty cylinder c Never turn the switch to the disconnect 6 o clock position straight from the ON 12 0 clock position d Depress the centre button of the switch Keeping it depressed turn the switch anticlockwise to the disconnect 6 o clock position and lift off the regulator e Replace the orange safety cap onto the empty cylinder 7 Warning and Safety ...

Page 11: ...es etc 16 After every use check the drip tray for fat build up in the sand Discard any saturated sand and replace with fresh sand failure to fill with sufficient clean dry loose sand may result in a fat fire or excessive flare up This can severely damage your barbecue and is NOT covered by the warranty 17 Flare ups occur when meat is barbecued and its fats and juices fall upon the hot lava rock Th...

Page 12: ...ht adjacent burners will cross light when their gas controls are turned to HIGH At HIGH setting the burner flame should be approximately 12 20mm long with a minimum of yellow tipping Turn the gas control fully anticlockwise for minimum setting Should you have any difficulty lighting your barbecue following the above steps contact your dealer for advice 10 Storage Your Gas bottle must be stored out...

Page 13: ...itor Burner will not light with a match LP gas cylinder is empty Replace with full cylinder Faulty regulator Have reg checked or replaced Obstructions in burners Clean burners Obstructions in gas jets or hose Clean jets and hose Low flame or flashback fire in Obstructions in burners Clean burners burner tube a hissing or roaring noise may be heard Obstructions in gas jets Clean jets and hose or ho...

Page 14: ...ns of this appliance may be dangerous and are not permitted 12 Barbecue Safety Hints Stand your barbecue on a safe level surface away from inflammable items such as wooden fences or overhanging tree branches Never use your barbecue indoors Once lit do not move your barbecue or leave it unattended Keep children and pets at a safe distance from the barbecue Keep a fire extinguisher handy The barbecu...

Page 15: ... 3 The guarantee will not apply if the appliance is defective due to use that is not in accordance with these instructions accidental damage incorrect assembly or modification or repairs to the appliance by an unauthorised dealer Failure to also carry out the correct maintenance procedures and storage procedures will also invalidate this warranty Guarantee does not cover any rust which could appea...

Reviews: