


- 4 -
- 37 -
Connecting to a telephone wall jack with an existing telephone:
n
Remove the existing telephone line cord plug from the wall jack and
insert it into the jack marked PHONE on the back of your MailBug.
n
Take the new telephone line cord that came with your MailBug and insert
one end into the jack marked LINE on the back of your MailBug.
n
Insert the other end of the line cord into a working telephone wall jack.
2.3
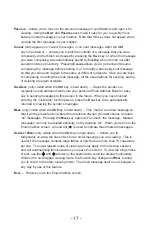
Basic Features
MailBug’s basic features are shown in the diagram below. Notice it has several different
types of keys and a LED status indicator light in the upper corner.
Note:
If you subscribe to Caller ID service, your MailBug will display your calls on
its screen. If you currently have a Caller ID display box connected between your
telephone wall jack and telephone, you may replace it with your MailBug, or you can
connect both your MailBug and your Caller ID box together in a chain, and see your
calls on both of these devices. Alternatively you might consider moving your existing
Caller ID box to a phone in another room. Speak with your phone company if you
need additional help.