background image

PAGE 16

11/19


A DIVISION OF C-B TOOL CO.

1340 MANHEIM PIKE ● LANCASTER PA 17601-3196 ● TEL:717-397-3521 ● FAX: 717-392-0266 

www.lancasterwatertreatment.com ● E-mail: [email protected]

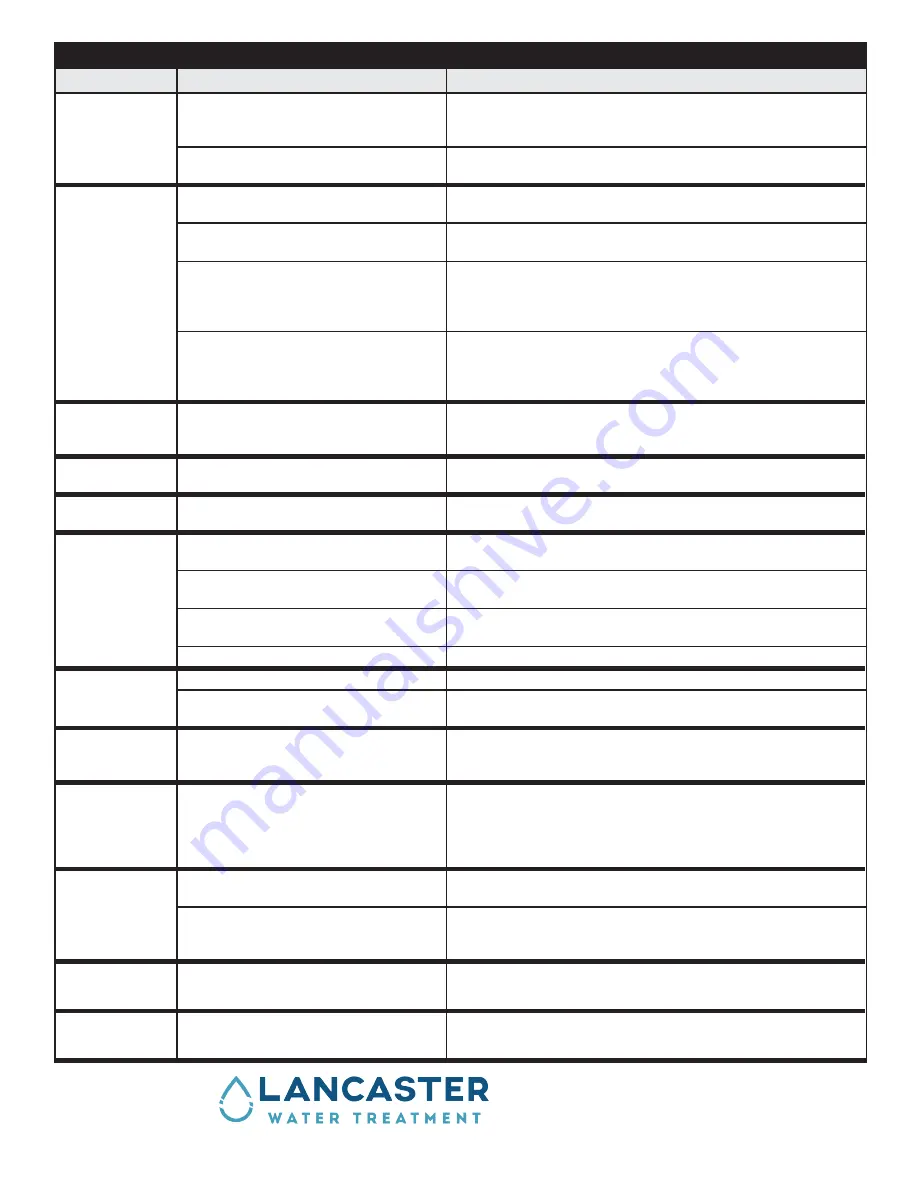
TROUBLESHOOTING GUIDE

Symptom

Possible Causes

Solutions

Pressure Drop

Sediment pre-filter clogged

• 

replace filter cartridge with appropriate 5 micron cartridge

Note: 

check source water supply as fluctuations may occur in 

source pressure

Flow regulator (not provided)

• 

flow regulator will result in pressure drop when approaching full 

flow

High Bacteria 

Counts

Quartz sleeve is stained or dirty

• 

clean sleeve with scale cleaner and eliminate source of staining 

problem (i.e. soften hard water, see page 3)

Change in feed water quality

• 

have source water tested to ensure that water quality is still 

within allowable limits for this system

Contamination in water lines after UV 

system due to a power failure, plumbing 

dead ends, etc.

• 

it is imperative that effluent water stream be shocked with 

chlorine (bleach) before water leaves UV system - disinfection 

system must have a bacterial free distribution system to work 

effectively (see page 10-11 disinfection procedure).

Possible break-through of sediment 

through pre-filter

• 

have source water tested for turbidity - may need stepped 

filtration in order to catch all sediment entering water system 

(20 micron filter followed by a 5 micron filter followed by UV 

system)

Heated Product 

Water

Common problem caused by infrequent 

use of water; water sitting in UV chamber 

and heating up

• 

run water until it returns to ambient temperature

Excessive Heat 

Generated

Water temperature is too high

• 

Ensure treatment is on cold water side only (prior to heating of 

water)

Water Appears 

Milky

Caused by air in the water lines

• 

run water until air is purged

UV Chamber 

Leaking Water

Problem with o-ring seal on gland nut

• 

ensure o-ring is in place, check for cuts or abrasions, clean 

o-ring, moisten with water and re-install, replace if necessary

Condensation on reactor chamber caused 

by excessive humidity & cold water

• 

check location of disinfection system and control humidity

Inadequate (misaligned or cross-threaded) 

inlet/outlet port connections

• 

check thread connections, reseal with Teflon® tape and re-

tighten

Water hammer causing pressure spikes

• 

Install a “water hammer” arrestor in the plumbing system

Leaks Between 

Filter Sump and 

Filter Head.

Sump not sufficiently tightened.

• 

Tighten further the sump with the wrench.

O-ring affected/old.

• 

If the sump still leaks, change the sump’s O-ring with a new one 

(use original replacement / spare parts).

Leaks in Filter 

Inlet / Outlet 

Connections.

Not enough sealant and/or connection not 

sufficiently tightened.

• 

Remove the previous sealing tape from the fitting and place 

more sealing tape and/or tighten the connection properly.

System 

Shutting Down 

Intermittently

Interrupted power supply

• 

ensure system has been installed on its own circuit, as other 

equipment may be drawing power away from UV (i.e. pump or 

refrigerator)

• 

UV system should not be installed on a circuit which is 

incorporated into a light switch

Lamp Failure 

Alarm on - New 

Lamp

Loose connection between lamp and 

connector

• 

disconnect lamp from connector and reconnect, ensuring that a 

tight fit is accomplished

Moisture build up in connector may keep 

lamp and connector from making a solid 

connection

• 

eliminate chanc  e of any moisture getting to the connector and/

or lamp pins

LED Display 

reads “A3”

Lamp life expired - countdown is at “0” 

days

• 

Press and hold button 2 to 5 seconds for an alarm silence 

delay, replace lamp (see page 12 UV lamp replacement)

LED Display is 

Blank

No power to electronic ballast;

GFCI wall socket is tripped

• 

Reset, following GFCI manufacturer’s instructions

• 

Check socket with other applications

Summary of Contents for Clear-Flo Haloshield 7-LWT-UV410-009

Page 1: ... AND ELECTRICAL INSTALLATION BY A CERTIFIED PLUMBER IS RECOMMENDED In the event that you need assistance for servicing your UV system please first contact the professional contractor who installed the system Congratulations on purchasing your new Lancaster Water UV Disinfection System This unit is designed to give you many years of trouble free service For servicing and future inspection purposes ...

Page 2: ...rly grounded grounding type controller receptacle that is protected by a Ground Fault Circuit Interrupter GFCI or to a residual current device RCD having a rated residual operating current not exceeding 30 mA Inspect operation of GFCI as per manufacturer s suggested maintenance schedule DO NOT operate the disinfection system if it has a damaged cord or plug if it is malfunctioning or if it has bee...

Page 3: ...our UV chamber Hg EXPOSURE The UV lamp contains mercury If the lamp breaks then avoid inhalation or ingestion of the debris and avoid exposure to eyes and skin Never use a vacuum cleaner to clean up a broken lamp as this may scatter the spilled mercury Obey local regulations and guidelines for the removal and disposal of mercury waste NOTICE Safety Information 3 on his entire manual before operati...

Page 4: ...MAN 1AP MANIFOLD FILTER HOUSING VENT VALVE FILTER HOUSING HEAD 410 C5 MB FILTER CARTRIDGE FILTER HOUSING O RING 410 H 1 B BLUE FILTER HOUSING INCLUDING PLUGGED HEAD SUMP O RING UV ELL 1FM STAINLESS STEEL STREET ELBOW AND FM1 24 FLEXIBLE HOSE FILTER HOUSING SPANNER WRENCH INCLUDED NOT SHOWN ...

Page 5: ...ORDSET GROUND WIRE RING TERMINAL CONNECT TO UV CHAMBER GROUND STUD WITH GROUND NUT GROUND WIRE FORK TERMINAL CONNECT TO BALLAST WITH GROUND SCREW LOCATED UNDER BALLAST STAINLESS STEEL STREET ELBOW AND FLEXIBLE HOSE QUARTZ SLEEVE DOMED END BALLAST MOUNTING GROUND STUD MANIFOLD FILTER HOUSING VENT VALVE FILTER HOUSING HEAD FILTER CARTRIDGE FILTER HOUSING O RING FILTER HOUSING SUMP FILTER HOUSING SPA...

Page 6: ...PAGE 6 4 50 11 25 21 00 16 00 9 00 4 50 20 44 OUTLET 1 0 MNPT INLET 1 0 FNPT GENERAL NOTES FOR ESTIMATING ONLY ALL DIMENSIONS ARE IN INCHES DRAIN 0 5 MNPT WEIGHT 22 LBS ...

Page 7: ...120 PSI 7 25 PSI AMBIENT AIR WATER TEMPERATURE 36 to 104 F PRESSURE DROP at 30mJ cm RATED FLOW 2 UV CHAMBER MATERIAL 304 SS INLET OUTLET PORT SIZE 1 0 FNPT FILTER HOUSING HEAD INLET 1 0 MNPT UV CHAMBER OUTLET STEADY WORK GREEN LED LAMP ON INDICATOR LAMP LIFE REMAINING DAYS CONTINUES TO BE DISPLAYED BUT STOPS COUNTING DOWN LAMP FAILURE INDICATOR VISUAL COUNT DOWN DISPLAY 365 0 MANUAL RESET FUNCTION...

Page 8: ...tire house install the disinfection system before any branch lines PROCEDURE 1 The diagram below shows the installation of a typical drinking water system and the related components that may be used for the installation The use of a bypass assembly is recommended in case the system requires off line maintenance If this is the case it must be noted that the system will require supplementary disinfe...

Page 9: ...S 5 Mount the electronic ballast controller onto the metal manifold as shown on assembly page 5 A ground stud and nut are provided on the UV reactor chamber Attach the supplied 3 foot long 14 AWG green ground wire to this ground stud using the ring terminal end Attach the fork terminal end of the ground wire to the electronic ballast controller ground screw 6 Install the UV lamp as shown on assemb...

Page 10: ...he UV unit is installed and repeated thereafter whenever the UV is shut down for service without power or inoperative for any reason The procedure for sanitizing the plumbing system is readily accomplished as follows Ensure the electronic ballast controller is plugged in for entire disinfection process Shut off the water supply Close each valve Slowly and partially open vent to release the pressur...

Page 11: ... iron manganese hydrogen sulphide organics etc will result in oxidation of these contaminants and may require repeated flushing of the hot water tank This contingency must be dealt with independently under the start up procedure for any other conditioners that may form a part of the pre treatment for the UV unit 2 This disinfection procedure will result in a massive chlorine residual far in excess...

Page 12: ...sing the sleeve to fracture 3 To install a new lamp first remove the lamp from its protective packaging again being careful not to touch the lamp s quartz surface Oil deposits from your fingers can create hot spots on the surface which may lead to premature lamp failure Handle the lamp by the ceramic ends only If the quartz surface becomes dirty use a lint free cloth and isopropyl alcohol to remov...

Page 13: ...ng by verifying ballast green LED indicator is on and display is operational Note After replacing the UV lamp or quartz sleeve perform the disinfection procedure FILTER CARTRIDGE REPLACEMENT It is recommended to change the filter cartridge every six months or earlier Please note that a drop in pressure may indicate that the filter cartridge requires replacement It is recommended to replace the fil...

Page 14: ...talling new filter cartridge make sure filter housing o ring seal is properly seated and shows no sign of visible damage Ensure o ring is lubricated using silicone based lubricant Open the new filter cartridge wrap and discard wrap Insert the new filter cartridge into the sump housing and connect to the unit using the sump spanner wrench Note Be careful not to overtighten Plug the electronic balla...

Page 15: ... be silenced Please note that if this condition occurs and you are on a non municipal water source you should immediately stop using the water for potable applications until the lamp is replaced and distribution lines are disinfected BALLAST FAILURE INDICATOR Blank display ELECTRONIC BALLAST OPERATION 7 UVC Total Days Running Lamp Life LED Display Button Red LED Fault Green LED Work The 7 UVC Elec...

Page 16: ...V Chamber Leaking Water Problem with o ring seal on gland nut ensure o ring is in place check for cuts or abrasions clean o ring moisten with water and re install replace if necessary Condensation on reactor chamber caused by excessive humidity cold water check location of disinfection system and control humidity Inadequate misaligned or cross threaded inlet outlet port connections check thread co...

Reviews: