background image

11

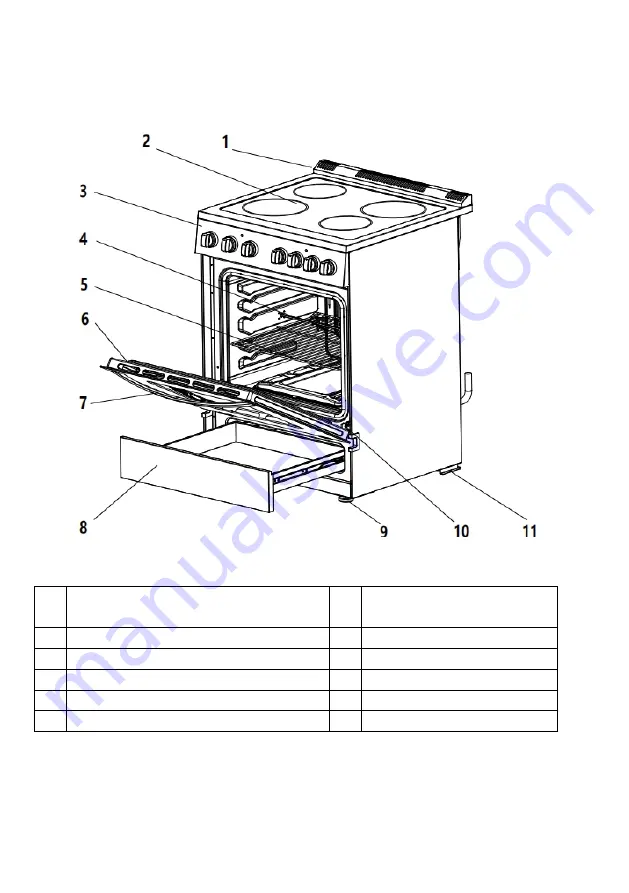
Parts of Model: LB-ERK24RC-B and LB-ERK24RC-W

1

Backsplash with Integrated Oven

Vents

2

Ceramic Glass Cooktop

3

Control Panel with Control Board

4

Rotisserie

5

Oven Rack

6

Oven Door

7

Oven Door Handle

8

Storage Drawer

9

Leveling Feet

10

Oven Door Hinge

11

Anti-tip Bracket

Summary of Contents for LB-ERT24RC-S

Page 1: ...RANGE 24 Wide Model LB ERT24RC S LB ERK24RC B LB ERK24RC W BEFORE USE PLEASE READ AND FOLLOW ALL SAFETY RULES AND OPERATING INSTRUCTIONS Lanbo has a policy for continuous improvement on its products...

Page 2: ......

Page 3: ...our Electric Range 13 Each Box Contains 13 Important Precautions and Recommendations 15 Installation 16 Installation of Electric Range 16 Using the Surface Units 22 Cookware Tips 22 Using the Electric...

Page 4: ...record important product information Write down purchase date the model and serial numbers Find them on a label located on the rear outside wall of the appliance Please write these numbers here Purcha...

Page 5: ...t avoided could result in death or serious injury CAUTION Indicates a potentially hazardous situation which if not avoided may result in minor or moderate personal injury or property damage DANGER Ind...

Page 6: ...ly shut off Fire risk Do not store flammable material in the oven or in the bottom drawer Fire risk Do not attempt to dry clothing or any other type of textile in the oven or in the bottom drawer Make...

Page 7: ...d CAUTION Take care when removing the range due to the weight of the unit Improper use of the oven door such as stepping sitting leaning or placing heavy items on it can result in door damage or poten...

Page 8: ...sizes Select cookware having flat bottoms and large enough to cover the heating element of the surface unit The use of proper size cookware or pans will improve heating efficiency Never leave surface...

Page 9: ...e moved while oven is hot do not let potholder contact hot heating element in oven During and after use do not touch or let clothing or other flammable materials contact surface units areas near units...

Page 10: ...orce or heavy load is applied to the open door Appliance damage or personal injury may result due to range tipping over To reduce the risk of tipping the appliance must be secured by properly installi...

Page 11: ...1 Backsplash with Integrated Oven Vents 2 Ceramic Glass Cooktop 3 Control Panel with Digital Display 4 Control Knob 5 Oven Rack 6 Rotisserie 7 Oven Door Hinge 8 Oven Door 9 Oven Door Handle 10 Storage...

Page 12: ...10 Cooktop of Model LB ERT24RC S 1 Front right element 3 Front left element 2 Rear right element 4 Rear left element...

Page 13: ...ERK24RC W 1 Backsplash with Integrated Oven Vents 2 Ceramic Glass Cooktop 3 Control Panel with Control Board 4 Rotisserie 5 Oven Rack 6 Oven Door 7 Oven Door Handle 8 Storage Drawer 9 Leveling Feet 1...

Page 14: ...element 3 Front left element 2 Rear right element 4 Rear left element Element location Heating element type Heat element size Rating power Front right Ceramic 165mm 1200W Front left Ceramic 200mm 180...

Page 15: ...proper installation adjustments alterations services or maintenance can result in property damage personal injury or death For any problems or concerns please consult a qualified personnel and service...

Page 16: ...elements have a protective coating which must be burned off before use To do this set the temperature to 450 F Turn the function selector to the Bake element and the Broil element separately for appr...

Page 17: ...tray or other cookware on the base of the oven chamber To prevent appliance damage short circuit electric shock or any other possible hazards the installation maintenance and repair should ONLY be ca...

Page 18: ...lled by a qualified technician Make sure you have everything necessary for correct installation It is the installer s responsibility to comply with installation clearances specified in the manual Cabi...

Page 19: ...is fully assembled as above picture To level your electric range adjust the leveling legs at the bottom of the unit Avoid installing the unit in moist areas ass this may result in the risk of electric...

Page 20: ...roperly by following instructions below The anti tip bracket can be fixed at either the left or right side of the appliance 1 Place the anti tip bracket on the floor where the range is going to be ins...

Page 21: ...19 6 Slide the appliance in position NOTE If range is relocated the bracket must be removed and installed in new location Install the anti tip bracket either right or left side...

Page 22: ...d on the rating label The range can be connected directly to the fused disconnect or circuit breaker box through flexible armored or non metallic sheathed copper cable with grounding wire Allow two to...

Page 23: ...inal Block Access Plate on the back of range by removing the fixing screw Loosen the screws securing the strain relief bracket Insert all 4 power cords L1 L2 N Grounding passing through the bracket Lo...

Page 24: ...lections when using glass cookware Pan size should match the element size A slightly larger pan covers the entire element and prevents spillovers from contacting the heat surface and burning in Using...

Page 25: ...e oven door becomes very hot during operation Keep children well out of reach Use the door handle to open and close the door Use protective gloves to take food out Operate for Electric Control Control...

Page 26: ...CE Cooking Icon Use Heat Elem Temp Range C Default ALARM Count M Range Default Max Power Rate W UPPER HEAT ELEM 150 250 230 1 480 45 2200 BOTTOM HEAT ELEM 150 250 230 1 480 45 2000 UPPER REAR HEAT ELE...

Page 27: ...arameter and then click to confirm or click TIMER icon again to cancel SET ALARM Only cooking mode is selected ALARM setting is permitted Select ALARM icon then click enter setting use to adjust param...

Page 28: ...max rate power 2200W max temp 500 degree F touch again or alarm runout broil is end HOW TO BAKE Touch this key then touch next touch use adjust time then touch next touch use and touch to adjust temp...

Page 29: ...then touch next touch use adjust time then touch next touch use and touch to adjust temp Use conform Touch oven start heat circle max rate power 3300W max temp 500 degree F touch again or alarm runou...

Page 30: ...s ON the keepwarm function is actived In KEEPWARM model the oven automatically keeps warm for 8 hours after cooking HOW TO PREHEAT Select PREHEAT icon then you can setting parameter you need to click...

Page 31: ...s and click to start running again 2 If you want to setting different alarm or temperature parameters select Or then click to enter setting 3 If you want to cancel cooking click first and then click t...

Page 32: ...ontrol knob 7 Left oven indicator 3 Right element indicator 8 Oven mode knob 4 Rear left element control knob 9 Rotisserie knob 5 Front left element control knob Electric Oven Mode Setting Bake COVN L...

Page 33: ...ner NOTE When the range is not being used turn the knobs to their OFF positions IMPORTANT The oven broil shall be used always with the door closed Always use suitable protective gloves when inserting...

Page 34: ...Do not use an adapter Failure to follow these instructions can result in fire electric shock or even death Enameled Parts All the enameled parts must be cleaned with a sponge and soapy water only or o...

Page 35: ...l 3 Close the oven door 4 To remove the shelf please repeat above three steps in the reverse order NOTE The shelf is provided with a security block to prevent accidental extraction Pay attention to in...

Page 36: ...ate oven cleaning it is possible to remove the door Please follow the instructions carefully The oven door can easily be removed as follows Open the door to the full extent Then turn the hinge as the...

Page 37: ...35 Gently close the door and withdraw the hinge pins from their location To replace the door repeat the above steps in reverse order...

Page 38: ...out of the sponge or cloth when cleaning area of the controls or any electrical parts Wash the outside cabinet with warm water and mild liquid detergent Rinse well and wipe dry with a clean soft clot...

Page 39: ...rning If it is oven control knob you are trying to turn the knob in wrong direction Oven light does not work Light bulb is loose or defective Oven function knob was set to OFF Switch operating oven li...

Page 40: ...splay E2 Oven temp sensor is defective please contact supplier service Oven is forbidden to use cooktop is permitted to use Screen display E3 Oven temp sensor and cooling fan is defective please conta...

Page 41: ...warranties of merchantability and fitness for a particular purpose If Lanbo cannot lawfully disclaim implied warranties under this limited warranty all such warranties including warranties of merchan...

Page 42: ...riate payment record to establish the warranty period Service under this warranty must be obtained by contacting Lanbo at service lanboappliances com Product features or specifications as described or...

Reviews: