Door
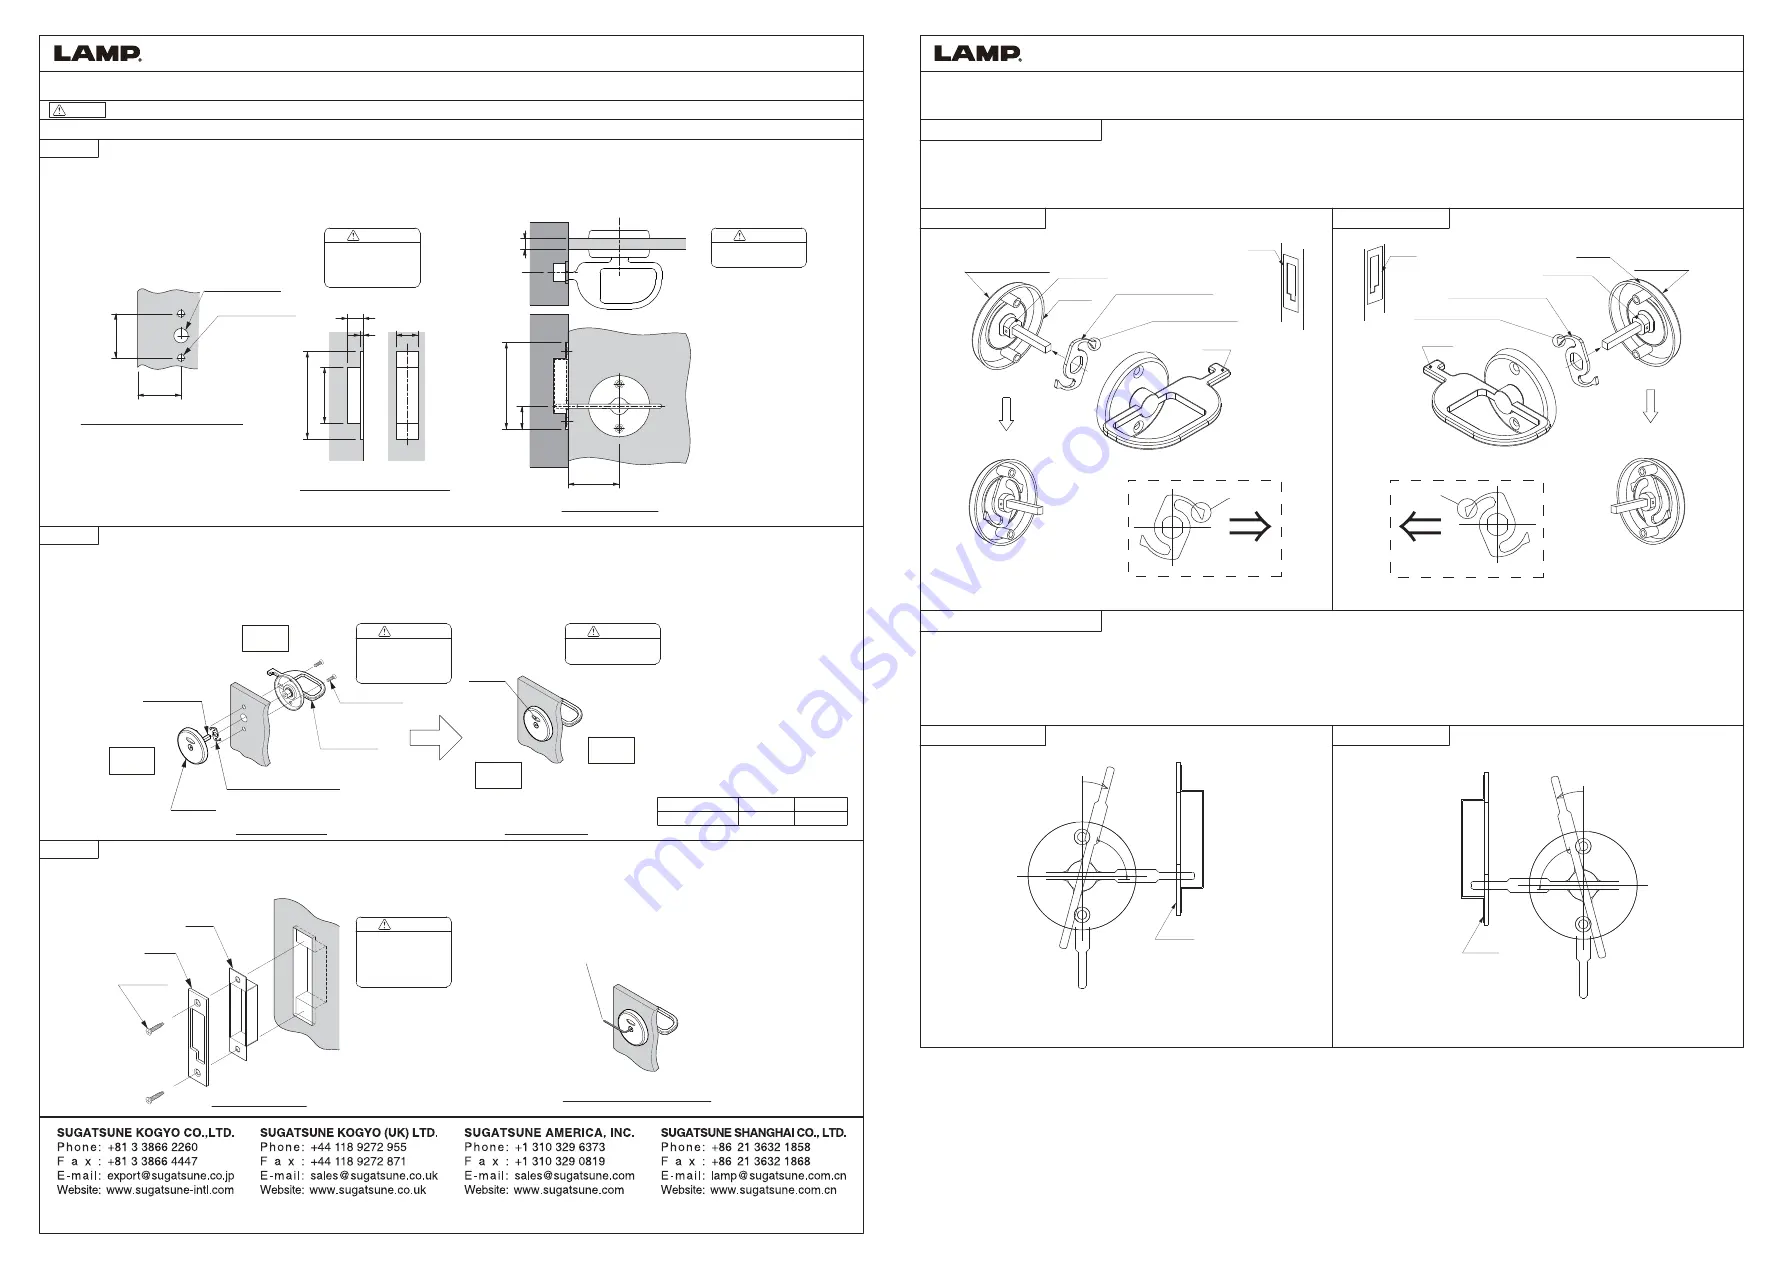
Fig. 6 Installation of strike
Fig. 7 Unlocking under emergency case
STEP 1
STEP 3
STEP 2
INSTALLATION PROCEDURES
(Unit: mm) Carefully install the latch to avoid injury.
Thank you for selecting the Sugatsune latch. In order to use this product correctly and safely, read this manual thoroughly before starting installation.
And, carry out installation correctly following instructions in the manual. After installation, keep this manual at hands of operator.
Caution When neglecting this caution, or not follwed, injury may be resulted. Furthermore, it may be not possible to install.
20
Door thickness (mm)
13
〜
16
M5
×
25
M5
×
30
Screw size
Mount screw recommended:
Flush bolt with hex. Hole (with anti-loose function)
×
2
Fig. 3 Completion drawing
Caution
103
66
18.5
4
26
Fig. 2 Process chart of strike mount hole
(Left Hand and Right Hand Types)
As shown in Fig. 1, prepare latch mounting holes (one hole of 20mm dia. and two holes of 8.5mm dia.) at door center.
Process the strike mounting hole as shown in Fig. 2, according to Step 3.
Set the latch to the strike, as explained in Fig. 3. The door width is for the 13 to 20mm panel.
As shown in Fig. 4, position the indicator at outside of door, and position the latch lever inside of the door. Then, fix them with set screws.
Then, confirm that the indicator indicates red. (when latch lever is horizontal – Fig. 5). If red is not indicated, turn the square core by 90 degrees
and assemble to the latch lever. Use anti-loose mounting screws.
※
When installing ET-48 latch stopper, refer to ET-48 Installation Manual on right page.
Latch lever
Fig. 4 Before installation
Fig. 5 After installation
In Fig. 3 under STEP 1, processing of holes for the strike and box are explained. This work should be done on the installation site.
Set the S box and then the strike to the mount hole, fix with set screws.
Mount screw recommended:
Phillips head flush bolt 3.8
×
20 (Stainless)
×
2
Mount screw
PAT
BATHROOM DOOR LATCH ET-125T INSTALLATION MANUAL
Sidewall
Sidewall
Door
Fig. 1 Process chart of indicator mount hole
20mm dia. hole
8.5mm hole
×
2
52
60
Door
Door
103
27.5
60
Mount screw
Side
(
Wall
)
S box
Strike
Inside
Inside
Outside
Outside
Square core
Indicator
※
Latch stopper ET-48
Indication
window
Emergency unlock function: In the emergency case,
use it inserting into hexagonal hole of the indicator to unlock the latch.
14.5
・
Process strike mount
hole at the installation
site without mistake for
correct function.
Caution
・
When assembling the
screw, use # 3 (nominal
diameter) hexagonal bar
spanner.
Caution
・
The strike mounting hole
should be processed at
the installation site. Or,
abnormal operation will
be resulted.
Caution
・
Since screw is not
attached, use appropriate
Caution
・
Processe the hole at a
right angle to the door.
ISO9001(Japan Offices and Sugatsune America) and ISO14001(Chiba Production division and Logistci center), certified.
2012.10 PRINTED IN JAPAN 0116-2
Strike
Strike
Lever
Lever
Hold position (approx. 75 degree)
90 degree position
Hold position (approx. 75 degree)
90 degree position
Lock position
(Indicator window: red)
Lock position
(Indicator window: red)
Release position
(Indicator window: blue)
Release position
(Indicator window: blue)
Strike
Installed status
Installed status
Indicating window (red)
Indicating
window (red)
<When installing ET-125T latch, follow the instructions on left page. >
※
When the lever is hold near “ lock-release” position, ET-48 may be installed inproperly. Reinstall the parts in correct manners.
Fig. C
:
Right lock type
Fig. D
:
Left lock type
*In case of left lock type, install parts such that upper protruded section faces door end (leftward).
Fig. A
:
Right lock type
Fig. B
:
Left locki type
ET-48 LATCH STOPPER (FOR ET-125)
INSTALLATION MANUAL
・
Fig. A: When installing the right-lock type (the lever faces rightward when indicator window shows “red”), set the protruded section to right
and upper position to insert firmly to the metal part of the indicator. With this status, install these parts to the panel;.
・
Fig. B: If left lock type is used, install parts with the protruded section of ET-48 facing reverse direction.
*For right lock type, set parts such that upper protruded section faces to door end (rightward).
・
Fig. C denotes lever-hold position for right lock type. When moving the lever to the lock position (0 degree) from 90 degree position,
confirm that the lever is held to the position.
・
Fig. D denotes the lever hold position for left lock type.
Confirmation of lever-hold position
Indicator
Metal section
Protruded section
Protruded section
Latch stopper ET-48
Latch stopper ET-48
Metal section
Indicator
INSTALLATION PROCEDURES
Thank you for selecting the Sugatsune stopper. In order to use this product correctly and safely, read this manual thoroughly before starting work.
※
When neglecting this caution, or not follwed, injury may be resulted. Furthermore, it may be not possible to finish installation.
Strike
Upper protrusion
Door end (rightward)
Upper protrusion
Door end (leftward)
Approx. 75 degrees
Approx. 75 degrees


