background image

8

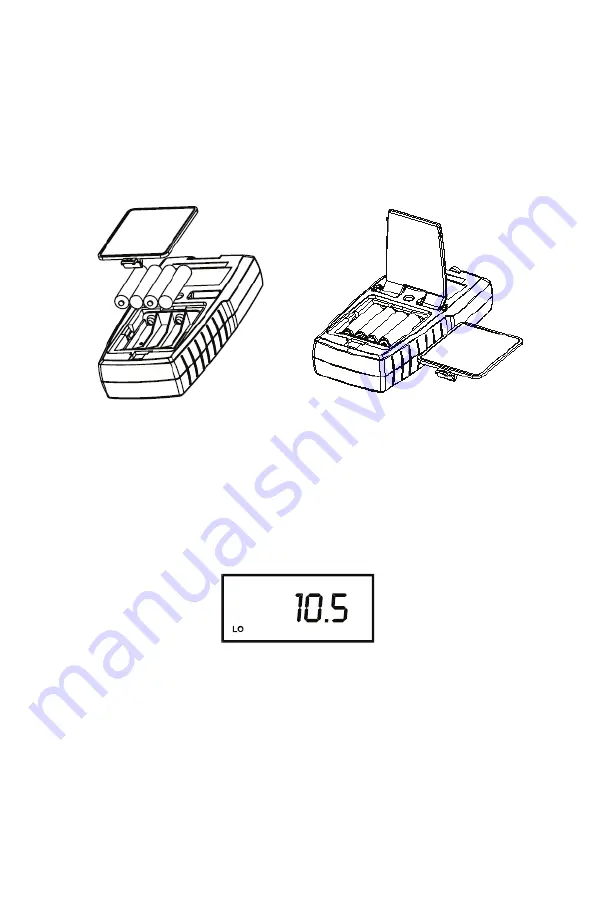
2.4 Inserting New Batteries

The battery compartment is found at the back of the instrument. To open 

the battery compartment, push the cover in the direction of the arrow 

and lift up. Note the polarity of the batteries before inserting them into 

position. After the batteries have been replaced, reposition the cover and 

press down until it locks.


2.5 Battery Replacement

The “LO” annunciator on the LCD alerts when battery power is running 

low.
Caution:  Power o

  the meter before changing battery. 

Summary of Contents for pHPLUS DIRECT 2

Page 1: ...Code 5 1936 01...

Page 2: ......

Page 3: ...not represent a commitment on the part of LaMotte Company WARNING Reagents marked with an are considered to be potential health hazards To view or print a Safety Data Sheet SDS for these reagents go t...

Page 4: ...alibration 10 3 1 1 pH Calibration Procedure 11 3 1 2 Changing the pH Bu er Group 12 3 1 3 Resetting User Calibrated Values 12 3 2 Ion Calibration 13 3 2 1 Ion Calibration Procedure 13 3 3 Temperature...

Page 5: ...mV ORP temperature and allows direct ion concentration measurement of various ions mono and divalent The mV mode is also useful for diagnosing problems with ion selective electrodes ISE The meter incl...

Page 6: ...up in the mode that was last used CAL Allows calibration for Ion pH mV or Temperature or to abort calibration and return to measure without confirming a value MODE Selects measurement mode for Ion mV...

Page 7: ...2 3 Inserting Removing the Rubber Boot Stand 1 To remove the meter from the rubber boot push out the bottom edge of the meter until it is completely out of the boot Ensure that the probe cables are no...

Page 8: ...he direction of the arrow and lift up Note the polarity of the batteries before inserting them into position After the batteries have been replaced reposition the cover and press down until it locks 2...

Page 9: ...without temperature compensation 2 7 Conditioning the pH Probe For best results condition the pH probe before the first use or if it has not been used for a long time by soaking it in pH 4 bu er solut...

Page 10: ...ts perform at least a 2 point calibration at room temperature 25 C using standard bu ers Begin with pH 7 00 USA group pH 6 86 NIST group or pH 6 97 Pb group For a 1 point calibration the calibration s...

Page 11: ...tandard solution e g pH 7 00 into a clean dry container Dip the pH probe and temperature probe into the solution Stir gently and wait for the reading to stabilize approximately 30 seconds depending on...

Page 12: ...p selection mode 3 Press MODE to toggle between the available pH bu er groups 4 Press HOLD ENTER to confirm the pH bu er group Note if Pb is selected measurement mode will begin If USA or nSt is selec...

Page 13: ...e displayed after a single point calibration is completed Recalibrate using a minimum of 2 points Calibration values are successfully stored if the ISE Ion Selective Electrode slope is within the spec...

Page 14: ...Adjustment solution if required Stir the solution gently with the electrode Press the CAL key to begin the calibration mode 2 The display will show CA to indicate the calibration mode momentarily fol...

Page 15: ...easurement mode If the calibration is not successfully stored in the memory an error message Er3 will be displayed This occurs when the slope is lower than 15mV decade or higher than 90mV decade 3 3 T...

Page 16: ...2 Without Temperature Probe no ATC If a temperature probe is not used the meter will compensate the pH response based on a temperature value that has been manually set or at the factory default of 25...

Page 17: ...erature 3 Dip the probes in the aqueous test sample Stir gently with the probes and wait for the reading to stabilize Note the reading Freeze the displayed if desired for details refer to Section 4 3...

Page 18: ...results store the ISE dry and the pH ORP probe bulb wet Store the pH ORP glass bulb in pH probe storage solution NEVER use deionized water for storage Wash probes with clean water after each use ISEs...

Page 19: ...alibrate c Replace electrode Er1 display Bu er value out of tolerance Use fresh pH bu er solution and recalibrate Ensure correct pH bu er group was selected Er2 display Single point calibration Perfor...

Page 20: ...4 01 7 00 10 01 USA pH 4 01 6 86 9 18 NIST pH 4 10 6 97 Pb Temperature Range 0 0 to 100 0 C Resolution 0 1 C Accuracy 0 5 C Temperature Comp Automatic Manual 0 to 100 C Millivolt Range 500 to 500 mV R...

Page 21: ...ablets pH 4 0 50 tablets 3983A H Mini Bu er Tablets pH 7 0 50 tablets 3984A H Mini Bu er Tablets pH 10 0 50 tablets 3985A H Ion Selective Electrode Ammonia ISE 5 0043 Fluoride ISE 5 0048 Nitrate ISE 5...

Page 22: ...pecific purpose and will not be liable for any direct indirect incidental or consequential damages LaMotte Company s total liability is limited to repair or replacement of the product The warranty set...

Page 23: ...23...

Page 24: ...PO Box 329 Chestertown MD 21620 800 344 3100 410 778 3100 f 410 778 6394 www lamotte com 626094 30 11 19...

Reviews: