


10
11
www.howdens.com
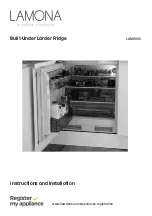
Built-Under Larder Fridge
LAM6000
Instructions and Installation
3
Exclusive to Howdens
Dear Customer
Congratulations on your choice of energy efficient larder fridge.
• Please read these instructions before use to ensure safe and economical
operation of the larder fridge.
• Please keep these instructions in a safe place for your future reference.
• If you have any questions, or if you are not sure about any information
contained in this booklet please contact us - details at the end of the User
Instructions.
This appliance is intended to be used in household and similar domestic
applications, see guarantee page for definition of domestic use*.
Welcome
Warning for hazardous
situations with regard to
life and property.
Warning for
electric shock.
Warning for
risk of fire.
Throughout this manual the
following symbols are used.
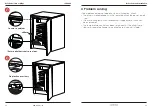
Transport Instructions
• The appliance should be
transported only in a vertical
upright position.
• If during the course of transport
the appliance has to be
transported horizontally, it must
only be laid on its left hand side
(when standing in front of the
appliance). After bringing it to
upright position,it must not be
operated for at least 4 hours to
allow the cooling system to settle.
• Failure to comply with the
above instructions could result
in damage occuring to the
appliance. The manufacturer will
not be held responsible if these
instructions are disregarded.
• The appliance must be
protected against rain, moisture
and other atmospheric
influences.
• Empty any water in the drain
tray before moving see section
‘
Defrosting
’ and ‘
Cleaning &
Care
’ for further information.
3
Exclusive to Howdens
Dear Customer
Congratulations on your choice of energy efficient larder fridge.
• Please read these instructions before use to ensure safe and economical
operation of the larder fridge.
• Please keep these instructions in a safe place for your future reference.
• If you have any questions, or if you are not sure about any information
contained in this booklet please contact us - details at the end of the User
Instructions.
This appliance is intended to be used in household and similar domestic
applications, see guarantee page for definition of domestic use*.
Welcome
Warning for hazardous
situations with regard to
life and property.
Warning for
electric shock.
Warning for
risk of fire.
Throughout this manual the
following symbols are used.
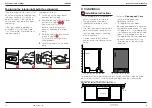
WARNING!
• Make sure the plastic
evaporating pan at the back of
the product is located correctly
before installation.
• Care should be taken with the
grilles and pipework at the
rear of the appliance to avoid
damage to the product and
person.
• This appliance is not designed
for stacking with another
appliance.
• Do not trap and damage mains
cable under appliance,
• Do not allow children to play with
the appliance or controls.
• Do not sit or stand on appliance.
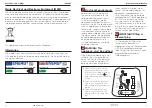
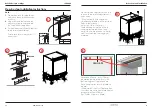
1. Using the appliance
Before you start using the
refrigerator check that:
1.
The feet have been adjusted
and the appliance is secured
to the cabinets plumb & level.
2.
The interior is clean, dry and air
can circulate freely.
See
‘
Cleaning and Care’
.
3.
Insert the plug into the wall
socket and switch on the
electricity supply. When the
door is open the interior light
will come on.
(*Ensure socket is accessible
after installation)
4.
As the compressor starts up
various noises may be heard.
The liquid and gases sealed
within the refrigeration system
may give rise to noise, whether
the compressor is running or
not. This is normal.
5.
We recommend that you set
the thermostat knob at 3 (three)
and monitor the temperature
to ensure the appliance
maintains the desired, safe
storage temperature. (c. 4°-5°C
normally)
6.
Do not load the appliance
immediately after it is switched
on. Wait until the correct
storage temperature has
been reached. (2-3 hours).
We recommend that you
check the temperature with
an accurate thermometer
periodically.
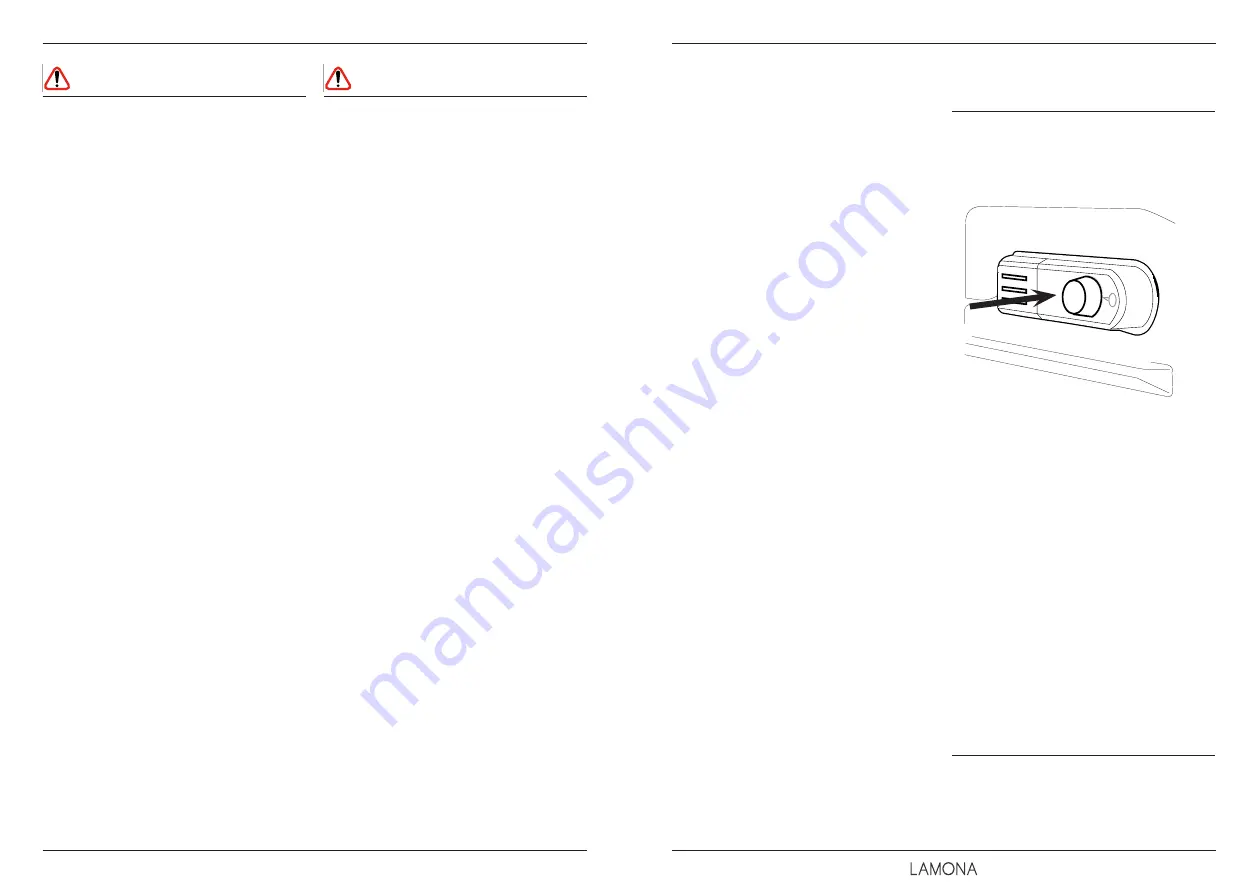
Temperature control and
adjustment
Operating temperature is
controlled by the thermostat
dial (see image). Setting 5 is the
coldest position.
The average fridge temperature
is recommended to be no higher
than +5°C, Initially set the dial to
3 and check the temperature
after 24hrs.
Some sections of the fridge are
warmer (e.g. the salad crisper and
the upper area) This is normal.
During summer the dial may need
to be turned colder.
Frequent door opening causes
loses cooling, so close the door as
soon as possible.
If excess ice develops turn dial to
a warmer setting until ice defrosts
and then return to normal setting.
Important Note:
Ice formation at the back is
normal during normal use.
SWITCHING THE APPLIANCE ON
Before you start using the refrigerator check that:
1.
The feet have been adjusted and the appliance is secured to
the cabinets plumb & level.
2.
The interior is clean, dry and air can circulate freely.
See
'Cleaning and Care'.
3.
Insert the plug into the wall socket and switch on the electricity
supply. When the door is open the interior light will come on.
(*Ensure socket is accessible after installation)
4.
As the compressor starts up various noises may be heard. The
liquid and gases sealed within the refrigeration system may give
rise to noise, whether the compressor is running or not. This is
normal.
5.
We recommend that you set the thermostat knob at 3 (three)
and monitor the temperature to ensure the appliance maintains
the desired, safe storage temperature. (c. 4°-5°C normally)
6.
Do not load the appliance immediately after it is switched on.
Wait until the correct storage temperature has been reached.
2-3 hours) We recommend that you check the temperature with
an accurate thermometer periodically.
10
11
Important Note :
Ice formation at the back is normal during normal use .
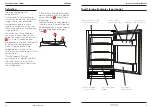
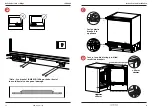
DEFROSTING
The larder fridge defrosts automatically.
During defrosting water droplets will form at the back of
the larder fridge ,where the concealed evaporator is
located. Some droplets may remain on the rear liner and
refreeze when defrosting is completed.
The water from these droplets runs down a drain tube via
the collection channel at the rear wall (1). This water is
collected and evaporated in a special container at the
back of the appliance.
Do not use pointed or sharp-edged objects, such as
knives, forks to remove any droplets which have
refrozen.
*Ensure foodstuffs and containers etc. do not contact
the rear wall as ice will form across and water will leak
into the refrigerator.
* If at any time the
defrost water does
not drain from the
collection channel, check
to ensure that no food
particles have blocked
the drain tube. The drain
tube can be cleared by
pushing the special
plastic plunger down the
drain tube.
1
2
TEMPERATURE CONTROL AND ADJUSTMENT
Operating temperature is controlled by the
thermostat dial (see image). Setting 5 is the coldest
position.
The average fridge temperature is recommended to be no higher
than +5°C, Initially set the dial to 3 and check the temperature
after 24hrs.
Some sections of the fridge are warmer (e.g. the salad crisper
and the upper area) This is normal.
During summer the dial may need to be turned colder.
Frequent door opening causes loses cooling, so close the door as
soon as possible.
If excess ice develops turn dial to a warmer setting until ice
defrosts and then return to normal setting.


