Lamona FLM8600 User Instructions Download Page 35

35

Exclusive to Howdens
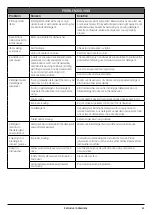
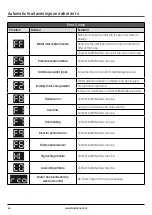
PROBLEM SOLVING

Problem

Reason

Solution

Pitting of steel 
items

Prolonged contact with salty or high 
acidic foods or with undissolved or highly 
concentrated detergent.

Remove spots with silver polish. Rewash. Wash soon after use, 
or pre-wash items if they will not be washed right away. Do not 
overload cutlery basket. Avoid spilling or pouring detergent 
directly on flatware. Make sure dispenser cup is properly 
closed.

Decorations 
being erased on 
kitchenware

Items unsuitable for dishwasher.

Items being 
scratched

Salt leakage.

Check lid on dispenser is tight.

High salt content on plate.

Perform wash cycle sooner.

Scratches on 
glassware.

A water or chemical reaction with some 
glassware. Usually caused by some 
combination of soft or softened water 
and alkaline washing solutions reacting 
with the glassware. Can be accelerated 
by poor rinsing, overloading and 
excessive temperature.

The condition may not always be preventable. To minimise the 
possibility of etching, use minimum amount of detergent.

Use of the appropriate programme.

Use of a rinse aid may also help.

Detergent cakes 
in detergent 
dispenser.

If using a powder detergent, there may be 
dampness in the dispenser.

Make sure dispenser is dry before adding powder detergent. 
Start dishwasher immediately.

If using a gel detergent, the detergent 
may be left in dispenser too long before 
using.

Start dishwasher soon after adding gel detergent. Do not 
allow detergent to dry out in the dispenser.

Faulty cover.

Do not overfill. Cover should close tightly. Check cover for fit.

Improper loading.

Do not place large items in front part of dishwasher.

Old detergent.

Use detergent within one or two months of purchase. To 
assure freshness, buy detergent as needed and no more than 
one or two at a time. Store in a cool, dry place.

Tablet not dissolving.

Select longer wash programme.

Detergent 
remains in 
the detergent 
compartment.

Detergent was added when the detergent 
compartment was wet.

Make sure the detergent compartment is dry before use.

Chipping and 
breakage of 
dishes / glasses.

Improper loading.

Load with care following the instructions for use. Place 
glassware so it does not touch the other dishes. Remove from 
dishwasher carefully.

Odour in 
dishwasher.

Dishes washed only every two or three 
days.

Use the pre-wash cycle at least once a day until a load 
accumulates.

A dirty filter system may contribute to a 
bad odour.

Clean filter system.

Using low temperature programmes 

constantly.

Run a service wash programme.

Summary of Contents for FLM8600

Page 1: ...User Instructions FLM8600 www howdens com appliance registration Freestanding Dishwasher ISSUE v1 2 131123...

Page 2: ...2 www howdens com...

Page 3: ...9 Dishwasher components and accessories p 9 Control panel p 10 Programmes p 12 Selectable options p 13 3 Beforefirstuse p 14 Check water hardness p 14 Setting water hardness level adding salt p 15 Che...

Page 4: ...tectors have been removed from the appliance before positioning DoNot install a damaged machine NOTE Do not leave the dishwasher door open Be careful not to trip over open door NOTE If the electricity...

Page 5: ...ance Safe Use Do not sit stand or or place loads on the open door Dishwasher detergents are hazardous Obey the safety instructions on the detergent packaging Safety information Donotdrink the water fr...

Page 6: ...ine should be placed on flat ground otherwise it will be unstable and the door of the machine will not close properly Water connection We recommend fitting a filter to your water inlet supply in order...

Page 7: ...tap on fully and check for water leaks Always turn off the water inlet tap after a wash program has finished If the water hose is damaged immediately close the water supply valve and disconnect the m...

Page 8: ...building tested by a qualified electrician LAMONAcannot be held liable for the consequences of an inadequate earthing system e g electric shock fire Donot connect the appliance to the mains electrici...

Page 9: ...2 13 14 This system provides better drying performance for your dishes Integrated power cable Drain hose Water inlet valve Rear Connections 1 2 3 11 A Do not stand sit or place loads on the open door...

Page 10: ...st button press the delay time will be set The display will show the time delay indicator 3 1 The display will alternate between showing the set delay time and the programme time until the time elapse...

Page 11: ...tion to increase the wash temperature for maximum hygiene 12 HalfLoadIndicators option Selecting either of these options allows you to designate which area of the dishwasher will receive the selected...

Page 12: ...0 850 Smart 50 C 70 C Auto programme for heavily soiled dishes Heavy 01 49 02 59 11 8 24 1 250 1 900 Steam Wash Suitable for heavily soiled dishes with effective cleaning by steam Heavy 02 41 20 3 1 7...

Page 13: ...rd Programme 04 31 Save 5 4It 02 57 Dual Prowash 60 C 01 53 Super 50 65 C Quick Clean 00 50 Smart 30 C 50 C 01 12 01 31 Smart 50 C 70 C 01 49 02 59 Steam Wash 02 41 Selectableoptions Note when the Eco...

Page 14: ...ve good cleaning results the dishwasher needs to operate with soft water Hard water results in the build up of calcium deposits on crockery and on the inner surfaces of the appliance The dishwasher ha...

Page 15: ...tting e g White chalky deposits during use Increase the salt softener level 1 3 2 Example shows L1 is chosen The default salt setting is Onlyuse granular dishwashersalt Risk of corrosion Ensurelidisco...

Page 16: ...and seperate rinse aid and salt Default 1 4 3 2 The factory default level is If there are stains on tableware items after washing the level must be increased If there is a blue trace after wiping the...

Page 17: ...e dishwasher It is used to assess compliance with the EU ecodesign legislation Reference programme for testing institutes The tests in accordance with EN 50242 60436 must be carried out with a full wa...

Page 18: ...each other because of possible damage during the wash programme Carefully place glasses so they don t move and break Long stemmed glasses should lean against the basket or the support shelves and not...

Page 19: ...th the handles upwards in the cutlery basket However cutlery placed handle down in the cutlery basket will come out cleaner and drier Place knives forks spoons etc between the bars on the cutlery tray...

Page 20: ...acksandfoldingshelves Fold the shelves to suit small larger or taller items Theupper cutlery traycomprisestwomovabletrays that canbe adjusted to makespaceforitemsplacedintheupperbasket e g tallwine gl...

Page 21: ...udible click will be heard when set at each position The height adjustment may not work properly if the basket is overloaded Ensure the basket is level after adjustment Tolowerthe height of the upper...

Page 22: ...shwasher continued Lower spray arm Upper spray arm Check that the upper and lower spray arms can rotate freely Spray arms Maximum plate diameters Upper Basket Lower Basket Upper position Lower positio...

Page 23: ...lose the container lid 3 ensure that it clicks into place firmly If you are using all in one tablets read the manufacturer s recommendations in order to determine where the tablets should be placed in...

Page 24: ...3 Select option s 5 Start the programme 3 4 Use to select option s Press to con rm To Deselect Use the same procedure Note Only compatible programme options can be selected See page 13 To delay the st...

Page 25: ...1 minute Thepump activates Anaudio alertsounds repeatedly All program indicators go off the end light is displayed 3 long alerts sound 6 Programme End Aftertheprogrammeends an audiblealertsounds Afte...

Page 26: ...e to 0 Hours 1 Press button 2 Press to start If you switch the dishwasher off after a delay time has been set the delay time is cancelled Child lock Press for 3 seconds All LEDs illuminate and CL is d...

Page 27: ...te for quick and easy recall This is useful if you are frequently using a programme with one or more options and want to recall it quickly First select a programme and add the desired option s as desc...

Page 28: ...ic items and on the tops of cups and bowls etc This is normal use a clean tea towel to dry Unloadingthedishwasher Caution Water and steam may be very hot Caution If the dishwasher is running and you w...

Page 29: ...able to all models 1 2 2 Hold 3s Hold 3s The current power mode will be displayed IL1 On IL0 Off This will store the setting When the dishwasher is switched on again this setting will be used Note The...

Page 30: ...ollected by the filters Cleaningtheupperandlowersprayarms Cleaningthefilters monthly cleaning ensures optimum performance 5 Cleaning the dishwasher Caution Thedishwashermust notbeusedwithoutfilters In...

Page 31: ...the casing and interior Donot use abrasive or caustic agents solvents as they will damage the appliance Caution Do not use steam cleaners or jet washers Ifthedishwasherisnotgoingtobeusedforalong peri...

Page 32: ...t of the dishwasher Always place the tablets in the detergent dispenser of the detergent holder Usingthree in onedetergent softeningsaltandrinseaid These detergents will not give you the same drying p...

Page 33: ...utton Fuse has blown breaker has tripped Check replace your household fuse reset or replace consumer unit breaker Water inlet tap is closed Turn on the water inlet tap The dishwasher door is open Clos...

Page 34: ...ers periodically Over sudding pre washing with a liquid dish washing detergrent Rinse items thoroughly before putting them into the dishwasher to remove dish washing detergent Rinse aid dosage and or...

Page 35: ...der detergent there may be dampness in the dispenser Make sure dispenser is dry before adding powder detergent Start dishwasher immediately If using a gel detergent the detergent may be left in dispen...

Page 36: ...schargewater Water discharge hose and filters may be clogged Cancel the programme If the error continues contact LAMONA Service Line Heatererror Contact LAMONA Service Line Overflow Unplug the machine...

Page 37: ...he product is tampered with or repaired by any unauthorised person The guarantee in no way affects your statutory or legal right Whattodoifyouneed toreport a problem Please ensure you have ready The p...

Page 38: ...845mm Width 598mm Depth 598mm Min Water Consumption 5 4 Litres Supply voltage 220 240 V 50 Hz Total current 10 Amp Fuse 13 Amp Total power 1900 W Water supply pressure Minimum 0 03 Mpa Maximum 1 Mpa...

Page 39: ...39 ExclusivetoHowdens Notes...

Page 40: ...f Trading a copy of the Howdens Terms and Conditions is available upon request Copyright 2023 Howden Joinery Ltd All rights reserved Howden Joinery Ltd Thorpe Road Howden East Yorkshire DN14 7PA Engla...

Reviews: