


10
www.howdens.com
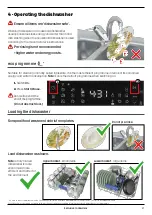
1.
Programme selection knob
2.
Display
3.
Delay Start indicator
4.
Delay Start button
5.
Time Drying button
6.
Drying Level button
7.
Delicate button
8.
Delicate indicator
9.
Anti-crease button
(
Long pressing Anti-
crease toggles audio
tones on/off).
10.
Anti-crease indicator
11.
Start / Pause button
12.
Start / Pause indicator
13.
Empty water tank indicator
14.
Clean condenser grille indicator
2
3
4
5
6
7
8
9
10
11
12
13
14
15
2.1
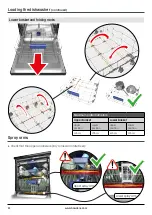
Programmes
3.1
1
Indicator LED
Options
Control panel
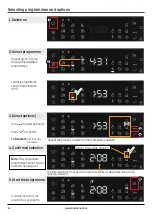
1.
Power On/Off
Turn the appliance on by pressing the On/Off button.
2.
Program Selection Button
Use to select a programme. The programme’s
indicator LED will illuminate
(2.1)
.
3.
Time Delay Button
This allows you to set a time delay of between 1 to
24hours. Setting to 0 turns the function off.
This must be set before a programme starts.
Pressing repeatedly or long pressing will cycle
through the selectable hours.
After the last button press, the delay time will be set.
The display will show the time delay indicator
(3.1)
The display will alternate between showing the
set delay time and the programme time until the time
elapses and the programme starts.
To change the delay time
, press
The delay time indicator flashes. Use the
button
again to set a new delayed start, then press
4. Washing Progress & Remaining Time Indicators
This section allow you to monitor the progression
of the active programme via the remaining time
display and the washing progress indicators.
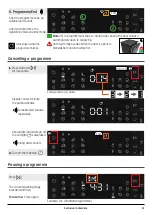
Washing Progress Indicators
These, will illuminate at each stage of the
programme flow.
Wash
Rinse
Dry
End
5.
Pause / Start Button
Starts or pauses the current programme.
To pause a programme:
During normal operation, press
or open the
dishwasher door. The duration of the programme
pauses and the related washing step indicator blinks.
6.
Options Button
Use the Options button to set the desired option.
Note:
See page 13 for programme compatibility.
Use the Select button
to confirm the option.
Note:
While the drying indicator is on, the
dishwasher will be silent for 15 to 20 minutes.
Summary of Contents for FLM8600
Page 2: ...2 www howdens com...
Page 39: ...39 ExclusivetoHowdens Notes...