3
(95666) TROPOS
Operating Instructions
Operating Instructions
Data logger TROPOS (95666)
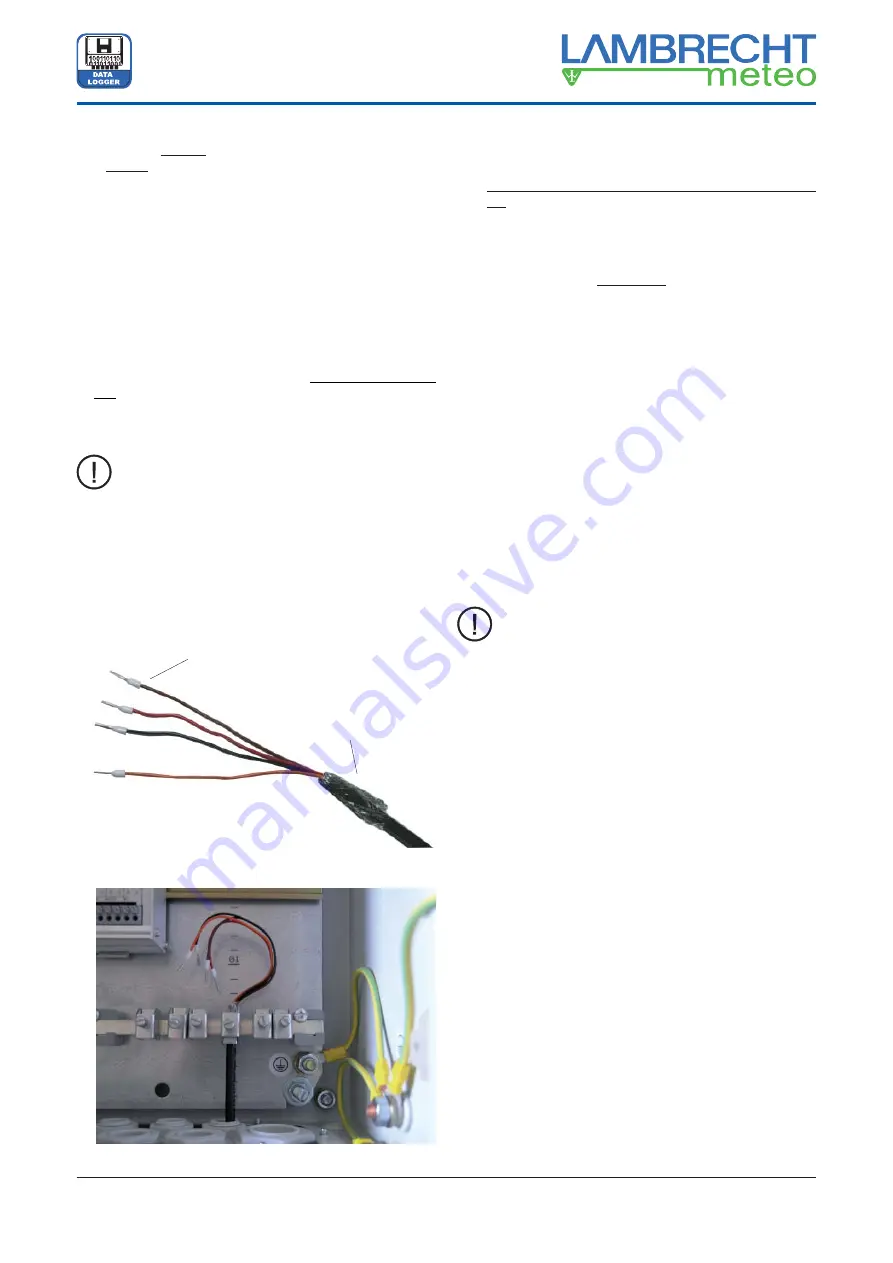
Figure 2: Wire end sleeves for wiring at TROPOS
Figure 3: Wire end sleeves and ground connection
Wire end sleeve
Shielding
4. Now all necessary wiring activities at TROPOS have to be
carried out, without the connection of the power supply, that
is without putting the plug into the socket. For this steps see
the following article and
the chapter 4.4, pages 5+6.
Correct cable connection
The wire end sleeves have to be pressed on the insulated
ends of the sensor cables. The wire end sleeves (cross-
section 0.5...1.5 mm
2
) should provide a smooth outside
surface to disconnect the cable easily.
Normally a lower pressure is enough to insert the wire ends
into the connecting clamps. If it is needed, the pusher can
be pressed to plug in the wire end sleeves without resist-
ance.
Only a lower pressure on the pusher is enough to unplug
the cables. Therefor the cable end has to be pressed in
fi rst during pressing the pusher, before the cable can be
unplugged.
The wire end sleeves can be stuck because of
self-locking. In this case don’t keep pulling! The
connection will become even more tight. Push the
cable down into the jack while pressing the pusher
down too. Then remove the cable while still holding
the pusher down.
The shielding has to be connected with the potential
equalisation panel of the used switchboard, see also
fi gures 2+3.
5.
TROPOS has to be connected to a COM interface of
your PC by means of the delivered connecting cable +
null modem adapter (TROPOS-sided).
6. Now the power supply of TROPOS may be switched
on. TROPOS turns on automatically and the LCD gets
active. The LCD turns off automatically when there are
no further activities at the push-/ rotary switch for some
times. TROPOS is still active but in the standby mode.
Please, from now don’t make any wiring operations!
7.
You have to deal with the software
”TROPOS-Commander
“
again.
8.
Choose your language and click “Close”. “
TROPOS
Commander
” has to be started again.
9.
The first communication between PC and TROPOS
should be carried out by the function
Request CFG
. Thus
you get the information whether TROPOS and PC are
able to communicate together or which deviations have
been occurred. Check fi rst the right choice of the COM
interface, if required.
Choose the menu item „Setup/ TROPOS confi guration“
and start the on-line help via the F1 key on your key-
board. Follow the instructions and hints.
10. All further settings and operations are described in the
on-line help.
Recommendation:
If a new confi guration or a reconfi guration of TRO-
POS is necessary, you should keep ready your deliv-
ery note. Thus a quick fi nding of the sensors, which
have to be connected, is possible by their “ID-No”.
An overview about the available sensor inputs exists
in the software “TROPOS-Commander” under the
menu item „Setup/ TROPOS confi guration/ Measur-
ing channels“.
There is a selective list, from which the correct sen-
sor can be chosen per each channel.
If a combined sensor should be chosen, that is a
sensor with more than one output, the right choice
of parameter is important.
Example: Humidity Temperature Sensor (8093):
E...00.8093.000000_Humidity_0-1V
E...00.8093.000000_Temperature_PT100.


