background image

3

PRODUCT FEATURES

1. Chute
2. On/off button
3. Cone holder
4. Lock
5. Cord and plug
6. Pusher
7. Base unit
8. Cone fastener

1

2

6

7

4

5

3

8

Slicing cone (Green)

Coarse grating cone (Red)

Extra fine grating cone (Purple)

Mini fries cone (Yellow)

Fine grating cone (Orange)

Summary of Contents for 31554

Page 1: ...INSTRUCTION BOOKLET Model 31554 QUICK PREP ...

Page 2: ...d easy to clean the compact portable design won t take up space in your cupboard or on your worktop Here at Lakeland our award winning family owned business still offers the same excellent quality value for money and exceptional customer service as when we founded the company back in the 1960s Our products are hand picked and thoroughly tested so you can be sure that everything you purchase will b...

Page 3: ... 2 On off button 3 Cone holder 4 Lock 5 Cord and plug 6 Pusher 7 Base unit 8 Cone fastener 1 2 6 7 4 5 3 8 Slicing cone Green Coarse grating cone Red Extra fine grating cone Purple Mini fries cone Yellow Fine grating cone Orange ...

Page 4: ...not use if damaged or has been dropped In the event of damage or if the appliance develops a fault contact the Lakeland customer care team on 015394 88100 Do not use this appliance if the lead is damaged If the lead is damaged it must be replaced with a special lead Contact the Lakeland customer care team on 015394 88100 Always use the appliance on a dry level heat resistant surface Unplug from th...

Page 5: ...o avoid risk of suffocation keep these bags out of reach of babies and children These bags are not toys Only use the pusher to push food through the appliance NEVER use your fingers or hands to push ingredients into the chute Ensure that hands hair jewellery and clothing are kept away from rotating and moving parts Take care when handling and changing the cones as the blades are extremely sharp ho...

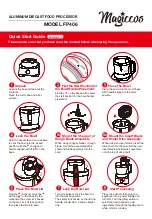
Page 6: ...es are extremely sharp hold the plastic part Before first use wipe the base unit with a clean damp cloth Wash the cones cone fastener chute and pusher in warm soapy water rinse and dry thoroughly Make sure that all parts are clean and dry before assembling the product Place the base on a flat surface near a socket at least 10cm away from a wall 2 Insert the cone you would like to use into the cone...

Page 7: ...one fastener wide end first inside the back of the cone holder twist it anticlockwise to lock the cone securely in place You will hear a click 4 Insert the pusher into the chute 5 The Quick Prep is now ready to use ...

Page 8: ...es of food into the chute Be careful not to overfill Press and hold the on off button with one hand and use the pusher with the other hand to feed the food through Apply steady pressure on the pusher to slowly and gently press the food through the chute DO NOT use force Only use the pusher to push food through the appliance NEVER use your fingers or hands Your food will feed through the cone holde...

Page 9: ...edients will achieve the best results these will help stop food becoming stuck in the chute This appliance is not suitable for chopping extremely hard food e g nutmeg or coffee beans It is not intended for use as a meat grinder ...

Page 10: ...es for Dauphinoise potatoes vegetables for gratins fruit X X X X X COARSE GRATING COLOURED RED Grating vegetables for coleslaw and salads fruit hard cheese chocolate X X X X FINE GRATING COLOURED ORANGE Grating vegetables for salads hard cheese grating parmesan for pasta dishes chocolate for toppings X X X EXTRA FINE GRATING COLOURED PURPLE Grinding hard cheese nuts MINI FRIES COLOURED YELLOW Chop...

Page 11: ...11 ONION BEETROOT CABBAGE APPLE HARD CHEESE PARMESAN CHOCOLATE DRY BREAD BISCUITS NUTS X X X X X X X X X X X X X X X X X X X ...

Page 12: ...tener is twisted inside the base of the cone until you hear a click Press the on off button first before inserting food into the chute to ensure the cone is correctly locked into place Question Why is the cone holder hard to fit and remove Answer With use this will become easier to fit and remove Question Why are my ingredients not feeding through the Quick Prep Answer The chute and cones may have...

Page 13: ...water or any other liquid To clean the base unit wipe with a clean damp cloth and dry thoroughly before storing Wash the cones cone fastener chute and pusher in warm soapy water dry thoroughly before storing All of these parts are dishwasher safe If the cone plastic becomes stained by food e g carrot rub it with a cloth dipped in a little cooking oil and then clean as above Store the Quick Prep wi...

Page 14: ... is coloured blue MUST be connected to the terminal which is marked with the letter N Neutral The wire which is coloured brown MUST be connected to the terminal which is marked with the letter L Live Before refitting the plug cover check that there are no cut or stray strands of wire inside the plug Use a 3 amp BS1362 fuse Only BSI or ASTA approved fuses should be used If you are at all unsure whi...

Page 15: ...15 ...

Page 16: ...16 ...

Page 17: ...17 GEBRAUCHSANWEISUNG QUICK PREP ...

Page 18: ...Ministifte und Pommes Die praktische Küchenmaschine ist schnell und einfach in der Anwendung und leicht zu reinigen Dank des kompakten tragbaren Designs benötigt sie im Schrank und auf der Arbeitsfläche nicht viel Platz Unser mehrfach ausgezeichnetes Familienunternehmen legt heute genauso viel Wert auf ein Höchstmaß an Qualität ein gutes Preis Leistungs Verhältnis und einen hervorragenden Kundense...

Page 19: ...Taste 3 Aufsatzhalterung 4 Arretierung 5 Netzkabel und Netzstecker 6 Stopfer 7 Gehäuse 8 Aufsatzverschluss 1 2 6 7 4 5 3 8 Schneideaufsatz Grün Grober Reibeaufsatz Rot Extrafeiner Reibeaufsatz Lila Aufsatz für Mini Pommes Gelb Feiner Reibeaufsatz Orange ...

Page 20: ...hme alle Verpackungsmaterialien sowie Aufkleber vom Gerät Vergewissern Sie sich stets vor Gebrauch des Geräts dass es keine erkennbaren Schäden aufweist Verwenden Sie das Produkt nicht falls es Schäden aufweist oder versehentlich fallen gelassen wurde Wenden Sie sich im Falle von Schäden oder Defekten am Gerät an den Kundenservice von Lakeland unter der Rufnummer 0800 444 1500 Verwenden Sie das Pr...

Page 21: ...cher Schlag Achten Sie auf die ordnungsgemäße Entsorgung des abgeschnittenen Netzsteckers ACHTUNG Die Kunststoff Verpackungsmaterialien dieses Geräts können gefährlich sein Sie dürfen nicht in die Hände von Babys und Kindern gelangen da Erstickungsgefahr besteht Diese Verpackungsmaterialien sind kein Spielzeug Verwenden Sie ausschließlich den Stopfer um Zutaten in den Einfüllschacht zu drücken Drü...

Page 22: ...f sind Halten Sie die Aufsätze immer am Kunststoffende Wischen Sie das Gehäuse vor dem ersten Gebrauch mit einem sauberen feuchten Tuch ab Reinigen Sie die Aufsätze den Aufsatzverschluss den Einfüllschacht und den Stopfer in warmem Spülwasser spülen Sie diese Teile mit klarem Wasser ab und trocknen Sie sie danach gründlich Alle Bestandteile müssen sauber und trocken sein bevor Sie das Gerät zusamm...

Page 23: ...3 Setzen Sie den Aufsatzverschluss mit dem breiten Ende von hinten in die Aufsatzhalterung und drehen Sie ihn gegen den Uhrzeigersinn bis der Aufsatz vollständig und mit einem Klickgeräusch hörbar einrastet 4 Setzen Sie den Stopfer in den Einfüllschacht ein 5 Der Quick Prep ist jetzt betriebsbereit ...

Page 24: ...füllschacht nicht zu überfüllen Halten Sie die Ein Aus Taste mit einer Hand gedrückt und verwenden Sie mit der anderen Hand den Stopfer um die Zutaten durch den Einfüllschacht zu pressen Drücken Sie den Stopfer gleichmäßig um die Zutaten langsam und vorsichtig durch den Einfüllschacht zu pressen Wenden Sie dabei KEINE Gewalt an Verwenden Sie ausschließlich den Stopfer um Zutaten durch den Einfülls...

Page 25: ...hen Sie die besten Ergebnisse Diese verhindern außerdem dass Zutaten im Einfüllschacht steckenbleiben Das Gerät eignet sich nicht zum Zerkleinern von sehr harten Zutaten z B Muskatnuss oder Kaffeebohnen Das Gerät eignet sich nicht als Fleischwolf ...

Page 26: ...N Schneiden dünner Scheiben für Kartoffel und Gemüsegratins Obst X X X X X GROBES REIBEN FARBE ROT Reiben von Gemüse für Krautsalat und Salate Obst Hartkäse Schokolade X X X X FEINES REIBEN FARBE ORANGE Grating vegetables fReiben von Gemüse für Salate Hartkäse Reiben von Parmesan für Pastagerichte Schokolade für Toppings X X X EXTRAFEINES REIBEN FARBE LILA Reiben von Hartkäse Nüssen MINI POMMES FA...

Page 27: ...27 ZWIEBEL ROTE BEETE KOHL APFEL HARTKÄSE PARMESAN SCHOKOLADE TROCKENES BROT KEKSE NÜSSE X X X X X X X X X X X X X X X X X X X ...

Page 28: ...einrastet Drücken Sie die Ein Aus Taste bevor Sie die Zutaten in den Einfüllschacht geben um sicherzustellen dass der Aufsatz richtig angebracht ist Frage Warum ist es so schwierig die Aufsatzhalterung anzubringen und zu entfernen Antwort Mit der Zeit wird es einfacher die Aufsatzhalterung anzubringen und zu entfernen Frage Warum gehen meine Zutaten nicht durch den Quick Prep Antwort Der Einfüllsc...

Page 29: ...sauberen feuchten Tuch ab und trocken Sie das Gerät danach gründlich bevor Sie es verstauen Reinigen Sie die Aufsätze den Aufsatzverschluss den Einfüllschacht und den Stopfer in warmem Spülwasser und trocknen Sie alle Teile vor dem Verstauen gründlich ab Alle abnehmbaren Teile sind spülmaschinenfest Falls der Kunststoff an den Aufsätzen durch Zutaten fleckig wird z B Karotten benetzen Sie ein Tuch...

Page 30: ...30 ...

Page 31: ...31 ...
Page 32: ...32 Lakeland Alexandra Buildings Windermere Cumbria UK LA23 1BQ Tel 44 0 15394 88100 www lakeland co uk Tel 0800 444 1500 www lakeland de D ...

Reviews: