background image

44

Laetus web technology | 13 9 66 0802 | FirmwareVersion 1.1.x/2.0.x | 2009-10

Setup – Product Format Parameters

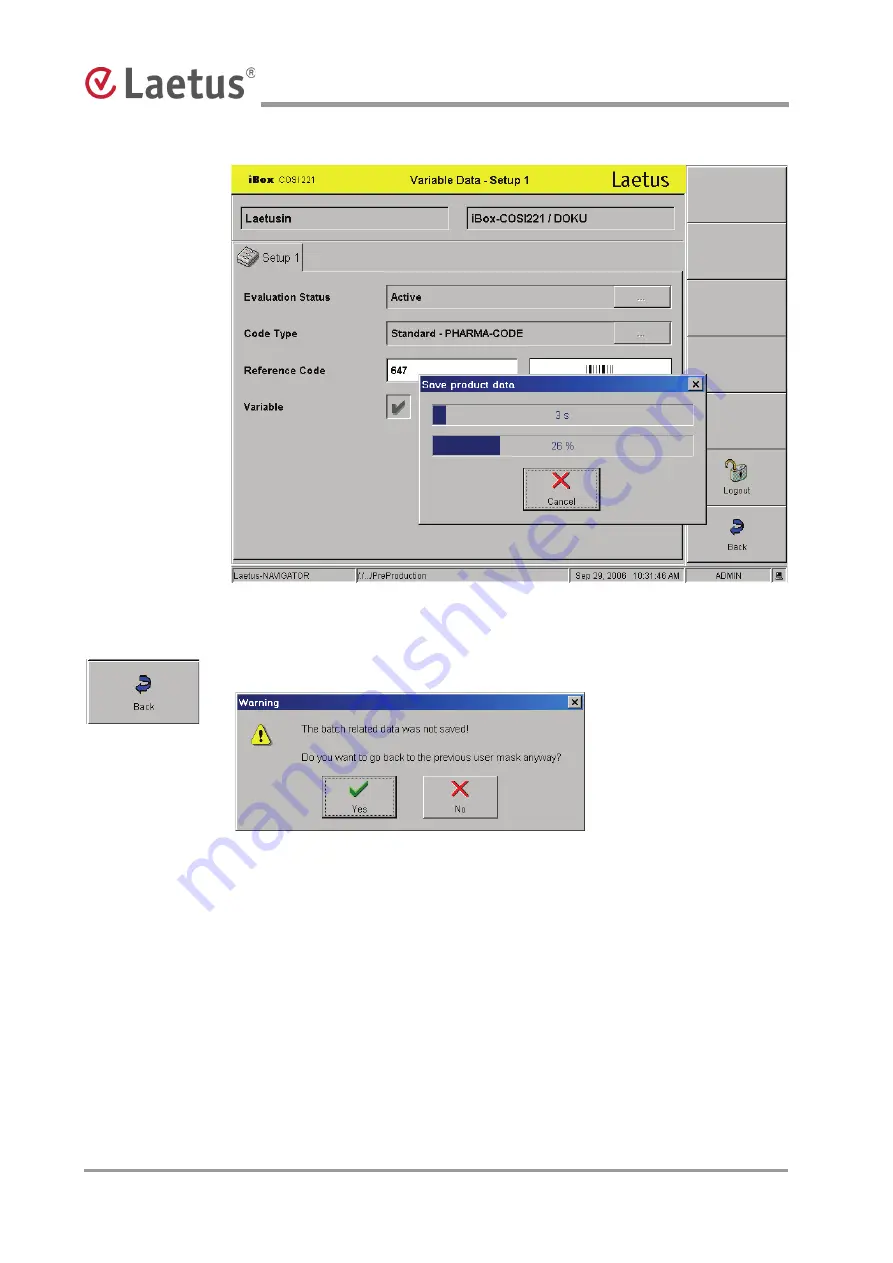
Fig. 40 Saving the product data

When you press the 

Back

 button, the following warning appears:

Fig. 41 Warning about saving batch related data

If you press 

Yes 

, the "Setup Product" menu will be displayed and the modified

product data is not logged in the ARGUS wt10.

If you press 

No

, the "Batch Related Data" menu is displayed and you can select the

Save

 button. The changed product data are logged in the ARGUS wt10.

The ARGUS wt10 main menu appears.

Summary of Contents for iBox COSI 221

Page 1: ...Laetus web technology 13 9 66 0802 FirmwareVersion 1 1 x 2 0 x 2009 10 English iBox COSI 221 Operating Manual Add this manual to your Laetus system file ...

Page 2: ...ind your regional Laetus representatives in the Internet on the page Contact Operating Manual Laetus web technology iBox COSI 221 Laetus Number of this manual 13 9 66 0802 Document Versions Manual Version Firmware Version Date Week Created Checked Extensions to the Previous Version 1 0 x 1 0 x 2003 09 M R K KU T J G Initial version 1 0 x 1 0 x 2004 21 2005 34 M R K M R K KU T J G Chapter Access Ri...

Page 3: ...Laetus web technology 13 9 66 0802 FirmwareVersion 1 1 x 2 0 x 2009 10 3 ...

Page 4: ...4 Laetus web technology 13 9 66 0802 FirmwareVersion 1 1 x 2 0 x 2009 10 ...

Page 5: ...andard version are possible the following acces rights in the various menus for the users User Production Setup Service Administration Without login view only limited access blocked only wt device info OP Current Data Timing Diagram Contrast Level Installation Setup 1 Setup 2 Configuration Identification view Fault Readings delete Setup 1 Setup 2 modification allowed Configuration Identification v...

Page 6: ... Medium High 27 4 3 3 Result Pulse Output Immediately End of Gate 28 4 3 4 Tube Orientation Signal Deactivated by Length by Bars by Time 29 4 3 5 Orientation Parameter 31 4 3 6 Code Print Normal Inverse 33 4 3 7 Decoder Forwards Backwards 34 4 4 Setup Configuration 35 4 4 1 Gate External Internal 36 4 4 2 Gate Polarity Negative Positive 37 4 4 3 Result Pulse Width 1ms 500ms 38 4 4 4 Reading Direct...

Page 7: ...10 7 5 2 2 Fault Readings 58 5 2 3 Timing Diagram 59 5 2 4 Contrast Level 61 5 2 5 Installation 62 6 Administration 63 6 1 Administration Menu Overview 63 6 2 Administration Menu in Detail 64 7 Sample Configuration 67 7 1 Tube Filler 67 8 Error Messages and Remedies 68 ...

Page 8: ...8 Laetus web technology 13 9 66 0802 FirmwareVersion 1 1 x 2 0 x 2009 10 ...

Page 9: ...identifies code on packaging material Our developments unite comfortable operation and a graphic user interface Together with the Laetus web technology wt the COSI 221 stands for reliable recognition of PHARMA CODETM on various different products The iBox COSI 221 is connected with the evaluation unit e g COMMANDER 12 01 via the Ethernet interface Fig 1 COSI 221 Barcode reader ...

Page 10: ...ng the machine You do not have to switch on the COSI 221 and the iBox separately OUT1 OUT2 OUT3 OUT4 OUT5 OUT6 IN1 IN2 CAN LINK 1 2 3 4 5 6 7 8 1 2 3 4 5 6 7 8 OUT1 OUT2 OUT3 OUT4 OUT5 OUT6 IN1 IN2 CAN LINK 1 2 3 4 5 6 7 8 1 2 3 4 5 6 7 8 1 2 3 4 5 6 7 8 1 2 3 4 5 6 7 8 1 2 3 4 5 6 7 8 10 9 11 12 13 14 15 16 10 9 11 12 13 14 15 16 10 9 11 12 13 14 15 16 1 OUT1 Device Ready 2 OUT2 Machine Enable 3 ...

Page 11: ...elled Route indicates the following The wt device is located in the same network i e a connection is possible The wt device is not located in the same network IP configuration must be carried out The Discovery of wt devices menu enables you to sort the wt devices by serial number name IP address or route They are sorted by pressing the corresponding column header press Device Name in order to sort...

Page 12: ...9 66 0802 FirmwareVersion 1 1 x 2 0 x 2009 10 Selecting the iBox COSI 221 in the Laetus NAVIGATOR The Main Menu of the iBox COSI 221 appears Fig 4 Main Menu of the wt device iBox COSI 221 Press the field with the name of COSI 221 ...

Page 13: ...ecting the iBox COSI 221 in the Laetus NAVIGATOR In the status bar of the main menu is this description also used in the iBox COSI 221 for the tabular display of a menu containing information on the session number IP address and the logged in user Fig 5 Active NAVIGATOR Sessions ...

Page 14: ... wt device press the Service button in the Main Menu The Service menu appears 3 1 Service Menu Overview Factory Settings Clicking on the Factory Settings button causes the iBox COSI221 to revert to the Laetus shipping status predefined values This function turns the red positioning lamp on the sensor head on and off Login Logout If you are logged in and do not perform any operations you will be au...

Page 15: ...head is integrated into the ARGUS wt10 Server Sensor Name displays the name of the wt device e g iBox COSI 221 DOKU Switch on the position LED this function switches on or off the red position LED in the sensor head A thin red line is produced on the code level This positioning aid allows you to adjust the sensor head parallel to the code and to center it on the code Fig 7 Switch off the position ...

Page 16: ...tory Settings button The following menu appears Fig 8 Question to load the factory settings If you select Yes the factory settings will be loaded The product data will be loaded Fig 9 Loading and saving the product data If you click on Cancel the process is terminated No entries can be made in this menu Fig 6 Note All parameters of the sensor head are reset to their factory settings ...

Page 17: ...entification Next With Next and Previous you can switch between the tab cards Previous Setup 1 setting parameters Select evaluation status Select code type Enter reference code Setup 2 setting parameters Select digital level sensitivity result pulse output tube orientation signal orientation parameter code print decoder Configuration Select gate Select gate polarity Select result pulse width Selec...

Page 18: ...e displayed in gray This means that either the user does not have the corresponding access rights or the current operating mode does not permit this function Saving Data To store your settings permanently you have to save them before leaving a menu To do so press the Save button A small window is opened displaying the progress of the saving process Once saving is completed the sensor uses the set ...

Page 19: ...etup Product Format Parameters Fig 11 Information Close this window by pressing OK The system only becomes active after you perform this confirmation If you close the window and if you press the Back button the following question appears Fig 12 Reminder for saving changed data ...

Page 20: ...ct Format Parameters 4 2 Setup Menu in Detail Setup1 In order to setup the wt device and ready it for operation press the Setup button in the Main Menu The Setup Setup 1 menu is opened Fig 13 Setup Setup 1 menu Here you can select and edit the Evaluation Status Code Type Reference Code ...

Page 21: ...e when you change the sensor and the packaging material is not controlled at this point The rest of the system continues to run normally Once the sensor head has been mounted again activate the function Evaluation Status After activation the system checks the automatic configuration with the data from the iBox and the sensor and makes it available for code control again Bypassing the sensor head s...

Page 22: ...ndow in which you can select between Standard PHARMA CODE Mini PHARMA CODE Print Mark No Code Standard PHARMA CODE Select this setting if the code to be controlled corresponds to Standard PHARMA CODE More information on code design is available in the Laetus PHARMA CODE Guide Mini PHARMA CODE Select this setting if the code to be controlled corresponds to Mini PHARMA CODE More information on code ...

Page 23: ...ectly orienting a tube in a filling machine More information on this is available in section 7 1 Tube Filler No Code The system verifies that neither a code nor a print mark is located within the reading gate Make the appropriate selection and confirm with OK or close the window without accepting any changes by pressing Cancel If you press the Save button the changes will be stored and also be app...

Page 24: ...board and confirm your entry with ENTER Fig 16 Entering the reference code Alternatively you can use the bar keys thick and thin Select the corresponding white field to enter the PHARMA CODE The button means delete backwards Fig 17 Entry using bar keys If you press the Save button the changes will be stored and also be applied in future Note If you enter a reference code using the bar keys you ris...

Page 25: ...roduct Format Parameters 4 3 Setup Menu in Detail Setup 2 Press the Setup 2 button The menu Setup Setup 2 appears Fig 18 Setup Setup 2 menu Here you can select and edit the Digital Level Sensitivity Result Pulse Output Tube Orientation Signal Orientation Parameter Code Print Decoder ...

Page 26: ...ase you can avoid frequent fault readings by changing the digital level Values up to 15 are usually sufficient If higher values should be necessary please contact the Laetus hotline The disadvantage of the changed level is that the color sensitivity of the sensor is reduced Not all permitted colors are recognized anymore This may allow faulty colored code to interfere As a rule of thumb the color ...

Page 27: ... sensitivity level Make the appropriate selection and confirm by pressing OK or close the selection menu without accepting changes by pressing Cancel Insufficient contrast between background and print image may lead to FAULT readings This may occur for example when reading code on a tube where the background color is not white To compensate for this you can increase the sensitivity of the COSI 221...

Page 28: ...tput is expected immediately after coding In this case the GOOD signal appears immediately after the clearance distance behind the code If you press the Fig 18 button a window is called up in which you can choose between Immediately End of gate Fig 21 Result output mode Make the appropriate selection and confirm by pressing OK or close the selection menu without making any changes by pressing Canc...

Page 29: ...ter 7 1 Tube Filler Select the function that suits your application Press the button Fig 18 The tube orientation selection menu appears You can choose between the following Deactivated by Length by Bars by Time Orientation signal Deactivated the sample e g a tube should not be oriented Note If you select the setting Deactivated the orientation parameter will not be set The corresponding field rema...

Page 30: ... the turning station is stopped when the time in ms the distance in mm or the number of bars specified under Orientation Parameter is reached For this please read the Installation Instructions COSI 221 Make the appropriate selection and confirm by pressing OK or discard any changes made by pressing Cancel If you press the Save button the changes will be stored and also be applied in future Tube Or...

Page 31: ...tation signal means that orientation is done using a barcode see Fig 24 Fig 25 Entering the bar number The turning station must be able to turn the tube almost one complete turn after reading the code This is the most exact form of orientation In this case the number 1 16 of the bar to be used for orientation is entered under Orientation parameter ...

Page 32: ...hnology 13 9 66 0802 FirmwareVersion 1 1 x 2 0 x 2009 10 Setup Product Format Parameters Orientation signal Length Fig 26 Entering the value for the length Orientation signal Time Fig 27 Entering the value for the time ...

Page 33: ...ig 28 Selecting the code print type The PHARMA CODE on packaging usually consists of dark code bars on a light background If however packaging design requires a light code on a dark background select the inverse function for the Code Print Make the appropriate selection and confirm by pressing OK or close the menu without accepting any changes by pressing Cancel If you press the Save button the ch...

Page 34: ... the direction of movement of the coded packaging does not correspond to the direction that was intended during coding the parameter can be set to backwards so that the entered reference code corresponds with the requirements list Pressing the button Fig 18 calls up the Decoding selection menu You can select between Forwards Backwards Fig 29 Selecting the decoding direction Make the appropriate se...

Page 35: ...2009 10 35 Setup Product Format Parameters 4 4 Setup Configuration Press the Configuration button The menu Setup Configuration appears Fig 30 Setup Configuration menu Here you can select and edit the following Gate Gate Polarity Result Pulse Width Reading Direction ...

Page 36: ...lect Internal the gate is created by the sensor itself only with Laetus tab guidance Note You can only switch between the External and Internal gates when Deactivated has been selected as the orientation signal If Internal has been selected the Gate Polarity can not be set The corresponding field remains inactive Fig 31 Gate For this please also read the Installation Instructions COSI 221 Make the...

Page 37: ...between Negative Positive Polarity at the iBox IN2 signal According to the gate polarity select Positive if the gate is not to be inverted If you select Negative the gate is inverted internally Fig 32 Selecting polarity Make the appropriate selection and confirm by pressing OK or close the menu without accepting any changes by pressing Cancel If you press the Save button the changes will be stored...

Page 38: ...ction menu appears Fig 33 Time setting for the result pulse width This is where you set the width of the result pulses The predefined value should only be changed if the control results are transmitted to the machine control for shift tracking The required impulse width depends on the machine control If you press the Save button the changes will be stored and also be applied in future ...

Page 39: ...n the sensor select Forwards If the code is moving in the opposite direction select Backwards Pressing the button Fig 30 opens a window in which you can choose between Forwards Backwards Fig 34 Reading direction Make the appropriate selection and confirm by pressing OK or close the menu without accepting any changes by pressing Cancel If you press the Save button the changes will be stored and als...

Page 40: ...p Identification menu is displayed Fig 35 Setup Identification menu This menu displays the descriptions for product and sensor name that you specified Sensor Name Sensor Type Serial Number Batch Number Software Version Hardware Version No entries can be made in this menu You have successfully completed the installation process Press the Back button The Main Menu appears ...

Page 41: ...221 as a slave device in the ARGUS wt10 Server Note If the COSI 221 is integrated in the ARGUS wt10 you can change variable data the reference code in just a few steps There are additional menus for this purpose Press the Setup button in the ARGUS wt10 main menu in order to select a product and change its settings Fig 36 Main menu ARGUS wt10 ...

Page 42: ...lecting and loading a product If the product was created with the same grouping the LED symbol appears in green If the product corresponds with a compatible grouping the LED symbol appears in yellow If the product cannot be loaded for the current grouping the LED symbol is red Mark the desired product whose settings you wish to change and Load it ...

Page 43: ... 38 Establishing a connection to the sensor Select the sensor and then press the Connect to button This establishes a connection to the iBox Cosi221 You can entering new codes Fig 39 Entering a new reference code Enter the reference code via numerical input or using Enter PHARMA CODE and press the button Back ...

Page 44: ... following warning appears Fig 41 Warning about saving batch related data If you press Yes the Setup Product menu will be displayed and the modified product data is not logged in the ARGUS wt10 If you press No the Batch Related Data menu is displayed and you can select the Save button The changed product data are logged in the ARGUS wt10 The ARGUS wt10 main menu appears ...

Page 45: ...ariable setting activated or deactivated in the Setup Setup 1 menu The COSI 221 is integrated in the Argus wt10 Press the Setup button in the ARGUS wt10 main menu The Setup Product menu appears Fig 42 Product list in the ARGUS wt10 Mark the product in the list that you would like to edit and then press the Edit Product button ...

Page 46: ...eVersion 1 1 x 2 0 x 2009 10 Setup Product Format Parameters The Edit Product First Step menu appears Fig 43 Edit product first step In order to edit the selected product press the Connect to button A connection is then established to the COSI 221 ...

Page 47: ...ettings or make the desired changes and define new settings With Position LED Fig 44 you can turn the red positioning lamp on the sensor head on and off This function switches the red positioning lamp on the sensor head on and off A thin red line is depicted on the code level With this aid the sensor head can be positioned parallel to and over the middle of the code With Next and Previous you can ...

Page 48: ...on The following information appears Fig 45 Information Diagnosis Press the Yes button to continue the procedure The product data will be saved the evaluation will be halted and a machine stop initiated The menu Diagnosis Current Data appears Fig 46 Diagnosis menu Current Data In this menu you can check the current reference code the timing diagram and the contrast levels The counter is reset ...

Page 49: ...the product data will be restored and you can decide whether these settings should continue to be saved If you would like to return the iBox COSI221 to the Laetus delivery status click on the Factory Settings button The following menu appears with the question Fig 47 Question to load the factory settings If you select Yes the factory settings will be loaded ...

Page 50: ...values and meanings For an identification detail to be verified successfully all the printed characters must correspond with either the code type or the expected code reference code In the case of the iBOX COSI221 the setting Variable can be activated or deactivated for two code types Standard PHARMA CODE Mini PHARMA CODE Example If you have a number of different PHARMA CODEs for a packaging or pa...

Page 51: ...nce code must be entered here Otherwise the batch related data will not be processed fully A zero 0 cannot be entered here A 3 two thin bars is entered automatically when you leave the menu using the Back button Once you have entered the reference code press the Back button The Edit Product First Step menu reappears Press the Transfer button The following question appears Fig 50 Question about sav...

Page 52: ... Yes you arrive at the Edit Product Second Step menu Define the Status of the product accepted or not accepted Fig 51 Edit product second step Save your selection The following information appears Fig 52 Information about the changed product Press the OK button In the Setup Product menu Load the changed product ...

Page 53: ...g 53 Batch Related Data menu When you press the Save button the following warning appears Fig 54 Warning Press the OK button Now continue editing the data Select the Connect to button You will need to enter a new reference code in order to continue editing the data Change the reference code and press the Back button Then save the change The ARGUS wt10 main menu appears ...

Page 54: ...uct Format Parameters The Variable setting is not activated When the Variable setting is inactive in the Setup Setup1 menu the product can still be edited but a reference code cannot be entered after loading the product The main menu of the ARGUS wt10 server is displayed after loading ...

Page 55: ... needs you can select the following Selecting a tab card displays menus with the results of the readings Next With Next and Previous you can switch between the tab cards Previous Current Data View the results of the current data Fault Readings View and delete fault readings Timing Diagram View gate inactive gate length code length result pulse width Contrast Level Depict the contrasts of read code...

Page 56: ...nd do not perform any operations you will be automatically logged out after the time period set under Auto logout time in the NAVIGATOR has elapsed The operating elements become inactive The Back button returns you to the Main Menu Note Inactive buttons have a gray symbol and gray writing Entry fields are displayed in gray This means that either the user does not have the corresponding access righ...

Page 57: ...re you can view and edit the following production data Current Data Fault Readings Timing Diagram Contrast Level Installation 5 2 1 Current Data Press the Current Data button The Production Current Data menu appears displaying an overview of the reading results This menu also appears if you press the Production button in the Main Menu Fig 55 Production Current Data menu ...

Page 58: ...several LEDs indicate different states of the iBox 5 2 2 Fault Readings Press the Fault Readings button The menu Production Fault Readings is displayed Fig 56 Production Fault Readings menu This menu displays the last 13 fault readings The column header displays the reference code numerically and graphically The reading results are displayed underneath Fault Readings are codes that do not correspo...

Page 59: ...ive Gate Length Code Length Result Pulse Width Fig 58 Production Timing Diagram menu Starting with the falling edge of the last gate all important events up to the next falling edge are listed and depicted graphically with their distance in time This allows you to determine the position of the code within the gate The last reading is displayed The system continues running while displaying the timi...

Page 60: ...dividual times is depicted in the following Fig 59 Explanation of signal edges FAULT signal Gate GOOD signal Result end gate or GOOD signal Result end gate 9 Gate inactive Beginning of gate Beginning of code End of code Code length End of gate Gate length Beginning of result pulse End of result pulse Result pulse width ...

Page 61: ...displays the contrasts of the read code bars The broad rectangle indicates that a thick bar was recognized the thin rectangle correspondingly indicates a thin bar A contrast of 100 can be attained with an immaculate optical depiction of the code if the bars were printed with an ideal black color on to an ideal white color The higher the contrast values the more reliable the code evaluation Note Co...

Page 62: ...on The Setup Setup1 menu is called up Fig 61 Setup Setup 1 below Production Installation In this menus Setup Setup1 Setup Setup2 Setup Configuration Setup Identification you can view inspect settings of the setup process No entries can be made in these menus You have completed Production Control The Back button returns you to the Main Menu ...

Page 63: ...Time s Possibility of entering name of wt device only for the user ADMIN Account View account and user list Select user language Next With Next and Previous you can switch between the tab cards Previous Save Save changed data Login Logout If you are logged in and do not perform any operations you will be automatically logged out after the time period set under Auto logout time in the NAVIGATOR has...

Page 64: ...Software Version Hardware Version Device Class Device Sub Class Operational Time s Fig 62 Administration menu You can assign a name to the sensor with the iBox for example a name indicating the location of the sensor installation in our example we chose iBox COSI221 DOKU Only the ADMIN user has the access rights to change a device name Place the cursor into the Equipment Name field and enter the n...

Page 65: ... Administration Press the Accounts button Fig 63 Administration Accounts Here you can select the user language for the selected user account Press the button The selection menu for the user language appears Select the desired user language Fig 64 Selecting the user language ...

Page 66: ...d your changes press the Cancel button Save your settings Press the Save button If you press the Back button without saving your changes the following question appears Fig 65 Question on saving changed data Yes accepts the changes You have completed the Administration process Press the Back button in order to return to the Main Menu ...

Page 67: ...ned The GOOD signal begins 6 mm after the last code bar The orientation types by Time and by Length cause the motor of the turning station to stop when the time in ms or the distance in mm set under Orientation parameter is reached The orientation type by Bars means that the tube is oriented by a code bar The turning station has to be able to turn the tube by almost another whole revolution after ...

Page 68: ...r Messages and Remedies 8 Error Messages and Remedies Fig 66 Error message Error message The background color of the title bar is red Remedy Check the cable connection between the sensor or iBox and the evaluation unit Check the power supply cable between the iBox and the sensor ...

Reviews: