INSTRUCTIONS FOR THE INSTALLER
7
2.
2.2.2.
Location of the appliance in the
room
Choose a location in the room which
favours good hot-air distribution by
convection and radiation.
2.3.
Installation of the appliance
2.3.1.
Floor
Make sure that the base can withstand
the total constructed weight of the
appliance and its casing.
When the floor surface (base) is
combustible, fit suitable insulation.
2.3.2.
Safety distances
Be sure to respect the appliance
installation distances from combustible
materials. Looking at the appliance head-
on:
Distance to
combustible
materials
(mm)
From the right-hand side
150
From the left-hand side
150
From the rear
200
From the front
1000
Bear in mind that it may even be
necessary to protect non-combustible
material in order to prevent breakage,
deformation, etc., as a result of
overheating if the non-combustible
material is not designed to withstand high
temperatures.
2.3.3.
Checks before lighting for the first
time
Make sure that the glass/es is/are
not broken or damaged.
Make sure that the flueway is not
obstructed with packing or loose parts.
Make sure that the airtight joints
on the flue circuit are in perfect
condition.
Make sure that the doors close
properly.
Make sure that all moving parts
are fitted in place.
2.3.4.
Height adjustment and levelling
the appliance
The appliance must be perfectly level,
horizontally and vertically, both at the
front and on the sides (use a spirit level).
2.3.5.
Casing
Make sure that the material around the
appliance is not flammable or likely to
deteriorate as a result of heat (wallpaper,
carpet, plastic-based casing, Silestone,
etc.).
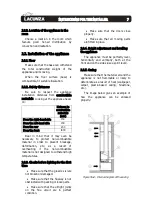
The image below gives an example of
how the appliance can be encased
properly:
Figure No.4 -
Interior diagram of the casing
Summary of Contents for Sara
Page 1: ...Sara Lorea Abodi Andrea Instruction Book...
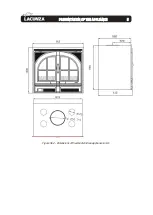
Page 6: ...PRESENTATION OF THE APPLIANCE 5 1 Figure No 2 Dimensions of the Abodi Andrea appliance in mm...
Page 19: ...BASIC BREAKDOWNS 18 6 BASIC BREAKDOWNS 6 NO TRADUCIR EL TEXTO DE ESTA IMAGEN...
Page 21: ...DECLARATION OF PERFORMANCE 20 7 DECLARATION OF PERFORMANCE 7...
Page 22: ...DECLARATION OF PERFORMANCE 21 7...
Page 23: ...DECLARATION OF PERFORMANCE 22 7...
Page 24: ...DECLARATION OF PERFORMANCE 23 7...
Page 25: ...CE MARK 24 8 CE MARK 8...
Page 26: ......


