background image

4. Setting Up Your LaCie Biggest S1S

page 28

LaCie Biggest S1S

User’s Manual

4.5.1. Formatting And Partitioning – Mac Users

After having followed the steps to set the RAID level, create the array and connect the interface cable, the LaCie Biggest S1S
must now be formatted and partitioned before it can be used:

1) If it is not already on, power on the host computer.

2) As soon as the array is detected by your computer, it will mount to the desktop as an untitled device.

3) From 

Finder

, use the 

Go

menu and open the 

Utilities

folder. Double-click on the 

Disk Utility

program.  

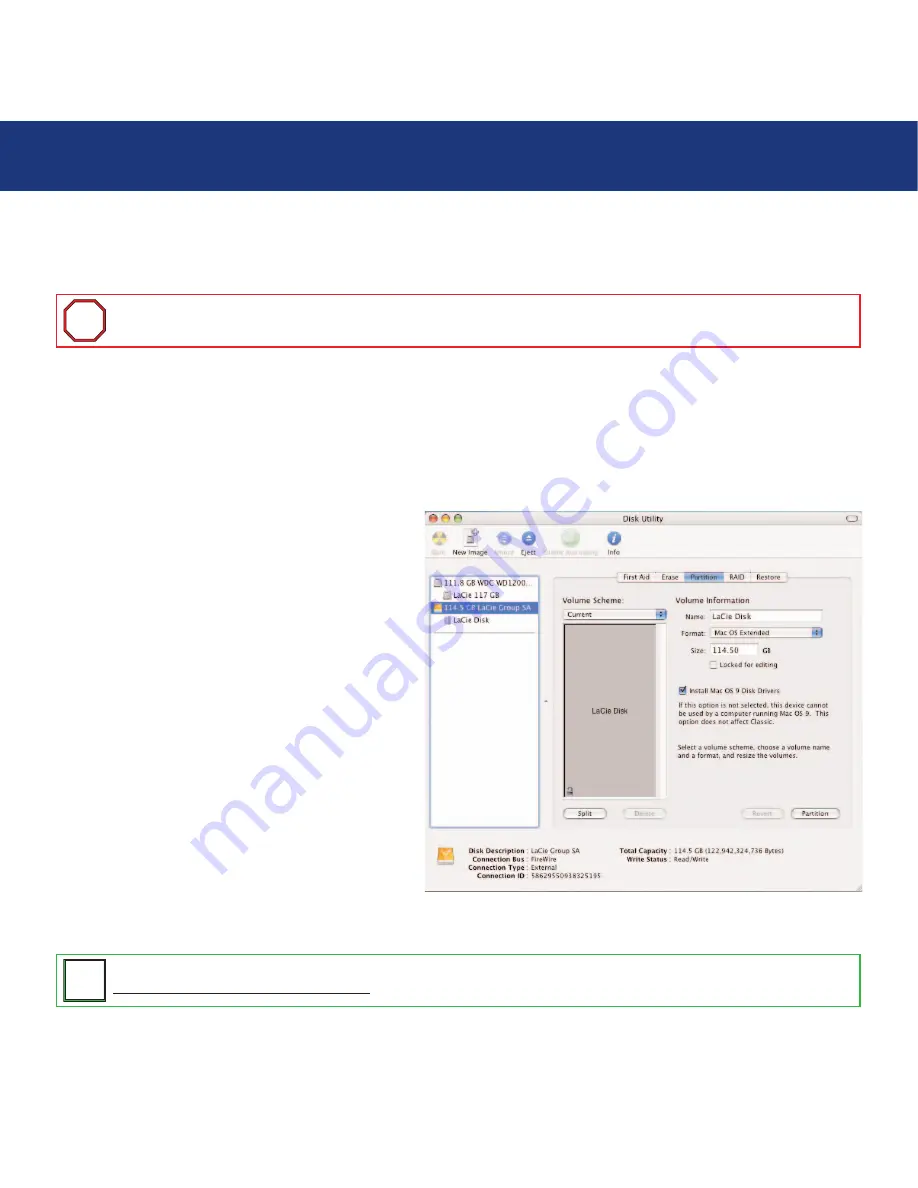
4) The 

Disk Utility

dialog box will appear. Your LaCie

Biggest S1S array will appear on the left-hand side, in
the list of hard disks that are mounted on your system.
You should see a volume that represents your internal
hard drive, and one that reads LaCie.

5) Select the LaCie drive, and then click on the 

Partition

tab.

6) From the 

Volume Scheme:

button, choose the number

of partitions you want to divide the drive into by clicking
on the pull down menu starting with 

Current

(Mac OS

10.x gives you the option of dividing the drive into at
most 8 partitions). You can customize the size of the
partitions by using the slide bar between the partitions
in the 

Volume Scheme:

area.

7) In the 

Volume Information

section, create a name for

each partition, choose the volume format (Mac OS
Extended, Mac OS Standard, MS-DOS File System or
UNIX File System) and the volume size.

Important Info:

Before beginning the format and partition process, ensure that there are no warning or error

messages being displayed on the LCD Display of the LaCie Biggest S1S.

i

i

Tech Note:

For a more detailed discussion on the various file system formats and partitioning, please refer to section

7.1.1. File System Formats – Mac Users

.

T

T

N

N

Summary of Contents for Biggest S1S

Page 1: ...a specific page or section To Exit From the Menu bar at the top of your screen select File Quit Icons Used In This Manual These icons describe the type of information being given Previous Page Next P...

Page 2: ...View 11 2 3 2 Rear View 12 2 4 SATA Cables Connectors 14 3 Understanding RAID 15 3 1 RAID 0 15 3 2 RAID 0 1 16 3 3 RAID 5 And RAID 5 Hot Spare 17 4 Setting Up Your LaCie Biggest S1S 19 4 1 Setting The...

Page 3: ...on Error Message 36 5 2 3 5 Overheating Error Message 36 5 2 4 RAID And Disk Status Messages 37 5 2 4 1 Power On 37 5 2 4 2 Disk Initialization 37 5 2 4 3 Ready 37 5 2 4 4 RAID Level 37 5 2 5 RAID And...

Page 4: ...Table of Contents page 4 LaCie Biggest S1S User s Manual 9 Troubleshooting 46 10 Contacting Customer Support 49 11 Warranty 51...

Page 5: ...Part 15 of the FCC Rules These limits are designed to provide reasonable protection against harmful interference in a residential installation This equipment generates uses and can radiate radio frequ...

Page 6: ...tion for CE Certification We LaCie solemnly declare that this product conforms to the following European standards Class B EN60950 EN55022 EN55024 EN61000 3 2 EN61000 3 3 With reference to the followi...

Page 7: ...LaCie Biggest S1S in an environment that is too cold or humid may damage the unit Always unplug the LaCie Biggest S1S from the electrical outlet if there is a risk of lightning or if it will be unuse...

Page 8: ...intelligent online recovery the LaCie Biggest S1S allows one drive to be designated a hot spare that way if one drive fails the LaCie Biggest S1S will seamlessly rebuild the failed drive s data on th...

Page 9: ...e disks Automatic on line rebuilding Serial ATA Hardware Requirements for Serial ATA G3 or greater or Pentium III or higher compatible processor Serial ATA Host Bus Adapter card Host computer system w...

Page 10: ...1S Utilities CD ROM LaCie Biggest S1S Quick Install Guide SATA bracket Important Info Please keep your box In the event that the LaCie Biggest S1S RAID subsystem tower should need to be repaired or se...

Page 11: ...LCD Display messages please see section 5 2 LCD Display Messages Menu Button The Menu Button is used to navigate through the information on the LCD Display and is used to select settings for setting...

Page 12: ...gest S1S User s Manual 2 3 2 Rear View Fan Status Indicator Power Switch Ventilation Fan RAID Level Switch Selectors Serial RS 232 Port SATA I port Power Status Indicator Power Supply Connector ON 1 2...

Page 13: ...he unit is turned off Power Supply Connector This is where you plug in the AC adapter supplied with the drive For more information please see section 4 2 Creating An Array Fan Status Indicator This LE...

Page 14: ...e L shaped design Serial ATA connectors have a defined placement within the port to help prevent incorrect mating There is also an extrusion on the outside of the connector to help guide and align the...

Page 15: ...s determined by the smallest disk in the array and the smallest disk s capacity is applied to all of the other disks in the array So for instance if you had four disks installed ranging in capacity fr...

Page 16: ...n this configuration you must have an even number of disks so in the case of the LaCie Biggest S1S you would need to have four hard disks installed Characteristics Advantages Implemented as a mirrored...

Page 17: ...the amount of storage capacity available amongst the disks in the array while still providing data redundancy Storage capacity in a RAID level 5 configuration is the result of a mathematical expressio...

Page 18: ...of RAID 5 but with the difference being that there is one less disk in the array So for instance if there was a RAID 5 Hot Spare array with three drives of varying capacities of 40GB 50GB and 60GB and...

Page 19: ...your RAID level in this step 4 2 Creating An Array The LaCie Biggest S1S will automatically initialize the four hard disks in the unit 4 3 Connecting To A Host Computer The LaCie Biggest S1S can be co...

Page 20: ...oth the disk settings and the RAID Level Switch Selectors the LCD will display the following two alternating messages 1 RAID level Unmatched 2 Current Rx i e the current RAID level settings of the ins...

Page 21: ...LaCie Biggest S1S s power off doing so may lead to the loss of the data on the array Important Info In a RAID 5 Hot Spare array the disk in the top Drive Bay is designated as the Hot Spare the defaul...

Page 22: ...to the ON position Move switch 2 of the RAID Level Switch Selectors to the OFF position 4 Setting Up Your LaCie Biggest S1S page 22 LaCie Biggest S1S User s Manual Tech Note In a RAID 0 1 array the di...

Page 23: ...aCie Biggest S1S and a grounded electrical outlet 4 Turn on the LaCie Biggest S1S by pressing the Power Switch 5 Slide each of the Drive Bays back into the LaCie Biggest S1S and push the Drive Bay Han...

Page 24: ...ivity Indicators please see sections 5 1 Disk Status And Activity Indicators and 5 2 LCD Display Messages i i Important Info All four of the Drive Bays should be locked in place in the LaCie Biggest S...

Page 25: ...nnect the other end of the SATA cable into an available SATA port on your computer It will take a few seconds for your computer to recognize the drive and for it to appear on the desktop or in My Comp...

Page 26: ...To adjust the time and date values use the Menu button on the left side of the LCD Display to scroll through the values Press the Enter button to confirm your selection and move to the next value Star...

Page 27: ...hat all of the sectors are reliable marks bad sectors i e those that are scratched and creates internal address tables that it later uses to locate information As you format the drive you will have th...

Page 28: ...al hard drive and one that reads LaCie 5 Select the LaCie drive and then click on the Partition tab 6 From the Volume Scheme button choose the number of partitions you want to divide the drive into by...

Page 29: ...10 x will automatically setup the disk with the partitions and volume format you selected and your new drive will be available for use Tech Note Under Mac OS 10 3 x the default format setting is Mac O...

Page 30: ...r 4 From the Computer Management dialog box select Disk Management from the menu on the left hand side The LaCie Biggest S1S array will appear in the lower right section of the Disk Management dialog...

Page 31: ...the same drive Click Next 9 Select Assign drive letter and select the desired letter for the drive Click Next 10 Select Format this partition and then select the default file system NTFS 11 Click Next...

Page 32: ...h the LCD Display By using the Menu button to scroll through the messages the following information is available RAID level and capacity Disk model Disk DMA mode and capacity Firmware version Fan and...

Page 33: ...NIT Failed Dx Bad sectors New RAID array being created Initialization completed successfully Initialization failed Re create a new RAID array If the disks have been installed and a new RAID array has...

Page 34: ...ectors Rebuilding data to a new disk following a disk failure Rebuild completed successfully Rebuild failed Rebuild completed successfully The Enter button is pressed The capacity of the new disk is t...

Page 35: ...ay failed There are not enough disks for the RAID array to operate A disk is re installed The RAID array failed The sequence of the disks in the array is incorrect The current sequence is displayed wi...

Page 36: ...does not match the exisiting RAID level If you intend to initialize a new RAID array re insert four disks and create a new RAID or The LaCie Biggest S1S is shut down and the RAID Level Switch Selector...

Page 37: ...iggest S1S has completed its boot process LCD Display Message Message cleared when LACIE Initialize Disks The disks are spinning up The LaCie Biggest S1S has completed disk initialization LCD Display...

Page 38: ...And Temperature Information Disk 1 YYYYYYYYY ATA mode X xxxx GB Information about the Disk in Drive Bay 1 YYYYYYY the Disk ID The Menu button is pressed The ATA mode and capacity information about the...

Page 39: ...ograms may also be used 1 Power off the LaCie Biggest S1S 2 Connect one end of the Serial RS 232 cable to the Serial RS 232 port on the back of the LaCie Biggest S1S and the other end to a Serial RS 2...

Page 40: ...erminal connection is now established 7 Power on the LaCie Biggest S1S and press the ESC key on the host computer s keyboard The prompt will appear 8 Type in the command download 9 When the Enter 1 to...

Page 41: ...u will want to follow these guidelines Mac OS X prefers that all partitions be the same format therefore only the first FAT 32 partition is guaranteed to mount Mac OS 10 1 x Works reliably with FAT 32...

Page 42: ...ons and auditing as well as the ability to mirror drives and RAID 5 capabilities The minimum supported volume size for NTFS is 10MB with a maximum of 2TB with no limit to file size Volumes created in...

Page 43: ...e that all of the sectors are reliable marks bad sectors i e those that are scratched and creates internal address tables that it later uses to locate information Once formatted the actual available s...

Page 44: ...he device and the system at any time reducing arbitration delays associated with shared bus topologies What are the features and benefits of Serial ATA The Serial ATA specification provides several ke...

Page 45: ...rts all ATA and ATAPI devices i e CD DVD tape drives etc and delivers superior performance than both Hi Speed USB 2 0 and FireWire IEEE 1394 external Serial ATA connectors are intended for storage dev...

Page 46: ...tion You can also visit the drivers pages where the most recent software updates will be available If you need further assistance please contact your LaCie reseller or LaCie Technical Support see 11 C...

Page 47: ...data will be re built automatically to the hot spare disk You do not need to replace the failed disk immediately When adding a new disk the capacity of the new disk MUST equal or be greater than the...

Page 48: ...array In the event that the RAID level does not correspond to both the disk settings and the RAID Level Switch Selectors the LCD will display the following two alternating messages 1 RAID level Unmatc...

Page 49: ...tached If you have asked yourself all of the pertinent questions in the troubleshooting checklist and you still can t get your LaCie drive to work properly contact us via the provided Web link Before...

Page 50: ...www lacie com es support request LaCie Switzerland Contact Us At http www lacie com chfr contact LaCie USA Contact Us At http www lacie com contact LaCie Australia Contact Us At http www lacie com au...

Page 51: ...repair technician authorized by LaCie LaCie and its suppliers accept no liability for any loss of data during the use of this device or for any of the problems caused as a result LaCie will not under...

Reviews: