background image

LaCie LaCinema Classic 

Reformatting the LaCinema Classic 

User Manual 

page 35

6.2.  Mac Users

CAUTION:

 Following these steps will erase everything from 

the LaCinema Classic. If you have information that you want 
to protect or continue to use, back up this information before 
performing these steps.

IMPORTANT INFO:

 The drive should not be reformatted to a 

file system other than FAT32 or FAT16.  If the drive is formatted 
in a non-FAT32 format (such as NTFS or HFS+), files will NOT 
appear on your television screen.  This format limitation is also 
valid for storage devices connect through the LaCinema Clas-
sic’s USB expansion port on the front of the drive.  For details, 
see 

1.4. Views of the LaCinema Classic

.

1.  Connect the drive to the computer and turn on the drive.

2.  Select 

Utilities

 from the 

Go

 menu in the Finder menu bar.

3.  In the Utilities folder, double-click 

Disk Utility

.

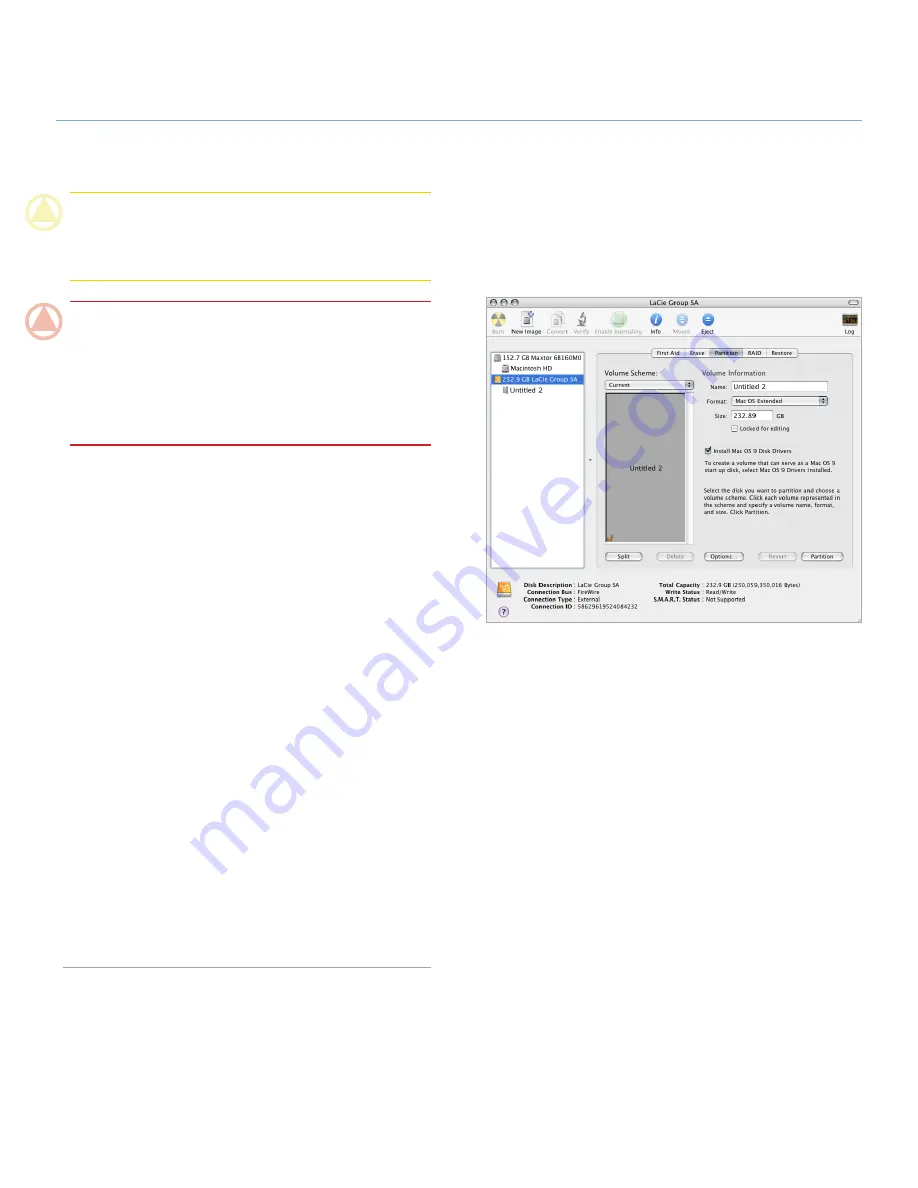
4.  The Disk Utility window will open. Select the volume labeled 

LaCie Hard Disk

 from the list of available hard disks on the 

left side of the window.

5.  Select the 

Partition

 tab.

6.  From the 

Volume Scheme:

 menu, choose the number of 

partitions you want to divide the drive into (Mac OS X gives 
you the option of dividing the drive into at most 16 parti-
tions). You can adjust the size of each partition using the 
slide bar between the partitions in the 

Volume Scheme:


area.

7.  In the 

Volume Information

 section, enter a name for each 

volume (partition), choose the volume format.

8.  Once you have finalized the volume options, click 

Parti-

tion

. Click 

Partition

 again when the alert message appears 

to continue.

9.  Mac Disk Utility will format and partition the disk according 

to your settings, and your drive will be ready to use.


Fig. 6.2

Summary of Contents for 301864EK

Page 1: ...necting the LaCinema Classic to Your TV and Stereo 14 3 1 Power Connection 14 3 2 Audio Video Connection 14 3 2 1 Composite Video Stereo Audio Cable 14 3 2 2 HDMI Video Cable 15 3 2 3 Coaxial Digital...

Page 2: ...a Classic 33 6 1 Windows Users 33 6 2 Mac Users 35 7 Technical Information 36 7 1 XviD Compatibility 36 7 2 Optimizing Data Transfers 36 8 Troubleshooting 37 8 1 Troubleshooting Mac Users 37 8 2 Troub...

Page 3: ...The devices may not cause harmful interference 2 The devices must accept any inter ference received including inter ference that may cause undesired operation NOTE This equipment has been tested and...

Page 4: ...aCinema Classic near a source of heat or exposing it to sunlight even through a window Inversely placing your LaCie LaCinema Classic in an environment that is too cold or humid may damage the unit Alw...

Page 5: ...RTANT INFO Any loss corruption or destruction of data while using a LaCie drive is the sole responsibility of the user and under no circumstances will LaCie be held liable for the recovery or restorat...

Page 6: ...or PC to transfer your movies music and photos to the LaCie LaCinema Classic Then simply connect the LaCie LaCinema Classic to your TV and use the included remote to easily navigate through the menus...

Page 7: ...dio 2 channels only For audio with more than 2 channels connect the product to a digital home receiver The audio is passed through the coaxial connection see section 3 2 3 Coaxial Digital Audio Cable...

Page 8: ...T INFO Please save your packaging In the event that the drive should need to be repaired or serviced it must be returned in its original packaging 1 3 Languages TECHNICAL NOTE Check the LaCie website...

Page 9: ...e mote control Make sure the receiver is not obstructed 2 USB expansion port Connect a USB flash disk to access its multimedia files directly from your TV The disk must be formatted in the FAT32 file...

Page 10: ...r connecting peripheral devices to a computer or to each other Hi Speed USB 2 0 is the latest implementation of this standard and it provides the neces sary bandwidth and data transfer rates to suppor...

Page 11: ...and to your computer Fig 2 1 B 3 The LaCinema Classic icon will appear on your computer on the desktop for Mac users and in the My Computer folder for Windows users after a few seconds Proceed to sec...

Page 12: ...you must empty the Trash or Recycle Bin after placing the files there Otherwise the files will still have a reference and occupy hard drive space 2 2 2 Data File Storage You can also use your LaCie L...

Page 13: ...in the lower right hand side of your screen click the Eject icon a small green arrow over a hardware image 2 A message will appear listing the devices the Eject icon controls it should say Safely remo...

Page 14: ...ideo Connection 3 2 1 Composite Video Stereo Audio Cable To connect the LaCinema Classic to TV via a stereo audio and composite video cable power on the LaCinema Classic as de scribed in section 3 1 P...

Page 15: ...via HDMI video pow er on the LaCinema Classic as described in section 3 1 Power Connection and follow the diagram below Once connected press the Gear button and select the Video menu in order to adju...

Page 16: ...2 3 Coaxial Digital Audio Cable The cable allows you to connect the LaCinema Classic to a Digi tal Audio amplifier Power on LaCinema Classic as described in section 3 1 Power Connection and follow th...

Page 17: ...e remote control Once the LaCinema is turned on and connected to the TV and the external drive is also turned on and is connected to the LaCinema the drive s multimedia files will be playable using th...

Page 18: ...he remote control uses two AAA batteries The batteries are not pre installed so you will need to install them before you can use the remote control To install the batteries 1 Remove the battery compar...

Page 19: ...revious Back to previous track 4 Volume down Adjust volume down 5 Volume up Adjust volume up 6 Stop Stop the current file playback 7 Play Select Play selected file confirm selection 8 Direction Right...

Page 20: ...nu options of the LaCie LaCinema Classic while it is connected to your TV When you first power on the LaCie LaCinema Classic the Main Menu appears From this menu you can choose from four dif ferent me...

Page 21: ...ers using the Up and Down buttons Right button to open a folder and Left to move to upper folder level To confirm your choice press the Play button A loading animation will appear while the movie is b...

Page 22: ...aced in the same directory Make sure that only one subtitle with the same file name is in the movie s folder The external subtitle will be loaded even if the movie file contains an embedded subtitle T...

Page 23: ...d in the same folder Select Play one to return to the Movies menu list at the completion of a movie or Play all to begin the next movie at the conclusion of a movie 5 1 6 Auto Bookmark If a movie has...

Page 24: ...lassic Only files recognized as music files will be displayed Movies and photo files will not be displayed To view all file types select the Browser menu You can scroll through the list of music track...

Page 25: ...y songs in continuous order 5 2 2 Repeat Set the repeat audio status Select ON to repeat the songs in the folder continuously and Off to stop playback at the end when all song in the folder have been...

Page 26: ...a Classic Only files recognized as image files will be displayed Movies and music files will not be displayed To view all file types select the Browser menu You can scroll through the list of photos a...

Page 27: ...de This function allows you to see a thumbnail of photos as you scroll through the photo menu Select either List mode to see only the file name or Thumbnail mode 5 3 2 Play mode Select Shuffle to disp...

Page 28: ...and Off to stop playback at the end when all photos in the folder have been displayed 5 3 4 JPEG Duration Sets the photo display duration Choose from Manual advanc es only with input from the remote...

Page 29: ...om External Hard Drive Follow these steps to play multimedia files located on an external hard drive on your TV using the LaCinema s USB expansion slot 1 Turn on the LaCinema and connect it to your te...

Page 30: ...aused Press the Up and Down buttons to select the desired setup then press the Play button to confirm Press the Left and Right but tons to select the submenu then press Play To select another option p...

Page 31: ...e on screen without distortion Pan Scan Automatically display the decoded image on full screen without distortion TV System PAL NTSC HD Resolution Auto default 480p 576p 720p 1080i 1080p HD Jpeg Mode...

Page 32: ...omputer and connect it to your TV 3 Go to Browser view from the main menu 4 Select the Update folder and press the Play button to open it 5 Select update bin file and press the Play button The firm wa...

Page 33: ...ing the drive These steps will erase anything that is on the disk CAUTION Following these steps will erase everything from the LaCinema Classic If you have information that you want to protect or cont...

Page 34: ...The drive should not be reformatted to a file system other than FAT 32 If the drive is formatted in a non FAT32 format such as NTFS or HFS files will NOT appear on your television screen 13 Click Fin...

Page 35: ...on the drive 2 Select Utilities from the Go menu in the Finder menu bar 3 In the Utilities folder double click Disk Utility 4 The Disk Utility window will open Select the volume labeled LaCie Hard Di...

Page 36: ...sold separately or integrated by your com puter s manufacturer and the appropriate drivers These host bus adapter cards which include one or more USB ports are shipped with special Hi Speed USB 2 0 d...

Page 37: ...er Does an icon for the drive appear on the desktop There should be an icon for the LaCie drive on the desktop If the drive does not appear follow the rest of the Troubleshooting tips to isolate the p...

Page 38: ...connected to a Hi Speed USB 2 0 port on your computer Check to see that the Hi Speed USB 2 0 drivers for both your host bus adapter and device have been installed correctly If in doubt un install the...

Page 39: ...only operate at Hi Speed USB 2 0 performance levels when it is connected directly to a Hi Speed USB 2 0 port Otherwise the Hi Speed USB 2 0 device will operate at the slower USB transfer rates For mor...

Page 40: ...ere is no picture being displayed Are all of the cables connected correctly Ensure that all of the cables are connected correctly If you are using the Composite A V cable make sure that the component...

Page 41: ...have the following information on hand Information Where to Find Information 1 LaCie hard drive serial number Located on a sticker at the back of drive or on the original packaging 3 Macintosh PC mode...

Page 42: ...lacie com fr contact LaCie Germany Contact us at http www lacie com de contact LaCie Italy Contact us at http www lacie com it contact LaCie Japan Contact us at http www lacie com jp contact LaCie Net...

Page 43: ...LaCie and its suppliers accept no liability for any loss of data during the use of this device or for any of the problems caused as a result LaCie will not under any circumstances be liable for direct...

Page 44: ...virtually all movie soundtracks Firmware Permanent or semi permanent instructions and data programmed directly into the circuitry of a programmable read only memory or an electronically erasable progr...

Reviews: