background image

LaCie 2big USB 3.0 

• 

DESIGN BY NEIL POULTON


Setup

User Manual 

page 12

Confirm

Fast

JBOD

Safe

USB 3.

0

DESIGNED BY NEIL POULTON

2.2.  Turn the Drive On

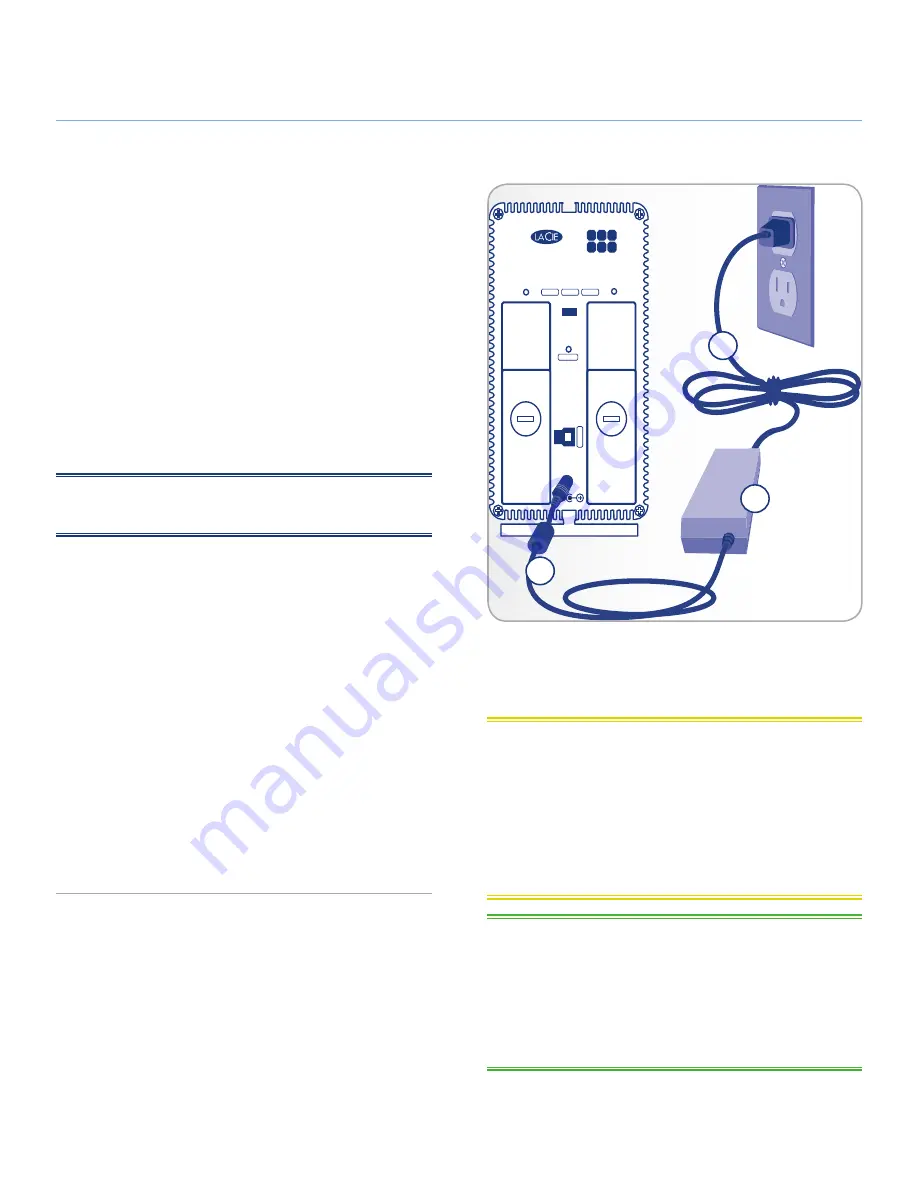
The power supply kit is composed of two cables: one cable (

A

connects to the LaCie drive; and the other cable (

B

) connects to a 

power outlet, such as a wall outlet or a surge protector.

1.  Connect Cable 

A

 to the 2big USB 3.0. 

2.  Connect Cable 

B

 to the power supply brick (

C

).

3.  Connect Cable 

B

 to a surge protector or wall outlet.

4.  The 2big USB 3.0 is in auto mode by default. It will boot 

when plugged into a USB 3.0 or USB 2.0 slot on a com-
puter that is powered on. Without a computer, push the LED 
button on the front to power on the 2big USB 3.0.

The 2big USB 3.0 may take a few seconds to boot up.

NOTE:

  Depending  on  your  country,  power  outlet  connections 

may be different from the illustration.

Auto Power and Manual Shut Off

The 2big USB 3.0 will shut off when:


it is disconnected from the computer after unmounting the 
drives (

2.3. Disconnecting Your Hard Drive


shutting down the computer while the drives are connected 
and mounted on the desktop 


performing a long push on the front LED button while the 
drives are powered on. The 2big USB 3.0 will take more 
than a few seconds to switch off when using a long push as 
it finishes writing the last action.

Your LaCie 2big USB 3.0 also conserves energy by powering off 
the LEDs and entering Eco mode automatically if the drives have 
not been used for 30 minutes. The partition(s) will remain on the 
desktop (Mac) or in My Computer (Windows) while the drives stay 
in Eco mode until the 2big USB 3.0 is accessed. 

A

B

C

Fig. 05 

CAUTION:

 Only use the AC adapter supplied with your specif-

ic LaCie device. Do not use a power supply from another LaCie 
device or another manufacturer. Using any other power cable or 
power supply may cause damage to the device and void your war-
ranty.

Always  remove  the  AC  adapter  before  transporting  your  LaCie 
drive. Failure to remove the adapter may result in damage to your 
drive and will void your warranty.

TECHNICAL NOTE:

 You may use your LaCie drive when in a 

foreign country thanks to its 100-240 Volt power supply. To be 
able to use this feature, you may need to purchase an appropriate 
adapter or cord. LaCie accepts no responsibility for any damage 
to the drive resulting from the use of an inappropriate adapter. 
Using an adapter other than one authorized by LaCie will void 
your warranty.

Summary of Contents for 301534

Page 1: ...RAID Modes 14 3 1 1 RAID 0 FAST High performance 14 3 1 2 JBOD Just a bunch of disks 15 3 1 3 RAID 1 SAFE Data protection 16 3 2 Changing the RAID Mode 17 3 3 Removing and Installing Drives 19 3 4 Fo...

Page 2: ...protec tion against harmful interference in a residential installation This equipment generates uses and can radiate radio frequency energy and if not installed and used in accordance with the instruc...

Page 3: ...f lightning or if it will be unused for an extended period of time Otherwise there is an in creased risk of electrical shock short circuiting or fire Use only the power supply shipped with the device...

Page 4: ...anding programs such as video editing or graphics you may choose RAID 0 FAST If data backup is important RAID 1 SAFE will keep a copy of each file on the 2big s two disks Providing greater integrity a...

Page 5: ...tes the LaCie 2big USB 3 0 must be connected to a USB 3 0 port If your computer does not have a USB 3 0 port you may add a USB 3 0 PCI Express card desktop computer or a USB 3 0 ExpressCard 34 portabl...

Page 6: ...2 SuperSpeed USB 3 0 cable compatible with USB 2 0 3 Power supply kit 4 LaCie Utilities CD ROM 5 Quick Install Guide 6 2 in 1 RAID modification and drive removal tool IMPORTANT INFO Please save your p...

Page 7: ...Front View The blue LED A on the front of the LaCie 2big USB 3 0 serves as a status indicator for the RAID and an on off button see Auto Power and Manual Shut Off for more information on the auto pow...

Page 8: ...7 RAID selection switch CAUTION To avoid overheating the LaCie 2big USB 3 0 should be installed in a well ventilated area and in such a way as to main tain sufficient airflow across the controller chi...

Page 9: ...peed USB 3 0 port up to 5 Gb s The cable is also backward compatible to accommodate Hi Speed USB 2 0 ports up to 480 Mb s TECHNICAL NOTE The USB 3 0 interface may require addi tional drivers to operat...

Page 10: ...3 0 Follow the steps below to power on and configure your 2big USB 3 0 2 Setting Up Your LaCie 2big USB 3 0 Step 1 2 1 Connect the Interface Cable Step 2 2 2 Turn the Drive On Step 3 3 4 Formatting an...

Page 11: ...end of the interface cable into the corresponding port USB 3 0 or USB 2 0 on your host computer 2 Connect the other end of the cable to the matching port on the 2big USB 3 0 2 1 Connect the Interface...

Page 12: ...ng push on the front LED button while the drives are powered on The 2big USB 3 0 will take more than a few seconds to switch off when using a long push as it finishes writing the last action Your LaCi...

Page 13: ...Mass Storage Device device can now be safely removed from the system It is now safe to disconnect the device Windows Vista Windows 7 Users From the System Tray located in the lower right hand side of...

Page 14: ...the computer In the event that one disk in the array fails all the files become inaccessible because parts of each string of data have been writ ten to all the disks See Fig 10 Applications RAID 0 is...

Page 15: ...ntage of JBOD is the use of the full capacity of both drives Also in the event of a single drive failure files stored on the healthy drive are not lost However this con figuration offers none of the b...

Page 16: ...mmediately on the second disk No data is lost if one disk fails Applications Maximum data safety RAID 1 reduces the total available capacity by 50 because two copies of the data are saved Disk 1 Disk...

Page 17: ...a switch inside the slot used for selecting the level of RAID Left RAID 0 FAST Center JBOD Right RAID 1 SAFE The RAID confirmation button is below the RAID selection switch a small circular slot with...

Page 18: ...ging the RAID mode See section 3 4 Formatting and Par titioning CAUTION Disk drives must be inserted correctly in the 2big USB 3 0 before changing the RAID level TECHNICAL NOTE The drive status LEDs o...

Page 19: ...The 2big USB 3 0 may stay on while removing the disk 1 The drive tray may be locked To unlock it insert the round end of the provided 2 in 1 tool into the slot on the drive lock and turn the lock unt...

Page 20: ...the grooves are vertically oriented The drives are locked when both locks are vertical TECHNICAL NOTE Data is still accessible during a RAID 1 rebuild The 2big USB 3 0 can be disconnected from the wo...

Page 21: ...s than 1MB all the way to 2TB It is the native file system of Windows 98 and Windows Me and is supported by Windows XP Windows Vista and Windows 7 When FAT 32 is used with Windows XP Windows Vista and...

Page 22: ...not limited by block size MS DOS File System FAT 32 This is the Microsoft file system more typically known as FAT 32 Use this file system if you are going to move your LaCie hard disk drive between Ma...

Page 23: ...sions and Windows 7 32 and 64 bit versions recognize volumes greater than 2TB but the disks must be con verted to the GPT file system 1 Connect the drive to the power source and to the computer via th...

Page 24: ...drive letter or mount path Fig 20 Click Next 11 Select the file format for the disk FAT32 will only appear as an option if the partion is 32GB or less see 3 4 1 File System Formats Once FAT32 or NTFS...

Page 25: ...s Fig 22 To make a change select Back 13 Your drive s partition s should have a Healthy status in the list of drives in Disk Management Fig 23 You will also see the drive s partition s in My Computer...

Page 26: ...s XP 32 bit Switching from MBR to GPT or conversely from GPT to MBR is not difficult Please copy all important data to a separate disk before making the change since adjusting the partition table form...

Page 27: ...te volumes also known as partitions You can choose to create a single partition or many Type the size of the partition you want to create in megabytes MB For example a 100GB gigabyte parti tion is 100...

Page 28: ...tition If the parti tion size is 32GB or less the choices will include NTFS and FAT32 Once the format is selected you may check Perform a quick format which allows for a much faster format While Disk...

Page 29: ...m overcomes many of the limitations of FAT32 In addition to Win dows Vista SP1 and Windows 7 the exFAT file system can work on Windows XP SP2 with a special driver Mac OS support is question able whic...

Page 30: ...L NOTE LaCie suggests using the Mac OS Extended format since it may provide a more familiar experience to Macin tosh users CAUTION Following these steps will erase everything from the 2big USB 3 0 Bac...

Page 31: ...the volume Format pull down list Fig 35 7b select one of the following Mac formats Mac OS Extended Journaled Mac OS Extended Mac OS Extended Case sensitive Journaled Mac OS Extend ed Case sensitive o...

Page 32: ...our specific problem You can also visit the drivers pages where the most recent software updates are available If you need further assistance please contact your LaCie reseller or LaCie Technical Supp...

Page 33: ...e LEDs of functional disks become solid blue when initialized RAID 1 only Rebuild Blinking blue Off All The hard drives have been idle for over 30 minutes Blinking blue and red Strong blue RAID 1 JBOD...

Page 34: ...rt your computer and try again Make sure your computer meets the minimum system requirements for compatibility with the 2big USB 3 0 See section 1 1 Minimum System Requirements for more information Ch...

Page 35: ...nd that you have the following information on hand Information Where to Find Information 1 LaCie hard drive serial number Located on a sticker at the back of drive or on the original packaging 3 Macin...

Page 36: ...www lacie com ie contact LaCie Italy http www lacie com it contact Japan Elecom CO LTD http www lacie jp LaCie Korea http www lacie com kr contact LaCie Latin America http www lacie com la contact LaC...

Page 37: ...en One or two of the hard disks have been removed and re placed by any hard disk other than a drive provided by La Cie For drive removal replacement process see section 3 3 Removing and Installing Dri...

Reviews: