background image

LaCie 

rugged

 SAFE


• D

esign


by

 n

eil

 P

oulton


Using Your Rugged Safe 

User Manual 

page 30

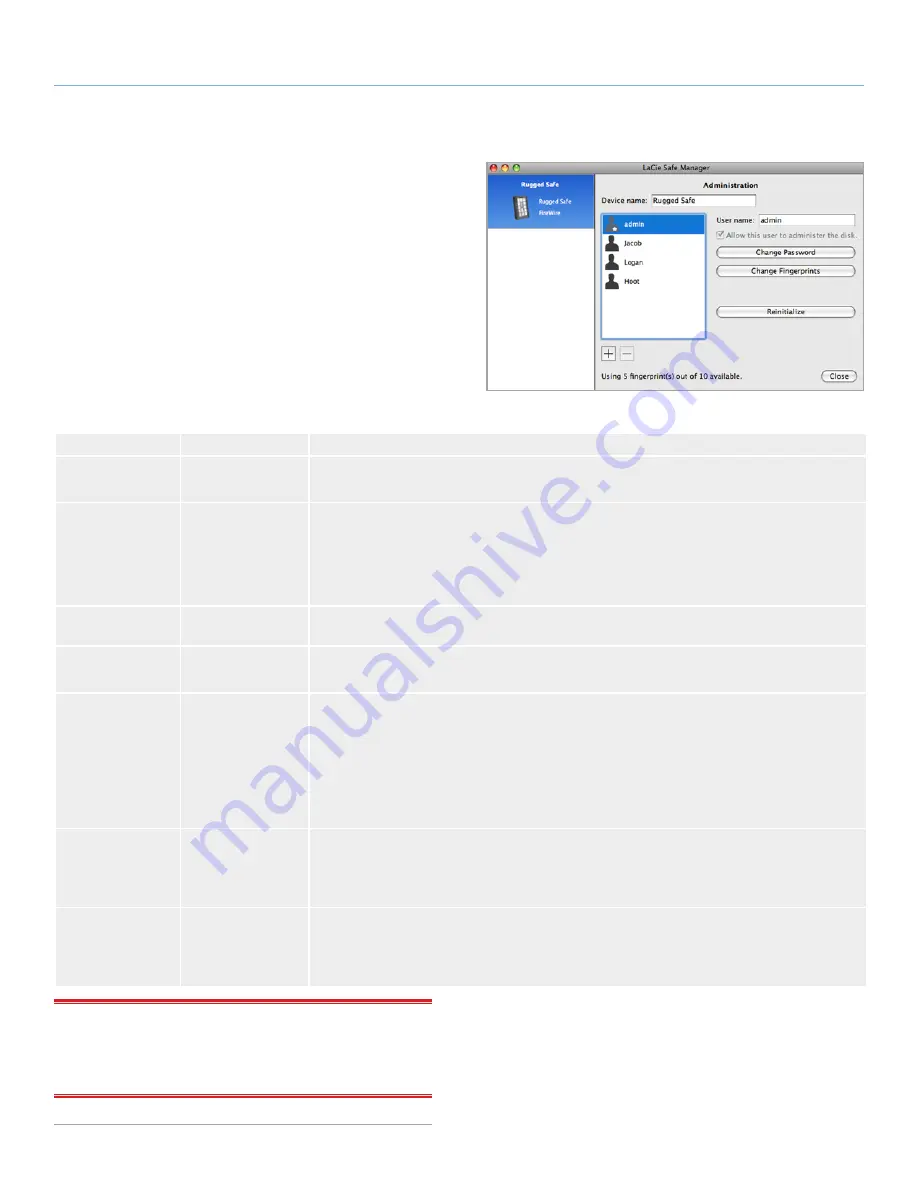
5.2.2.  Administration Page

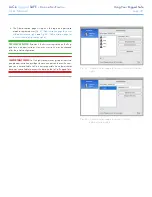
Fig. 39

 shows the Administration page when viewed with adminis-

tration rights. See 

Fig. 38 - Administration page for a user without 

administration rights

 for an example of a user’s Administration page. 

The following table offers brief descriptions of each administration 
option and who has access (all users/administrator(s)):


Option

Access

Description

Device name

All users


The default name is “Rugged Safe” but all users have the right to change it at any time. 


Please note that this is not the name of the partition.

User name

Administrator(s)


Clicking on one of the user names allows an administrator to change any of the login names. 


For example, if an administrator wanted to change the default (“admin”) for the first reg-
istered user to his own first name. Similarly, an administrator can select another user and 
change the name. 


Only an administrator can change User names.

Allow this user to 
administer the disk

Administrator(s)


Only an administrator may grant administrator rights to a user. See 

5.2.3. Granting Admin-

istration Rights (Administrator only)

 for more information.

Change Password

All users


A user may change his own password.


An administrator may change the passwords for all users.

Change Fingerprints All users


Each user or administrator may only change his own fingerprints. An administrator may not 
change the fingerprints of another user. The steps to modifying or add fingerprints are similar 
to 

4.2. Step 2: Registering the First User’s Fingerprint


Fingerprints may only be added if the ten fingerprint limit has not been met. For example,  

Fig. 39 

includes a note on the bottom of the page that reads, “Using 5 fingerprint(s) out of 

10 available”. This means that five more fingerprints may be registered. 


Users may also remove registered fingerprints.

Reinitialize

Administrator(s)


Reinitializing the Rugged Safe will delete all data and all user information. No files, docu-
ments, or media stored on the data partition will remain. New users and administrators must 
be created after reinitializing the device. See 

5.2.5. Reinitialize the Drive (Administrator only)


The Utilities partition will be available after Reinitializing the Rugged Safe.

+ & -

Administrator(s)


Click the “+” to add a user. The steps to adding a new user are similar to 

4.1. Step 1: Reg-

istering the First User

.


Select a user and click on the “-” to remove him. See 

5.2.4. Removing Users (Administrator 

only)

.

IMPORTANT INFO:

  Once the LaCie Rugged Safe has registered 

ten  fingerprints,  the  button  to  create  additional  imprints  (the  “+” 
sign) will turn grey. You must subtract existing fingerprints to include 
new users.  

Fig. 39 

Summary of Contents for 301490

Page 1: ...aring Cable USB 16 3 4 Install and Run LaCie Safe Manager Software 17 3 4 1 Windows Users 17 3 4 2 Mac Users 18 3 5 Disconnecting Your Hard Drive 19 3 6 Switching Interfaces 19 4 Setting Up Your LaCie...

Page 2: ...Users 37 6 2 3 Mac Users 41 7 Frequently Asked Questions FAQ 43 8 Troubleshooting 45 8 1 Troubleshooting the Hard Drive 45 8 1 1 Mac Users 45 8 1 2 Windows Users 47 8 2 Troubleshooting the Fingerprin...

Page 3: ...OTE This equipment has been tested and found to comply with the limits for a Class B digital device pursuant to Part 15 of the FCC Rules These limits are designed to provide reasonable protection agai...

Page 4: ...ing 10 of the nominal transient over voltages according to over voltage category II General Use Precautions Do not expose the LaCie Rugged Safe to temperatures outside the range of 5 C to 35 C 41 F to...

Page 5: ...that easily manages fingerprint recognition and password protection A software wizard guides the administrator of the LaCie Rugged Safe through the in stallation process The LaCie Rugged Safe also saf...

Page 6: ...for a fan Its unique design draws heat away from the internal drive toward the external casing The internal drive is kept safe prolonging its life and reliability As a consequence it is normal that t...

Page 7: ...FireWire 800 cable 4 FireWire 400 to 800 6 pin to 9 pin adapter cable 5 Power sharing cable 6 Quick Install Guide IMPORTANT INFO Please save your packaging In the event that the drive should need to...

Page 8: ...est versions of Microsoft Win dows XP Windows Vista or Windows 7 FireWire 400 FireWire 800 and or USB 2 0 Minimum of 600MB recommended The latest versions of Apple OS 10 5 x or 10 6 x FireWire 400 Fir...

Page 9: ...for more information 2 Drive Mode LED This LED indicates the drive mode See the table below for details 1 5 2 Drive Mode LED Behavior When the LED is The drive is Blinking Red Locked waiting for fing...

Page 10: ...e will also work when connected to a USB 1 1 port but drive performance will be limited to USB 1 1 transfer rates Fig 04 USB Cable Ends 1 6 2 FireWire Connections FireWire also known as IEEE 1394 is a...

Page 11: ...the sensor surface The tip of your finger should touch the top edge of the metal groove and the sensor Slowly slide your finger over the sensor when you register a finger or authorize access Fig 07 I...

Page 12: ...ilable all the time Please note that LaCie is not liable if one or more administrators are no longer available and access to your Rugged Safe is blocked For more on administrator privileges see sectio...

Page 13: ...he steps in section 3 6 Switching Interfaces TECHNICAL NOTE Upon completing the first registration process you are offered the choice of formatting your LaCie Rugged Safe in FAT32 MS DOS If you plan t...

Page 14: ...an available interface port on your computer Fig 08 2 Connect the other end of the cable USB 2 0 or FireWire 800 to the interface port on the back of the Rugged Safe 3 If the drive is using the USB i...

Page 15: ...le to an available FireWire 800 port on the LaCie Rugged Safe To attach a FireWire 400 peripheral a Connect the FireWire 400 end of a FireWire 400 to FireWire 800 cable into an available FireWire 400...

Page 16: ...computer will not provide enough power to the LaCie Rugged Safe To provide ad ditional power to the Rugged Safe attach the included USB power sharing cable to the drive from your computer 1 Attach th...

Page 17: ...ta or Windows 7 workstation the AutoPlay window may offer a prompt to open folders on the partition See Step 1 to select the folder 1 Run the LaCie Safe Manager installer from the LaCie Utilities part...

Page 18: ...begin see Fig 12 Follow the installation prompts to continue 4 Enter your computer s Administrator password when asked 5 Select Continue Installation when a prompt informs you that a restart is requi...

Page 19: ...essage The USB Mass Storage Device device can now be safely removed from the sys tem It is now safe to disconnect the device Windows Vista Windows 7 Users From the System Tray located in the lower rig...

Page 20: ...ers In the task bar right click the LaCie Safe Manager icon and select Open LaCie Safe Manager Fig 19 Fig 20 Select Start Programs LaCie Safe Manager Mac Users In the menu bar click on the LaCie Safe...

Page 21: ...t 2 Enter a login name and a password Fig 23 You may enter letters no accents and case sensitive and numbers For greater security do not use a password that has relevance or familiarity with a large g...

Page 22: ...ipe the same finger a second and third time for confirmation Fig 26 IMPORTANT INFO LaCie Safe Manager can register a maxi mum of ten fingerprints and each user may register more than one fingerprint F...

Page 23: ...ating system s disk utility to format the Rugged Safe will not destroy or erase the fingerprint se curity that you have recorded However LaCie strongly recommends against formatting your Rugged Safe w...

Page 24: ...use your LaCie Rugged Safe drive once you have successfully registered at least one user Connect the drive to begin storing and accessing data see section 3 Connecting Your LaCie Rugged Safe for more...

Page 25: ...dministration window 4 To unlock the drive you may choose to Enter a password Click the option on the right Click here to unlock your device and access data Fig 30 After typ ing your login and passwor...

Page 26: ...r the LED will blink red 3 Place a registered finger flat in the recess of the fingerprint sen sor Make sure the top of your finger touches the top of the recess and slide it down slowly 4 If the fing...

Page 27: ...The drive icon will disappear and the LED will blink red indicating the device is locked IMPORTANT INFO Mac users will generate a Device Removal error when swiping a registered finger before unmounti...

Page 28: ...king changes on the Administration page 1 Windows Users If it is not open launch LaCie Safe Manager from the Start menu or click on the LaCie Safe Manager icon in the system tray to select Open LaCie...

Page 29: ...for a user with administration rights and Fig 38 Administration page for a user without administration rights TECHNICAL NOTE By default the first user registered on the Rug ged Safe is an administrat...

Page 30: ...rd An administrator may change the passwords for all users Change Fingerprints All users Each user or administrator may only change his own fingerprints An administrator may not change the fingerprint...

Page 31: ...is not responsible if an administrator becomes unavailable to access the data on the LaCie Rugged Safe 5 2 4 Removing Users Administrator only To remove a user 1 Select the user s name from the user l...

Page 32: ...Rugged Safe User Manual page 32 5 3 LaCie Safe Manager Launch Preferences To make adjustments on how LaCie Safe Manager launches select the Rugged Safe icon in the menu bar Mac or right click in the s...

Page 33: ...data partition 6 1 One Partition for the Rugged Safe Please note that LaCie does not support using the Rugged Safe with more than one partition Dividing the Rugged Safe into more than one partition ma...

Page 34: ...rive 1 Connect the drive to the computer via the interface port 2 Right click My Computer and select Manage 3 From the Computer Management window select Disk Man agement located below the Storage grou...

Page 35: ...on for the Rugged Safe for further information 10 Assign a drive letter or mount path Fig 49 Click Next 11 Select the file format for the disk FAT32 will only appear as an option if the partition is 3...

Page 36: ...ars listing your choices If all seems well click Finish to begin the format process Fig 51 To make a change select Back 13 Your drive s partition should have a Healthy status in the list of drives in...

Page 37: ...Windows XP 32 bit Switching from MBR to GPT or conversely from GPT to MBR is not difficult Please copy all important data to a separate disk be fore making the change since adjusting the partition ta...

Page 38: ...partition or many Type the size of the partition you want to create in megabytes MB For example a 100GB gigabyte partition is 100000MB If you want to create a FAT32 partition the size cannot exceed 3...

Page 39: ...rmat for the partition If the partition size is 32GB or less the choices will include NTFS and FAT32 Once the format is selected you may check Perform a quick format which allows for a much faster for...

Page 40: ...overcomes many of the limitations of FAT32 In addition to Windows Vista SP1 and Windows 7 the exFAT file system can work on Windows XP SP2 with a special driver Mac OS support is questionable which li...

Page 41: ...Formatting Your LaCie Rugged Safe CAUTION Following these steps will erase everything from the hard drive Back up all data that you want to protect or continue to use before you format the disk drive...

Page 42: ...Scheme so that a name can be entered in the Volume Information sec tion Fig 64 7a From the volume Format pull down list Fig 64 7b select one of the following Mac formats Mac OS Extended Journaled Mac...

Page 43: ...consult section 8 2 Troubleshooting the Fingerprint Sensor for more suggestions How can an administrator be changed An administrator can be changed on the LaCie Safe Manager Administration page 5 2 Ma...

Page 44: ...in the event that you have to return the Rugged Safe What happens if the administrator is not available LaCie highly recommends giving at least two people Administration privileges in case one per son...

Page 45: ...Cie Rugged Safe Are the USB and or FireWire drivers installed correctly and enabled Open Apple System Profiler and click on the Devices and Volumes tab If your device is not listed recheck the cables...

Page 46: ...ot being used Did you get an error message telling you that the drive has been disconnected when coming out of sleep mode Simply ignore this message The drive will remount to the desktop LaCie drives...

Page 47: ...e Rugged Safe Are both ends of the FireWire or USB cables firmly attached Check both ends of the FireWire or USB cables and make sure that they are fully seated in their respective ports Disconnect th...

Page 48: ...ireWire devices to see if the drive s performance increases The drive is not run ning noticeably faster when connected via Hi Speed USB 2 0 Is the drive connected to a USB port on your computer or to...

Page 49: ...aCie Technical Support See section 9 Contacting Customer Sup port for details If you are having problems with your LaCie Rugged Safe see section 8 Troubleshooting Try one or all of the following if yo...

Page 50: ...Where to Find Information LaCie Rugged Safe serial number Located on a sticker at the back of drive or on the original packaging LaCie Rugged Safe file format Mac users Select the Rugged Safe icon on...

Page 51: ...www lacie com ie contact LaCie Italy http www lacie com it contact Japan Elecom CO LTD http www lacie jp LaCie Korea http www lacie com kr contact LaCie Latin America http www lacie com la contact LaC...

Page 52: ...its suppliers accept no liability for any loss of data during the use of this device or for any of the problems caused as a result LaCie will not under any circumstances be liable for direct special...

Reviews: