background image

LaCie 12big rack network 

Introduction/Installation

Quick Install Guide 

page 3

•The rack when configured with the units must meet the safety 
requirements of UL 60950-1 and IEC 60950-1.

Warning:

 Bifurcated power cords must NOT be used with the 

12big rack network.

ESD Precautions

1.3. 

It  is  recommended  that  you  fit  and  check  a  suitable  anti-static 
wrist or ankle strap and observe all conventional ESD precautions 
when handling plug-in modules and components. Avoid contact 
with backplane components and module connectors, etc.

Installation

2. 

Installation

2.1. 

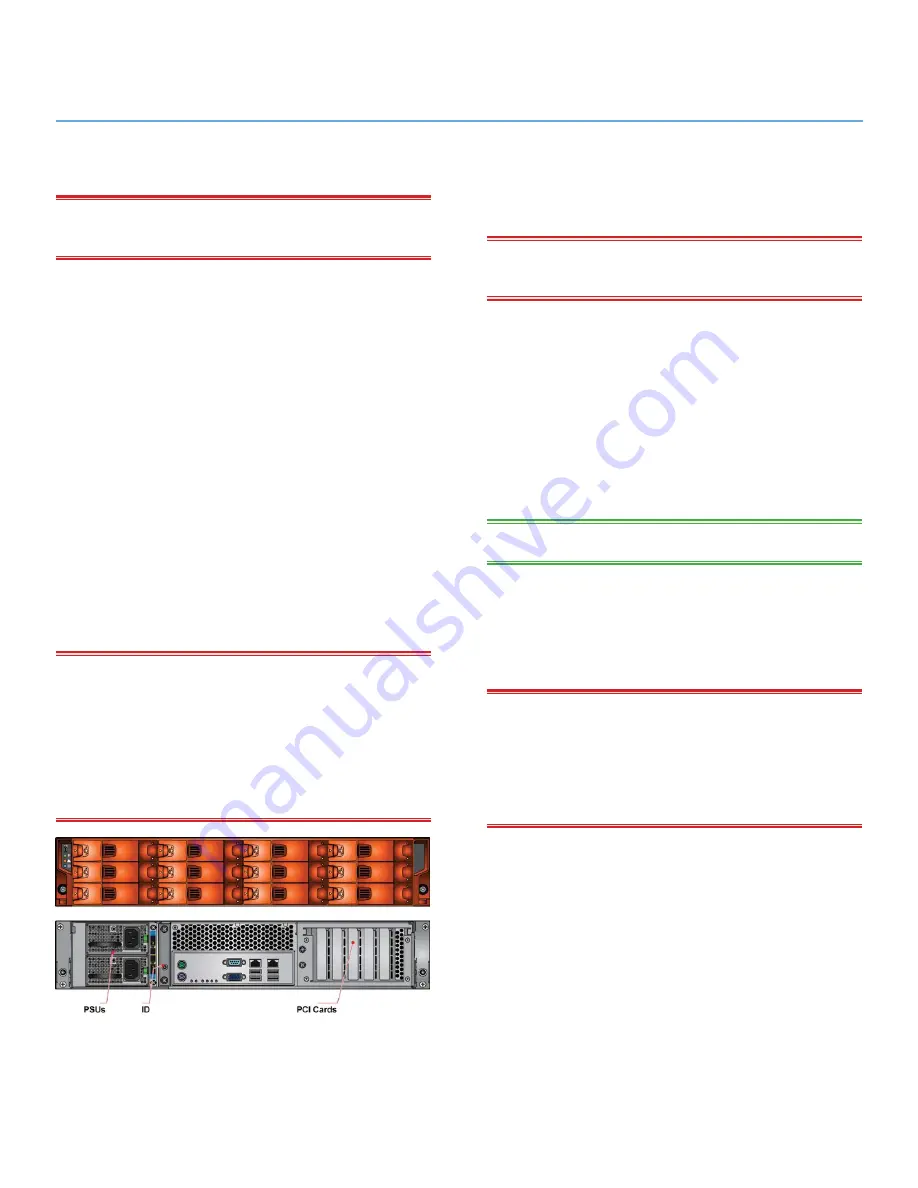
Fit the modules into the bays defined in 

Figure 1.

Warning:

 The removal of the enclosure top cover or a PSU 

module must only be performed by service personnel. Potential 
hazards include: 
• Rotating fans 
• Hot surfaces 
The screws or latches securing the enclosure top cover and PSU  
modules must be firmly tightened to prevent unauthorized access to 
those areas.

Fitting PSU’s

2.2. 

Two PSUs are installed in the mounting cage at the rear of the 
enclosure.

Warning:

 Do not remove covers from the PSU. Danger of electric 

shock inside. Return the PSU to your supplier for repair.

Check for damage, especially to the rear connector 

1. 

on the PSU.

Handle the PSU carefully and avoid damaging the  

2. 

connector pins. Do not install the PSU if any pins  
appear to be bent.

Slide the PSU into the mounting cage.

3. 

Push firmly until a click is heard as the securing  

4. 

spring engages.

note:

 This module must only be removed by service personnel.

You are now ready to connect the power supply cords 

5. 

to the power sources and switch the power supply ON.

Removing PSU’s

2.3. 

Warning:

 Prior to removing the PSU from the mounting cage, 

please  disconnect  the  power  from  the  power  supply,  by  either 
the  switch  (where  present)  or  by  physically  removing  the  power 
source, to ensure your system has warning of an imminent power 
shutdown. Do not remove the faulty PSU unless you have a replace-
ment ready for insertion.

Figure 1: Module Locations

Summary of Contents for 12big Rack Fibre 8

Page 1: ...Precautions 3 2 Installation 3 2 1 Installation 3 2 2 Fitting PSU s 3 2 3 Removing PSU s 3 4 2 4 Replacing a Fan 4 2 5 Battery Safety 5 2 6 Fitting Drives 5 2 7 Operator Panel 5 3 Creating the RAID A...

Page 2: ...of electric shock inside Return the PSU to your supplier for repair Caution The RJ45 sockets on the motherboard PCI cards are for Ethernet connection only and must not be connected to a telecommunica...

Page 3: ...nauthorized access to those areas Fitting PSU s 2 2 Two PSUs are installed in the mounting cage at the rear of the enclosure Warning Do not remove covers from the PSU Danger of electric shock inside R...

Page 4: ...ect the power supply cord 2 Squeeze retaining handle to the left to release 3 Grip the handle and withdraw the PSU 4 Grip the faulty Fan module with finger and thumb 2 and pull it upwards in order to...

Page 5: ...re operating the unit Dummy drive carrier modules are available for fitting to unused drive bays Release the carrier handle by pressing the latch in 1 the handle towards the right and insert the carri...

Page 6: ...ill appear 3 Click the Configure network button Create a RAID protected 3 2 disk array Verify that a local area connection with the heading 4 LaCie is established Click on the 1 Configure the raid for...

Page 7: ...k the Write Cache button f Click the OK button The new array is now available and will be listed under Unit Maintenance g The RAID protected disk array is now set up You can close the window or keep i...

Page 8: ...ow the disk capacity will be printed Healthy Primary Partition The logical volume is now mounted and should 12 appear in Windows Explorer 3 4 Share the volume From the Start Menu select 1 Server Manag...

Page 9: ...for the SMB and NFS share and click 6 Next Enter a description optional and click 7 Next Set SMB permissions and click 8 Next Set NFS Permissions 9 Click 10 Next Click 11 Next Click 12 Next Click 13...

Reviews: