background image

Chapter 5: Maintaining Your Washer


Product Service 1-800-522-7658 

36 

5.


When the washer fills the second time, open the washer and add two cups of 
4-8% acetic acid (or white vinegar) to the bottom of the tank. 

6.


Close the washer door and allow the unit to wash and drain without further 
interruption. 

Maintaining the Air Gap in Drain 

If the installation included an air gap (recommended) it requires periodic cleaning.  
The air gap is not part of the washer; therefore, it is not covered by the washer 
warranty.  The air gap protects the washer against water backing up in the event 
of a clogged drain.  Check the air gap for build-up any time your washer is not 
draining well. 
 
Most types of air gaps are easy to clean.  Simply follow the manufacturer’s 
directions for maintaining your air gap. 

Maintaining the Water Fill Valve


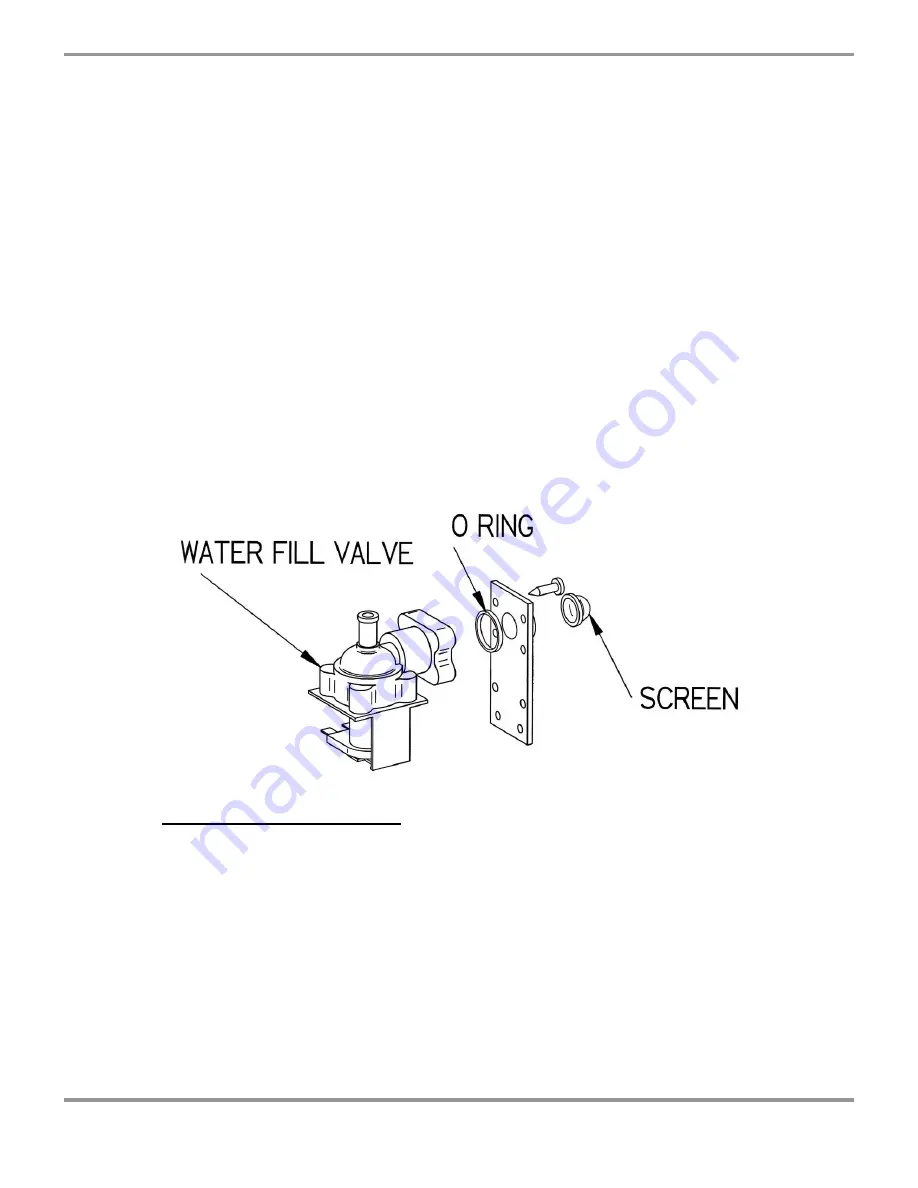
The filter screen of the water fill valve, illustrated below, may require periodic 
cleaning to remove trapped particles.  A low water fill occurs if the blockage is 
not removed. 


To clean the water fill valve: 

 
1.


Turn off the water and electrical power to the washer. 

2.


Remove the rear panel. 

3.


Disconnect the water supply tube that is connected to the valve. 

4.


Remove the valve from the base. 

5.


Remove the four screws from the valve plate and separate the valve from the 
inlet connection. 

6.


Remove the valve filter screen and clean it under running water. 

7.


Replace the screen and reassemble the valve connection.  Be certain the O-ring 
gasket is positioned in the groove in the fill valve body. 

Summary of Contents for FlaskScrubber Vantage Series

Page 1: ...sas City MO 64132 2696 800 821 5525 816 333 8811 FAX 816 363 0130 E MAIL labconco labconco com HOME PAGE www labconco com User s Manual Please read the User s Manual before operating the equipment To...

Page 2: ...00 a m and 6 00 p m Central Standard Time Part 4593300 Rev C ECO E867 Warranty Labconco provides a warranty on all parts and factory workmanship The warranty includes areas of defective material and w...

Page 3: ...the Leveling Feet 8 Leveling the Washer 9 Centering the Washer Door 10 Connecting the Water Services 10 Connecting the Hot Water Supply 10 Connecting the Purified Water Supply 11 Connecting the Drain...

Page 4: ...n 38 Replacing the HEPA Filter 39 Maintaining the Conductivity Sensor 40 CHAPTER 6 MODIFYING YOUR WASHER 41 Installing the Optional Upper Spindle Rack 41 Removing the Optional Upper Rack 43 Adjusting...

Page 5: ...s and complies with NSF ANSI 3 standards for sanitization You can select pre programmed wash cycles or program customized wash cycles to meet your requirements The Glassware Washer graphic display pro...

Page 6: ...00 522 7658 2 Throughout this manual potentially hazardous conditions are identified using the following words and symbols It is important that you understand the warnings listed throughout this manua...

Page 7: ...o be greater than 120 F 49 C to fully activate powdered detergents and raise the glassware temperature to achieve fast and complete drying Hotter water will produce better washing results Water pressu...

Page 8: ...of a wash cycle but instead is produced concurrently with the wash cycle the production rate must permit at least 0 9 gallon 3 4 liters per minute to be delivered to the washer Electrical Requirements...

Page 9: ...uct Service 1 800 522 7658 5 Space Requirements If your Glassware Washer will be installed undercounter you must ensure the undercounter opening is the proper size to accommodate the washer The dimens...

Page 10: ...You may need common plumbing and electrical installation tools in addition to a 9 16 wrench a flat blade screwdriver a Phillips screwdriver and a carpenter level to complete the instructions in this...

Page 11: ...s will not be accepted If your Glassware Washer was damaged in transit you must file a claim directly with the freight carrier Labconco Corporation and its dealers are not responsible for shipping dam...

Page 12: ...wraps and remove racks 2 Gently place the washer on its back positioning the washer on the shipping carton or other cushioning material 3 Remove the four screws fastening the skid to the washer 4 Reta...

Page 13: ...asher After you have installed the leveling feet level the washer by adjusting the leveling feet 1 Position the washer in its final installed location 2 Place a carpenter level on the washer in the po...

Page 14: ...right front corner of the washer If the door hits the left side of the tank raise the left front corner of the washer Connecting the Water Services A hot water supply must be attached to your Glasswa...

Page 15: ...lines for your purified water supply source prior to connecting the washer to the water lines The valve to which the purified water supply must be connected is located on the back of the washer base T...

Page 16: ...the top or the bottom of the carboy as illustrated in the following figures If the purified water supply feeds directly from the carboy top make certain the hose is submerged under the water line Att...

Page 17: ...stalled at the factory The hose provides a flexible coupling to the drain piping and can be secured with a spring or band hose clamp A band hose clamp is provided with your washer Tubing or pipe 75 1...

Page 18: ...rain without using an air gap the highest point of the drain pipe must be above the highest water level in the sink as shown below If you route the drain piping to a sink drain and use an air gap refe...

Page 19: ...your washer to the appropriate power source Be certain that you check and conform to all local electrical codes Do not disturb any internal wiring in the washer If you are connecting to certain legs o...

Page 20: ...pply 1 Remove the lower panel on the washer front by removing the two screws located at the bottom of the panel 2 Remove 2 screws on each side of the middle panel 3 Pull the middle panel forward and r...

Page 21: ...ng a computer or a stand alone printer See RS 232 Computer Connection in Chapter 4 If the Glassware Washer will be installed under a counter the cable that connects the Glassware Washer to the compute...

Page 22: ...ctive when the washer was shipped 12 Press RUN to save all settings Testing Your Washer Now that you have made the required water and electrical connections to your washer a series of diagnostic steps...

Page 23: ...the or button to energize the detergent cup Within about 1 minute the detergent cup door should be heard to open 10 Press the button and the arrow on the display will point to HEATER 11 Press either t...

Page 24: ...supply tubing must be purged of air If this is not done a wash cycle may be run with insufficient detergent or neutralizing acid rinse When refilling the containers follow this same procedure except...

Page 25: ...nd neutralizing acid rinse Method 1 Run a wash cycle with no glassware in the washer Set the detergent dispense rate to 30 ml and the rinse aid dispense to 6 ml Method 2 Run a diagnostics test When th...

Page 26: ...ack The FlaskScrubber Vantage Glassware Washer is equipped with a lower spindle rack and glassware holders The FlaskScrubber spindle rack is designed for narrow necked glassware such as volumetric fla...

Page 27: ...2 The holder may be raised or lowered by squeezing the spring clip on the bottom of the holder and then sliding the holder up or down 3 For best results do not allow the glassware to rest directly on...

Page 28: ...cle The detergent dispenser opens during the second wash cycle except when the Plastic cycle is selected which has only one wash cycle If your glassware is heavily soiled you may want to add powder de...

Page 29: ...ergent particularly with softened water may cause etching of the glassware This appears as a permanent cloudy film on the glassware Fill the main detergent cavity three fourths full if the water hardn...

Page 30: ...lds approximately 170 ml and should be checked and replenished as needed To fill the neutralizing acid dispenser refer to Figure 4 4 and follow the instructions below To fill the neutralizing acid dis...

Page 31: ...s performed all inputs entered by the user will be erased and the programs shipped with the washer will be reinstated It is possible to customize the following program parameters Wash 2 temperature Wa...

Page 32: ...If modifications to the program are necessary or you want to see the parameters that are entered into the program press DISPLAY and the elements in the program that may be altered will be displayed 7...

Page 33: ...se occurrences and provide an alarm to alert the operator Information is shown on the display to identify the alarm situation The following messages may be displayed Certain alarm situations are signa...

Page 34: ...ain operation Operation of the washer is canceled The alarm is canceled by opening the door LOW TEMP This displays if the water does not reach the set point temperature within 135 minutes Operation of...

Page 35: ...Sec Mode Temp Cond Temp Factor Cond Wash Cycle Indicator Alarm 12 20 WASH 2 26 5 26 5 536 10 LW Columns 1 5 12 20 Shows the time since washer was powered on Columns 7 12 Wash 2 Shows the cycle segment...

Page 36: ...pply catalog regarding the latest software available The following describes how to use an IBM compatible computer with Hyper Terminal software included with Windows 95 98 2000 operating systems to co...

Page 37: ...e box will open Using the down arrow selection button select the communication port to which the cable has been connected Press OK 5 Depending on the COM port selected COM1 COM2 COM3 or COM4 the Com X...

Page 38: ...ite for distributors http www seikoprinters com htm salesreps htm To connect to the Labconco RS 232 connector use a 6 wire telephone cable connection such as a Radio Shack 279 422 Simply insert one en...

Page 39: ...sidue that occur during loading Use a sponge sprinkled with non abrasive stainless steel cleaner to gently wipe the washer tank and door to remove surface discoloration caused by exposure to halogenat...

Page 40: ...t draining well Most types of air gaps are easy to clean Simply follow the manufacturer s directions for maintaining your air gap Maintaining the Water Fill Valve The filter screen of the water fill v...

Page 41: ...power to the Glassware Washer 2 Remove the lower and middle panels as described in Chapter 3 Getting Started Connecting the Power Supply 3 Disconnect the springs on each side that connect the pivot br...

Page 42: ...he washer sump you can remove and clean the screen To clean the sump filter screen refer to the figure below and follow the instructions below To clean the sump filter screen 1 Open the washer door an...

Page 43: ...ebris may block the air flow through the HEPA filter The filter may be replaced by following the instructions below To replace the HEPA filter 1 Open the left door by pressing it in the center 2 Press...

Page 44: ...sensor is also coated Follow the directions for removing film or spots from the washer interior described previously in this chapter To clean the conductivity sensor If the soil from unrinsed glasswa...

Page 45: ...Glassware Washer Accessories for the accessories that are available for your Glassware Washer Installing the Optional Upper Spindle Rack The Upper Spindle Rack expands the capability of the FlaskScru...

Page 46: ...e the slide assemblies using lockwashers and acorn nuts removed in Step 1 It may be necessary to synchronize the travel of the two slides Pull each slide out firmly to their maximum travel 3 Install t...

Page 47: ...oading the rack outside the washer or to allow very tall glassware to be loaded and washed on the lower rack To remove the upper rack 1 Slide the upper rack all the way out of the washer 2 Grasp each...

Page 48: ...rts in a FlaskScrubber Two sizes of Pipet Inserts are available The 8 place Pipet Insert shown below accommodates 1 ml to 10 ml pipets Multiple Pipet Inserts may be installed if desired Refer to the f...

Page 49: ...2 Replace the left and right spindles with the two short spindles that you received with the Pipet Insert 3 Replace all other spindles with the plastic plugs that you received with your washer 4 With...

Page 50: ...slot on the top and turning counterclockwise 2 Replace the standard spindle with a small spindle Installing Optional Inserts into the Spindle Rack A Multi Pin Insert is available that can be placed di...

Page 51: ...r to the figure below and the following instructions To install the optional Cool Drain Water Kit 1 Disconnect power to the washer 2 Remove the back panel of the washer 3 Attach the water valve assemb...

Page 52: ...Chapter 6 Modifying Your Washer Product Service 1 800 522 7658 48 9 Attach the outlet of the Air gap to the building drain 10 Turn on the electrical power...

Page 53: ...lfunction of relay Check electrical continuity or replace relay PCB Glassware interfering with cup door Move glassware Liquid detergent dispense 0 ml None Noises during operation Glassware rattling Lo...

Page 54: ...sults Water is not hot enough Check Wash 2 water temperature setting Must be at least 120 F 49 C Recommended temperature is 150 F 66 C Improper loading Check washer loading instructions in Chapter 4 i...

Page 55: ...quare Correct opening with leveling feet Door hitting counter top mounting screws Adjust mounting screws Washer leaks Washer is not level Adjust leveling feet Door not sealing Adjust door latch Tank g...

Page 56: ...witch Check operation Washer overfills Defective fill switch Check operation Selection buttons on control panel inoperable or controls malfunction Microprocessor memory error Perform Factory Reset Ope...

Page 57: ...no low spots or horizontal runs under washer tank Make sure hose is attached to the back of the washer and has a high loop Hose must be attached to building plumbing pipe inch ID or larger Hose from w...

Page 58: ...psi 138 kPa and flow must be at least 1 25 gallons 4 7 liters minute DI water supply must have flow of at least 0 9 gallons 3 4 liter minute At least 3 4 gallons 13 liters must be available for each D...

Page 59: ...level switch Replace grommet Low Temp Alarm Heater inoperative Check electrical connections Check voltage to heater Check resistance of heater If open circuit replace heater Defective controller Chec...

Page 60: ...HE ER R A AC CC CE ES SS SO OR RI IE ES S PART DESCRIPTION 4595600 4595800 Upper Spindle Rack Stainless Steel Contains one upper spindle rack with 30 spindles 30 glassware holders and 2 slides Same a...

Page 61: ...lder Small Grips wide mouth glassware over spindles Vinyl coated stainless steel wires Glassware Holder Large Grips wide mouth glassware over spindles Vinyl coated stainless steel wires 4596000 Small...

Page 62: ...t Stainless Steel Insert for 20 mm to 25 mm tubes Culture tube Test Tube Insert Stainless Steel Insert for 10 mm to 12 mm tubes Includes retainer top 4401401 4401401 Retainer Top for Culture Tube Inse...

Page 63: ...e mouth glassware 4401901 Retainer Top Stainless Steel To keep lightweight flasks in place under water pressure For use with 4401801 or 4401501 4589701 Petri Dish Insert Stainless Steel For plates pet...

Page 64: ...re such as stoppers spatulas small beakers etc Furnished with drop in cover part number 4403801 4591601 48 Pin Insert Stainless Steel For use with beakers Erlenmeyer flasks and wide mouth glassware Fo...

Page 65: ...tom Rack without spindles Stainless Steel 4591500 DNA Sequencing Plate Insert For electrophoresis plates 10 0 x 16 6 inches 25 4 x 42 1 cm Holds 6 plates 4542500 Utensil Holder For spatulas spoons sco...

Page 66: ...ses washer approximately 17 inches 43 cm Front opens to provide storage underneath washer 4591901 230V Cool Drain Water Kit Provides cool water to the drain plumbing Connects to a cold water source 75...

Page 67: ...nlet valve to plastic tubing 1233700 Power Boost Transformer For 208V operation CONSUMABLES PART DESCRIPTION 4422000 10 lb 4 5 kg LabSolutions Powder Detergent 4422100 27 5 lb 12 5 kg LabSolutions Pow...

Page 68: ...Product Service 1 800 522 7658 64 A AP PP PE EN ND DI IX X B B G GL LA AS SS SW WA AR RE E W WA AS SH HE ER R D DI IM ME EN NS SI IO ON NS S...

Page 69: ...Appendix B Glassware Washer Dimensions Product Service 1 800 522 7658 65 Interior Racks Without Spindles Interior Racks with Spindles...

Page 70: ...temperature 120 F 49 C Water consumption per fill 3 4 gallons 13 liters Minimum feed water pressure 20 psi 138 kPa Maximum feed water pressure 120 psi 827 kPa Minimum purified water feed pressure 0 ps...

Page 71: ...tuations not to exceed 10 of the nominal voltage Transient overvoltages according to Installation Categories II Overvoltage Categories per IEC 1010 Temporary voltage spikes on the AC input line that m...

Page 72: ...Pure Rinses 0 0 6 0 0 6 0 0 6 0 0 6 0 0 6 0 0 6 Final Rinse F 100 100 140 122 100 140 140 100 199 140 100 199 158 100 199 158 100 199 C 38 38 60 50 38 60 60 38 93 60 38 93 70 38 93 70 38 93 Rinse Aid...

Page 73: ...10 20 30 40 Wash 3 Temp F 180 100 199 180 100 199 199 100 199 C 82 38 93 82 38 93 93 38 93 60 38 93 82 38 93 Detergent Disp ml 20 0 40 20 0 40 20 0 40 20 0 40 20 0 40 Number of Rinses 5 0 6 5 0 6 6 0...

Page 74: ...SteamScrubber Freestanding with glass window 4400461 208 240V 50 60 Hz SteamScrubber Freestanding with electronics cleaning options 4420321 208 240V 50 60 Hz FlaskScrubber Undercounter 4420331 208 240...

Reviews: