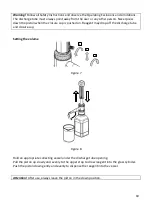
11
8.
Cleaning
The instrument must be cleaned in the following situations to assure correct operation:
if the piston becomes difficult to move
after dispensing liquids which form deposits
before changing the reagent
prior to long term storage
should liquid have accumulated in the closure cap
prior to sterilization
before replacing the valves
Warning!
Follow all Safety Instructions. The glass cylinder, valves, filling and discharge tubes
contain reagent. Wear protective clothing, eye protection and appropriate hand protection.
Note:
Never change the pistons of the instruments!
1)
Push on the closure cap.
2)
Empty and unscrew the instrument from the bottle and lift the instrument so that the
filling tube is out of the liquid but still in the bottle.
3)
Carefully tap the filling tube against the bottle from the inside so that the reagent runs
back into the bottle.
4)
Remove the closure cap, and dispense the remaining reagent into the bottle by repeated
piston operation.
5)
Mount the instrument onto another bottle filled with an appropriate cleaning solution.
6)
Flush the instrument.
7)
Empty the bottle, flush it and fill it with water. Repeat step 6 and 7.
8)
Empty the instrument.
9)
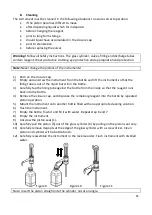
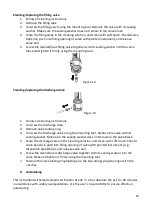
Unscrew the piston seat (1).
10)
Carefully pull the piston (5) out of the glass cylinder (6) by pulling on the piston seat only.
11)
Carefully remove deposits at the edge of the glass cylinder with a screw driver. Clean
piston and cylinder with a bottle-brush.
12)
Carefully reassemble the instrument in the reverse order. Flush instrument with distilled
water.
Figure 9
Figure 10
Figure 11
Note: Insert the piston straight into the cylinder, not at an angle.
Summary of Contents for 550.001.305
Page 16: ...16...


