


9
ENGLISH
The push button that controls this device is operated by a tongue in the collar of
the hopper. If the hopper is removed or not properly in place, the microswitch
prevents the appliance from working.To ensure the hopper is positioned correct-
ly it must be fixed to the casing using the relevant pin on the collar.
•
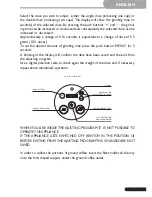
SAFETY SCREWS
(SUPER JOLLY)
The hopper must
always be attached to
the upper grinding
blade holder using the
relevant screw, which
must not be removed
by the user under any
circumstances.
In order to prevent the adjustment disk from being removed - which would make
the rotating parts accessible - there is a safety screw on the actual disk: said
screw must be positioned in whichever of the two holes on the disk enables the
wider and most suitable range of grinding adjustment, and must not be removed
by the user under any circumstances.
•
COFFEE OUTLET GUARD
The coffee outlet guard must always be fixed to the doser using the relevant
screws, which must never be removed by the user.
The removal of the coffee outlet guard can be done by skilled technical person-
nel only after disconnecting the appliance from the power supply by unplugging.
Before reconnecting the appliance to the power supply, fix the safety device to
the doser by the relevant screws.
11) WARNINGS REGARDING SAFETY
This electrical appliance must be used in conformity with the rules in force gov-
erning safe operation.
•
WHEN OPERATING THE APPLIANCE, BEWARE OF THE MOVING
MECHANICAL PARTS’ IN THE AREA OF THE GRINDING BLADES AND OF
THE GROUND COFFEE OUTLET.
BEFORE REMOVING THE HOPPER FROM THE GRINDING SYSTEM, DIS-
CONNECT THE POWER SUPPLY.
AVOID REMOVING FOREIGN BODIES FROM THE GRINDING SYSTEM OR
HOPPER
SAFETY
SCREW
ALTERNATIVE
TAPPED HOLE
DISCK SAFETY SCREW
COFFEE OUTLET
GUARD


