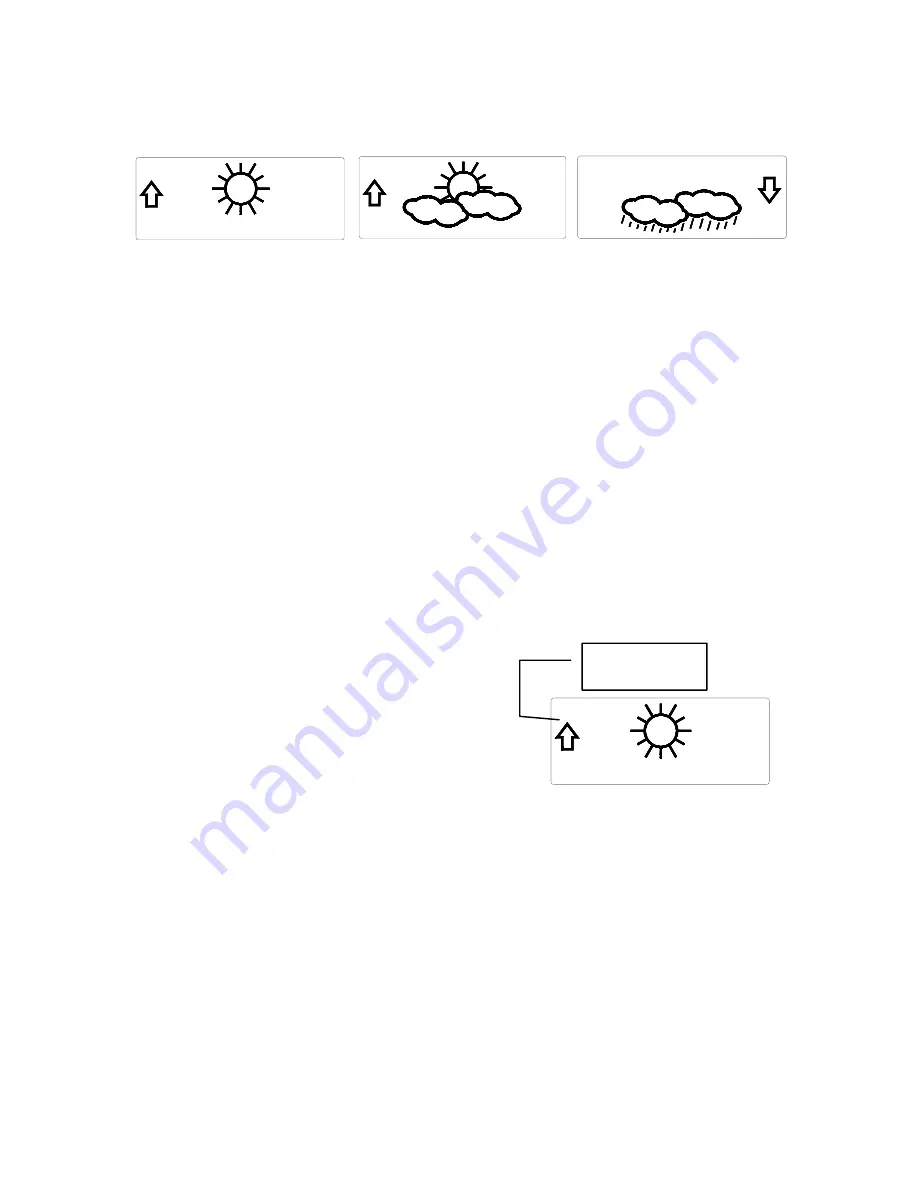
background image


17

1.


Weather Icons 

a.


There are 3 possible weather icons that will be displayed at 
various times in the center of the indoor weather station. 

i


Sunny—

indicates that the weather is expected to improve 

(not that the weather will be sunny). 

ii


Sun with Clouds—

indicates that the weather is expected to 

be fair (not that the weather will be sunny with clouds). 

iii


Clouds with Rain—

indicates that the weather is expected 

to get worse (not that the weather will be rainy). 

b.


The weather icons change when the unit detects a change in 
air pressure. 

c.


The icons change in order, from “sunny” to “sun with clouds” 
to “clouds with rain” or the reverse. 

d.


It will not change from “sunny” directly to “clouds with rain”, 
although it is possible for the change to occur quickly. 

e.


If the symbols do not change, the weather has not changed (or 
the change has been slow and gradual). 

f.


The sensitivity of the change in foreacst icon is set by the user 
in section F of the Detailed Set Up Guide. 


G.


Weather Tendency Arrows 
 

1.


Along with the forecast icon there 
is a pressure tendency arrow.


2.


There is one that points up (on the 
left side of the LCD) and one that 
points down (on the right side of 
the LCD).


3.


These arrows reflect current changes in the air pressure.  


4.


An arrow pointing up indicates that the air pressure is increasing 
and the weather is expected to improve or remain good.


5.


An arrow pointing down indicates that the air pressure is 
decreasing and the weather is expected to become worse or remain 
poor.


6.


No arrow means the pressure is stable.


7.


A storm can be expected if there is a drop of 4 hPa or more in less 
than 6 hours.  The 

clouds with rain

 icon will be displayed and the 

tendency arrow that points down will be flashing—indicating the 
storm warning feature has been activated.  The flashing will stop 
when the air pressure stabilizes or begins to rise. 
 

Pressure trend 
arrow

Summary of Contents for WS-9115

Page 1: ...WS 9115 Wireless 433 MHz Wireless Weather Station Instruction Manual...

Page 2: ...the Time Date Manually 10 11 Temperature Measuring Units F C 11 Air Pressure Measuring Units inHg hPa 11 Relative Pressure Setting 11 12 Forecast Sensitivity Setting 12 Features and Operation Time Al...

Page 3: ...ived up to 2 000 miles away through the internal antenna in the indoor weather station However due to the nature of the Earth s Ionosphere reception is very limited during daylight hours The indoor we...

Page 4: ...place your remote thermo hygro sensor outdoors and set your time The remote thermo hygro sensor should be placed in a dry shaded area The remote thermo hygro sensor has a range of 80 feet Any walls th...

Page 5: ...nsor 2 Remove the battery cover located on the backside of the sensor above the mounting post and bracket Press the arrow and slide the battery cover off 3 Observing the correct polarity install 2 Alk...

Page 6: ...st locations the WWVB reception indicator looks like a tower icon will flash The indoor weather station requires five full minutes of good reception to successfully capture the signal and set to the c...

Page 7: ...ing mode and your actual data shown will be different based on your local settings and conditions Radio controlled time WWVB Reception Indicator Moon Phase Display Date Display Indoor Temperature Humi...

Page 8: ...ime Zone 3 DST ON OFF 4 Radio controlled Time ON OFF 5 12 24 hour time mode 6 Hour 7 Minute 8 Year 9 Month 10 Date 11 F C 12 inHg hPa 13 Relative pressure setting 14 Forecast sensitivity B LCD Contras...

Page 9: ...the top of the display and a number will flash next to it 3 Press and release the SET button three more times to advance to the Radio controlled time ON OFF setting 4 RCC will appear to the right of...

Page 10: ...to advance to the Manual Minutes setting 4 The minutes will begin to flash at the top of the display 5 Press and release the OUT button to select the desired minutes 6 Press and release the SET button...

Page 11: ...unit 6 Press and release the SET button to confirm the temperature measuring unit and continue to the Air Pressure Measuring Units setting M Air Pressure Measuring Units Selection inHg hPa 1 Press and...

Page 12: ...ther side of the forecast icon and a flashing number will appear under the forecast icon 5 Press and release the OUT button to select the desired forecast sensitivity setting Note Barometric air press...

Page 13: ...to confirm the setting or wait for 20 seconds and the display will automatically return to the normal mode 2 To activate the alarm a Press and release the ALM DATE button to toggle between the alarm...

Page 14: ...indoor temperature and humidity The minimum and maximum values are updated automatically when a new minimum or maximum is recorded or until manually reset a From the normal display mode press and rel...

Page 15: ...r at least three seconds You will see then that the values will reset to the current temperature and humidity and corresponding time D Multiple Remote Temperature Sensors The WS 9115 is able to receiv...

Page 16: ...remote sensor will have its own minimum and maximum values stored E Comfort Indicator for Indoor Temperature and Humidity 1 The comfort level indicator appears inbetween the indoor tempearture and hu...

Page 17: ...en slow and gradual f The sensitivity of the change in foreacst icon is set by the user in section F of the Detailed Set Up Guide G Weather Tendency Arrows 1 Along with the forecast icon there is a pr...

Page 18: ...4 The 0 on the vertical axis indicates the current air pressure value 5 The 0h on the horizontal axis indicates the current hour thus the current air pressure also 6 Each bar on the bar graph represen...

Page 19: ...weather station loses the signal from the remote sensor it will display the last temperature reading for 15 minutes After 15 minutes of not receiving any signals the remote temperature will display A...

Page 20: ...ounting post into the receptor of the mounting bracket B Mounting the WS 9115 Indoor Weather Station The indoor weather station can be mounted in two ways free standing or hanging on a wall To have th...

Page 21: ...isplays and units with a soft damp cloth Do not use solvents or scouring agents they may mark the displays and casings C Do not submerge in water D Immediately remove all low powered batteries to avoi...

Page 22: ...te sensors are in use check location with corresponding boxed numbers 3 Move away from sources of heat cold 4 Adjust relative air pressure to a value from a reliable source TV radio etc 5 The indoor w...

Page 23: ...to 1040 hPa Relative inHg adjustable 28 35 inHg to 30 72 inHg Sensitivity setting hPa 2 hPa to 4 hPa Air pressure history For the past 24 hours 0 3 6 9 12 18 and 24 hours Data checking intervals Indoo...

Page 24: ...shipping charges to the owner of the product to a USA address only Your La Crosse Technology Ltd warranty covers all defects in material and workmanship with the following specified exceptions 1 damag...

Page 25: ...desired operation FCC ID OMO 01RX Receiver OMO 01TX sensor Freq 433 92 MHz La Crosse Technology Made in China WS 9115 All rights reserved This handbook must not be reproduced in any form even in excer...

Reviews: