background image


23 


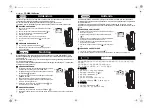
The total rainfall and 24 hour rainfall measurement is displayed in the last section of the 
LCD (where pressure is normally displayed), in the unit of mm or inch.  
To View the 24-hour rainfall or the Total rainfall reading: 
1. 

In normal display, press SET key once and the display will shift to Mode 2. 

2. 

Press + key consecutively key to toggle between the 24-hour rainfall, Total rainfall 
and Rel. pressure reading. 


VIEWING THE HISTORY DATA 

The weather station can store up to 140 sets of weather data which are recorded 
automatically at 3-hour intervals after the weather station is powered up, at the nearest 
time of 0:00, 03:00, 06:00, 09:00, 12:00, 15:00, 18:00 and 21:00.  For instance, if user has 
manually set the time as 14:52 after installing batteries, the first history record will be 
made at the coming 15:00 automatically. Then the second record will be on 18:00 and so 
on. 
Each weather record includes the Wind direction, Wind speed/ gust, Wind chill 
temperature, wind speed/gust, dew point, Outdoor temp and humidity, relative pressure, 
24-hour rainfall and total rainfall, pressure history and weather tendency. Also, the time 
and date of recording will be displayed. 


Note: 

In order to acquire the correct time of recording of the history records, you shall manually 
set the current time as soon as possible after installing batteries to the weather station. 
Afterwards, you should avoid changing the pre-set time as it will also alter the recorded 
"time of recording" of each history record, which may lead to confusion. 


24 hour rainfall icon 

Total rainfall icon 

24 hour rainfall amount 

Total rainfall amount 


24 


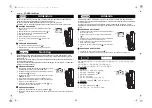
To view the weather history: 

1. 

In normal display, press the HISTORY key. The latest weather record will be shown 
with the date and time of recording. The "HISTORY" icon will be displayed at the 
bottom of the LCD. 

2. 

When viewing History records, user may shift to see the Mode 1 or Mode 2 data by 
pressing the SET key. 

Mode 1:

 with wind speed + outdoor Temp + Rel. pressure; 

Mode 2:

 with wind gust + Dew point + rainfall data (optional) 


Note:

 To view total rainfall or 24-hour rainfall in history records, first, in normal display 

mode, choose to show the particular rainfall data, then press the History key followed by 
the SET key to view the particular rainfall data in History records. (rain data information 
only available if a rain sensor is being used- optional). 


3. 

When viewing History records, press MIN/ MAX to view older records. 


(Press MIN/MAX and + key to view "Previous" and "Next" record respectively. The 
records are made at 3-hour intervals) 


Note: 


The stored history records will not be retained after battery change or whenever 
battery is removed. 

HISTORY icon

Summary of Contents for WS-1912

Page 1: ... Function keys 11 LCD screen 12 Manual settings 14 Weather forecast and weather tendency 20 Wind speed measurement 22 Rainfall measurement 22 Viewing history data 23 Viewing the MIN MAX weather data 25 Outdoor transmission 915 MHz reception 21 Positioning 32 Care and maintenance 35 Specifications 36 Warranty information 37 ...

Page 2: ...nds 6 25 seconds for rain sensor optional of all your outdoor data measured from the transmitters follow your climatic variations in real time This product offers 4 FEATURES The Weather Station Time display manual setting 12 24 hour time display Calendar display weekday date month year Weather forecast icons and weather tendency indicator Indoor temperature display in C ºF Outdoor temperature disp...

Page 3: ...d onto a horizontal panel TX32U IT 6 Cable connection between the wind sensor and the thermo hygro transmitter OPTIONAL Wireless transmission at 915 MHz Rain sensor to weather station Wireless transmission at 915 MHz thermo hygro transmitter to weather station Weather center Wind sensor Rain sensor optional Thermo hygro transmitter SETTING UP Note When putting the Weather Station into operation it...

Page 4: ...he weather station system is finished and the mounting of the system components can take place It must be ensured however that all components work properly together at their chosen mounting or standing locations For example if there appears to be problems with the 915 MHz radio transmission they can mostly be overcome by slightly changing the mounting locations or turning the base station Note The...

Page 5: ...1 Remove the battery compartment cover 2 Insert the batteries observing the correct polarity see the marking in the battery compartment 3 Replace the battery cover 10 HOW TO INSTALL AND REPLACE BATTERIES INTO THE RAIN SENSOR OPTIONAL SOLD SEPERATELY 1 Unlock the main cover from the rain sensor base and remove the cover 2 Remove the battery cover at the top of the rain sensor 3 Insert 2 x AAA IEC L...

Page 6: ...of different settings Press to confirm to reset the MIN MAX record MIN MAX key SET key key HISTORY key 12 Air pressure History histogram HISTORY key Press to display the weather data history records Press to exit manual setting mode MIN MAX key Press to display MIN MAX records of various weather data Press to adjust decrease the level of different settings LCD SCREEN The LCD screen is split into 3...

Page 7: ...tion of the reception of the signal from Thermo hygro transmitter 14 Mode 2 Wind gust dew point and rainfall optional reading are shown Note To view the rainfall data press the key after entering Mode 2 display MANUAL SETTINGS The following manual settings can be changed once the SET key is pressed and held for about 3 seconds LCD contrast setting Manual time setting 12 24 hour time display Calend...

Page 8: ...LENDAR SETTING Digit flashing Digit flashing Minutes Flashing Hour Flashing 16 Year Month Date for 12h time display Date Month for 24h time display CALENDAR SETTING The date default of the Weather Station is 1 1 of year 2009 The date can be set manually by proceeding as follows 1 The year digit starts flashing 2 Use the or MIN MAX key to set the year pressing and holding the key will forward the d...

Page 9: ...first adjust the barometer to your local relative air pressure related to elevation above sea level Ask for the current atmospheric pressure of your home area Local weather service www calibrated instruments in public buildings airport Flashing Flashing 18 The relative air pressure can be manually set to another value within the range of 27 14 to 31 90 inHg 919 to 1080 hPa for a better reference 1...

Page 10: ...better with sunny icon or worse with rainy icon since the icons are already at their extremes The icons displayed forecasts the weather in terms of getting better or worse and not necessarily sunny or rainy as each icon indicates For example if the current weather is cloudy and the rainy icon is displayed it does not mean that the product is faulty because it is not raining It simply means that th...

Page 11: ...9 6 3 and 0 hour The bars are plotted at each of the 5 steps and give the trend over the recorded period The scale on the right compares the result The 0 in the middle of this scale determines the current air pressure Air pressure changes in inHg Air pressure changes in hPa 22 The vertical axis represents the air pressure changes in inHg 0 12 0 06 0 0 06 0 12 The 0 represents the current air press...

Page 12: ...the history records you shall manually set the current time as soon as possible after installing batteries to the weather station Afterwards you should avoid changing the pre set time as it will also alter the recorded time of recording of each history record which may lead to confusion 24 hour rainfall icon Total rainfall icon 24 hour rainfall amount Total rainfall amount 24 To view the weather h...

Page 13: ...iewed by pressing the MIN MAX key in normal display mode 1 MIN outdoor temperature with the date and time of recording 2 MAX outdoor temperature with the date and time of recording MIN icon MIN outdoor temperature value Time and date or recording 26 3 MIN dew point temperature 4 MAX dew point temperature 5 MIN outdoor humidity with the date and time of recording 6 MAX outdoor humidity with the dat...

Page 14: ...10 MAX Relative pressure with the date and time of recording MIN icon MIN wind chill value Time and date or recording MAX icon MAX relative pressure value Time and date or recording 28 11 MAX wind speed with the date and time of recording 12 MAX Gust with the date and time of recording MAX icon MAX wind speed value Time and date or recording MAX icon MAX Gust value Time and date or recording ...

Page 15: ... MAX key fourteen times to show the total rainfall value The RESET icon will also be shown at the same time 24 hour rainfall icon 24h rainfall amount The 24h rainfall value is counted from this time and date 30 To reset the rainfall reading Press the key once when the Rainfall value and Reset icon are shown Then the total rainfall amount will be reset to 0 and the time updated to current time Note...

Page 16: ...cur During normal operation after the outdoor display shows the weather station will change to receive the outdoor data every 15 minutes until the data is read Then the reception period for thermo hygro transmitter will return to 4 5 seconds 6 25 seconds for rain sensor optional If no reception is possible despite the observation of these factors all system units have to be reset see Setting up 32...

Page 17: ...otate freely before fixing the unit For correct and accurate readings it is important to mount the sensor with the cups on the bottom The wind sensor should now be mounted using the screw or cable tie provided onto a solid wall panel mast or mast to allow the wind to travel around the sensor unhindered from all directions ideal mast size should be from diameter 0 62 to 1 29 16mm to 33mm Do not ove...

Page 18: ...ng a damaged LCD display The liquid crystals can be harmful to user s health Do not make any repair attempts to the unit Return them to their original point of purchase for repair by a qualified engineer Opening and tampering with the unit may invalidate their guarantee Never touch the exposed electronic circuitry of the device as there is danger of electric shock should it become exposed Do not e...

Page 19: ...and at no charge as stipulated herein with new or reconditioned parts or products if found to be defective during the limited warranty period specified above All replaced parts and products become the property of La Crosse Technology Ltd and must be returned to La Crosse Technology Ltd Replacement parts and products assume the remaining original warranty or ninety 90 days whichever is longer La Cr...

Page 20: ...ssed using electronic mechanical or chemical procedures without written permission of the publisher This handbook may contain mistakes and printing errors The information in this handbook is regularly checked and corrections made in the next issue We accept no liability for technical mistakes or printing errors or their consequences All trademarks and patents are acknowledged ...

Reviews: