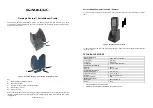
background image


21 

Free standing 


With the foldout stand, the Temperature Station can be placed onto any flat 
surface. 


To wall mount 

1. 

Fix a screw (not supplied) into the desired wall, leaving the head 
extended out the by about 5mm. 

2. 

Hang the temperature station onto the screw. Remember to ensure that 
it locks into place before releasing. 


22 

POSITIONING THE TEMPERATURE TRANSMITTER: 


The Transmitter is supplied with a holder that may be attached to a wall 
with the two screws supplied. The Transmitter can also be position on a 
flat surface by securing the stand to the bottom to the Transmitter. 


To wall mount: 

1.  Secure the bracket onto a desired wall using the screws and plastic 

anchors. 

2.  Clip the remote temperature transmitter onto the bracket. 


Note: 

In order to get an accurate reading and to prolong the life of your 

sensor we recommend that you have it in a sheltered area out of the sun 
and direct rain. Fog and Mist will not affect the sensor, but a soaking in 


23 

water may. You can mount it outside under an eve of your house or any other suitable place 
that will keep it out of the sun and rain. Do not wrap the sensor in plastic or seal it in a plastic 
bag as these can cause condensation problems and substantially reduced accuracy. Please 
note a sensor in the Sun will provide inaccurate temperature readings.


Before permanently fixing the transmitter wall base, place all units in the desired locations to 
check that the outdoor temperature reading is receivable. In event that the signal is not 
received, relocate the transmitter(s) or move them slightly as this may help the signal reception. 


CARE AND MAINTENANCE:


Extreme temperatures, vibration and shock should be avoided as these may cause 
damage to the unit and give inaccurate forecasts and readings. 


When cleaning the display and casings, use a soft damp cloth only. Do not use solvents 
or scouring agents as they may mark the LCD and casings. 


Do not submerge the unit in water. 


Immediately remove all low powered batteries to avoid leakage and damage. Replace 
only with new batteries of the recommended type. 


24 


Do not make any repair attempts to the unit. Return them to their original point of 
purchase for repair by a qualified engineer. Opening and tampering with the unit may 
invalidate their guarantee. 


Do not expose the units to extreme and sudden temperature changes, this may lead to 
rapid changes in forecasts and readings and thereby reduce their accuracy. 


SPECIFICATIONS: 

Temperature measuring range 
Indoor                 : 

14.2ºF to +139.8ºF with 0.2ºF / -9.9ºC to +59.9ºC with 0.1ºC resolution  
(“OF.L” displayed if outside this range) 

Outdoor              : 

-39.8ºF to +139.8ºF with 0.2ºF / -39.9ºC to +59.9ºC with 0.1ºC resolution 


(“OF.L” displayed if outside this range) 

Indoor Temperature checking interval 


:   every 15 second 

Outdoor data checking interval 


:   every 4 second 

Power Supply 
Temperature Station 


:   2 x AAA, IEC LR3, 1.5V 

Outdoor Temperature Transmitter 


:  2 x AA, IEC LR6, 1.5V 

Summary of Contents for Wireless Temperature Station

Page 1: ...ifications 32 Warranty Information 33 3 INVENTORY OF CONTENTS 1 Wireless Temperature Station 2 Wireless Outdoor Temperature Transmitter TX29U IT and mounting bracket 3 Instruction Manual This product offers INSTANT TRANSMISSION is the state of the art new wireless transmission technology exclusively designed and developed by LA CROSSE TECHNOLOGY INSTANT TRANSMISSION offers you an immediate update ...

Page 2: ...ter is used 1 User shall remove all the batteries from the Temperature Station and transmitters and wait 60 seconds if setting has been done with one transmitter first 2 Insert the batteries to the first transmitter 3 Within 30 seconds of powering up the first transmitter insert the batteries to the Temperature Station Once the batteries are in place all segments of the LCD will light up briefly F...

Page 3: ...few minutes of power supplying HOW TO INSTALL AND REPLACE BATTERIES IN THE TEMPERATURE STATION The Temperature Station uses 2 x AAA IEC LR3 1 5V batteries When batteries will need to be replaced the low battery icon will appear on the LCD To install and replace the batteries please follow the steps below 1 Lift up the battery compartment cover 2 Insert batteries observing the correct polarity see ...

Page 4: ...TEMPERATURE UNIT C F SETTING To display the time in 12 hour or 24 hour mode default setting 12h 1 In normal display mode press and hold the SET key for about 3 seconds The 12h or 24h digit will be flashing 2 Press the key to set the desired time display mode 3 Press shortly the SET key to advance to the MANUAL TIME SETTING Note When the time display is set as 12 hour mode the temperature unit will...

Page 5: ...lease check the following points 1 The distance of the Temperature Station or transmitter should be at least 5 to 6 5 feet 1 5 to 2 meters away from any interfering sources such as computer monitors or TV sets 2 Avoid positioning the Temperature Station onto or in the immediate proximity of metal window frames 3 Using other electrical products such as headphones or speakers operating on the same s...

Page 6: ...er wall base place all units in the desired locations to check that the outdoor temperature reading is receivable In event that the signal is not received relocate the transmitter s or move them slightly as this may help the signal reception CARE AND MAINTENANCE Extreme temperatures vibration and shock should be avoided as these may cause damage to the unit and give inaccurate forecasts and readin...

Page 7: ...pping charges to the owner of the product to a USA address only Your La Crosse Technology Ltd warranty covers all defects in material and workmanship with the following specified exceptions 1 damage caused by accident unreasonable use or neglect including the lack of reasonable and necessary maintenance 2 damage occurring during shipment claims must be presented to the carrier 3 damage to or deter...

Page 8: ...or chemical procedures without written permission of the publisher This handbook may contain mistakes and printing errors The information in this handbook is regularly checked and corrections made in the next issue We accept no liability for technical mistakes or printing errors or their consequences All trademarks and patents are acknowledged ...

Reviews: