background image

19

Relative Pressure

Add-On Temperature & Humidity Sensor

PRESSURE

EXTRA SENSORS

  Your Relative Pressure reading will come from your 

   station’s internal barometer. 

  Please allow up to 10 days for automatic calibration, or 

   program your local pressure value in the Settings Menu. 

  The arrows located to the left of the values represents 

   Pressure Tendency (rising/falling). 

2.

Hold the 

MINUS

 (

-

) button to delete these 

Temperature & Humidity readings.

3.

Hold the 

TEMP

 button until the blue Sensor 

Reception Indicator       starts to animate.

Adding a Separate Temperature & Humidity Sensor

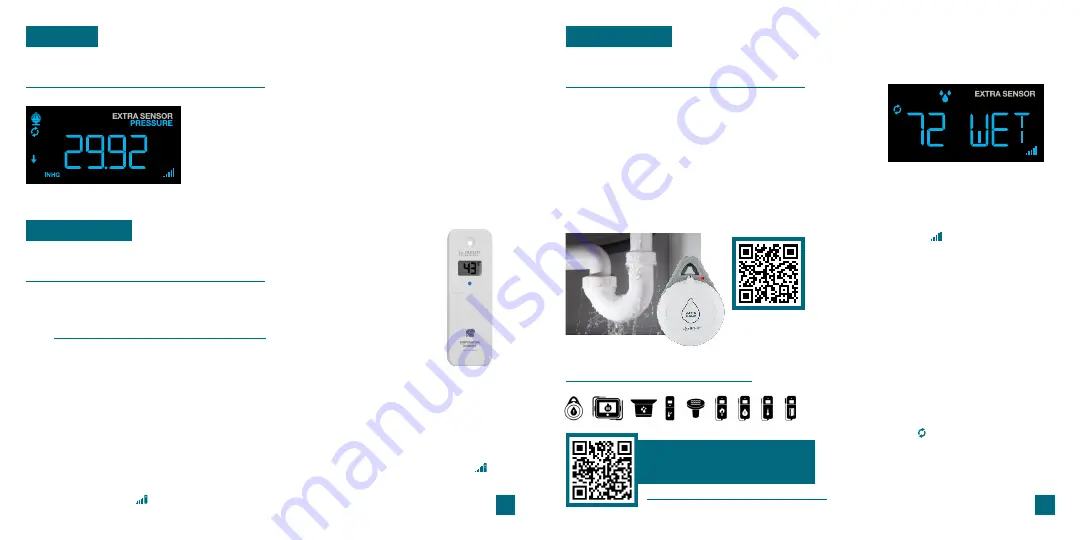
Pressure Reading Example

If you feel the temperature & humidity is not reading correctly from your 

Breeze Pro Sensor, you can add a separate sensor to your system.

Visit: 

www.lacrossetechnology.com/v51#parts

 to find available

Thermo-Hygro Sensors.

1.

Press the 

SENSOR

 button until you see the 

Outdoor Temperature and Humidity section light 

up on screen. “ID WTH 123” and “TWH SENSOR” 

will appear below.

4.

5.

Install new batteries into the add-on sensor 

and press the 

TX

 button inside its battery 

compartment. The LED light on the sensor 

will flash. 

The sensor should connect almost instantly 

with its data appearing on screen. The

icon will appear when an add-on TH sensor 

is being used. 

20

Additional Add-On Sensors

EXTRA SENSORS

Water Leak Data Example

Whether you choose to connect with the La Crosse View 

app or not, this station can display data for up to 4 extra 

sensors. This data will appear in the blue EXTRA SENSOR 

section on the LCD, and in your La Crosse View app if 

connected.

Scan the QR code above or visit:

www.lacrossetechnology.com/ltv-wl1

www.lacrossetechnology.com/v51#parts

Model Number

LTV-WL1

Find all of your add-on sensor 

options by scanning the QR 

code or visiting: 

Detect leaks & monitor ambient temperature 

with an add-on Water Leak Sensor

2.

Install batteries into your sensor. If the sensor 

has a 

TX

 button, press it to force a transmission 

signal. This button is usually located in or near 

the sensor’s battery compartment. The LED 

light on the sensor will flash once.

3.

Your sensor should connect within the next 3 

minutes, briefly displaying its ID and type on 

the LCD. The Sensor Reception Indicator will 

show solid on the screen when a sensor is 

connected.

Adding Sensors to Your Station

1.

Hold the 

EXTRA

 button until you see the Sensor 

Reception Indicator      start to animate.

Note: 

When first powering up, or after a factory 

reset, extra sensors should automatically connect 

to your station.

4.

Press the 

EXTRA

 button to cycle through the 

data you’d like displayed on the LCD. The

Auto Scroll Icon (    ) will appear if activated.

Summary of Contents for BP77970

Page 1: ...SET UP GUIDE Wi Fi PROFESSIONAL WEATHER STATION MODEL NUMBER V51 BP77970...

Page 2: ...g Disposal Cautions Statements Patents Support Information Factory Reset Stay in Touch 21 22 22 22 23 24 24 24 24 03 04 05 17 17 18 18 19 09 09 10 WIND Positioning Your Sensor Installation Options Vie...

Page 3: ...station and in the app SEE APP TO CONNECT Check your La Crosse View app for notifications NO WEATHER SERVICE Your Internet weather and time services are not connecting These should resolve on their ow...

Page 4: ...the station is first powered on it will begin searching for your outdoor sensors which should connect shortly To manually set your time date and other settings hold the SET button to enter the Setting...

Page 5: ...to adjust backlight Hold to enter Auto Dim settings 1 3 2 6 8 7 4 5 9 10 Side View Back View Your display must be connected to Wi Fi to receive Daily Hourly forecast information Please Note Only the h...

Page 6: ...n a safe place Remove batteries and cover in place Leave outside uncovered While the Rain Sensor cannot accurately record snowfall when the snow melts the water will be counted as rain The Rain Sensor...

Page 7: ...nstallation Options For Accurate Measurements Basic Assembly Advanced Installation Options Fence posts poles decks and even mailboxes are all common mounting options due to their convenience Many user...

Page 8: ...and Alerts WIND Viewing Wind Speed History Records Activate Deactivate Wind Speed Alert Important Notes Press the WIND button to toggle through wind speed history records with time and date stamps Th...

Page 9: ...g Individual Temperature Humidity Records Records Viewing Order Feels Like Temperature Press the TEMP button to toggle through indoor outdoor temperature humidity history records with time and date st...

Page 10: ...eive AccuWeather forecast data Available Forecast Icons on Standalone Station Sunny Clouds T Storm Partly Sunny Rain Snow Spring March 20th to June 20th Summer June 21st to Sept 20th Fall Sept 21st to...

Page 11: ...ar when an add on TH sensor is being used 20 Additional Add On Sensors EXTRA SENSORS Water Leak Data Example Whether you choose to connect with the La Crosse View app or not this station can display d...

Page 12: ...ed button batteries immediately and safely Flat batteries can still be dangerous Tell others about the risk associated with button batteries and how to keep their children safe WARNING This product co...

Page 13: ...e and Economic Development Canada s licence exempt RSS s Operation is subject to the following two conditions 1 This device may not cause interference and 2 This device must accept any interference in...

Reviews: