
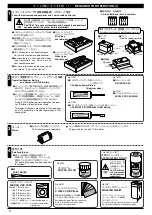
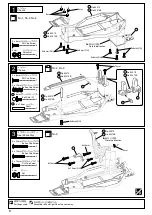
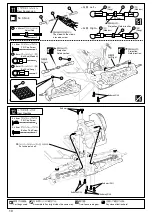
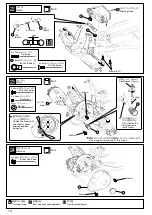
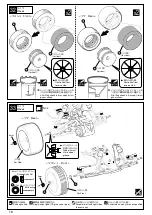
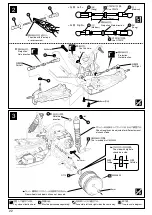

No.1
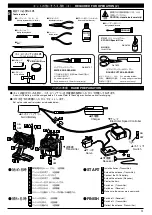
9
Part bags used.
Main Gear
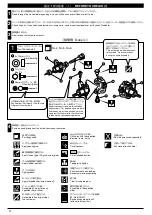
8
Assemble left and right
sides the same way.
Inside
Outside
Note the direction.
Rewind 1/2 turn from firmly tightened condition.
2.6x5mm
161
160
46
43
44
42
116
71
135
3x5mm
4mm
1
2 x 11mm
Shaft
71
46 4 x 8mm
Thrust Plate
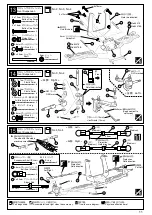
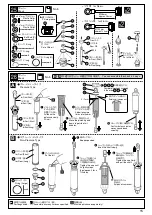
No.3, No.4
9
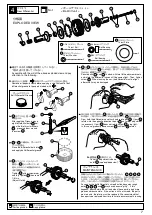
Rear Suspension
2
3 x 6 x 2mm
Plastic Collar
10
73
2
74
2
5 x 8 x 0.5mm
Shim
2
58 4.8mm
Ball Stud (L)
4
51 5 x 10mm
Ball Bearing
58
129
172
10
9
51
173
172
73
51
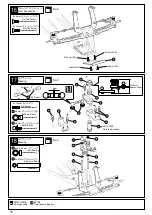
No.4
E2.5
Note the direction.
Use this hole.
10
Rear Suspension
2
3 x 6 x 2mm
Plastic Collar
10
4
E2.5
E-ring
2
2
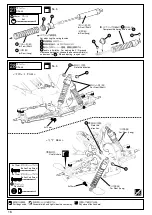
< Left >
< Right >
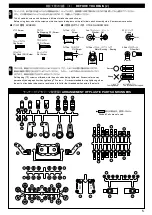
13
69
10
66
174
12
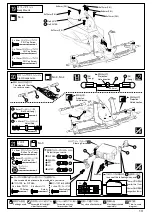
Pay close attention here!
Tighten 2.6mm
screw
x
2
Assemble as many
times as specified.
x
2
E2.5
ÒL3Ó marked
ÒR3Ó marked
Inside
Outside
Note the direction.
1.5 x 8mm
Roll Pin
3mm
2.6mm
L3
R3
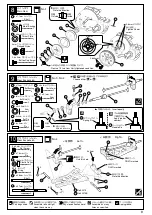
1
160 4 x 8mm
Metal Bushing
1
1
4mm
Flanged Nylon
2
2.6 x 5mm
Button Cap Screw
171
2
1.6 x 9mm
Pin
4
5 x 7 x 0.1mm
Shim
172
Choose either or .
A
B
66 3 x 47mm
Shaft
69 3 x 26mm
Shaft
2
3 x 5mm
Set Screw
4
174 2 x 7.8mm
Pin
Apply grease.
Spring Pin
Needle Pin
Apply rubber
cement.
Insert equally.
B
A
74
171
191
No.30073B
130
No.30073
使用する袋詰。
メインギヤ
内側
外側
向きに注意。
内側
外側
向きに注意。
しめ込んだ状態から
1/2
回転もどす。
2.6mm
ビス穴に
ねじ込む。
左右同じように組立てる。
シャフト
スラストプレート
リヤサスペンション
プラカラー
シム
ボールスタッド(
L
)
ベアリング
向きに注意。
取付穴。
左側用
右側用
プラカラー
リヤサスペンション
E
リング
注意して組立てる所。
2セット組立てる(例)。
L3
のマーク
R3
のマーク
ロールピン
メタル
フランジ付ナイロンナット
ボタンキャップビス
ピン
シム
,
の
2
通りの組み立てが出来ます。
B
A
シャフト
シャフト
セットビス
ピン
グリスを塗る。
スプリングピン
ニードルピン
ゴム系接着剤等
で固定する。
均等に入れる。


