


WARRANTY AND SERVICE
WARRANTY CARD - WARRANTY CONDITIONS
KWAZAR CORPORATION Sp. z o.o provides full warranty and post-warranty service.
1. A foamer that is sent for repair (regardless of cause) must be complete and clean - free of any spray liquid
residue.
2. Warranty repairs will be performed only if a completed warranty card and proof of purchase is provided
with the foamer.
3. Warranty and post-warranty repairs are conducted at the seat of the company and in Authorised KWAZAR
Service Centres - the list is available at www.kwazar.com.pl in the SERVICE tab.
SPARE PARTS AND ACCESSORIES
Spare parts are available for the foamer. For more information, visit www.kwazar.com.pl or the web store
at www.kwazar.com.pl/shop
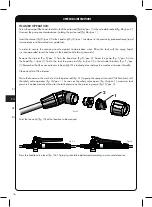
TROUBLESHOOTING
Always depressurise the tank before performing any maintenance or repair work!!!
SYMPTOMS
CAUSE
REMEDY
Low lance output pressure
(fig. 1/pos. 1).
Clogged filter (fig. 12/pos. 1) in the
lance handle assembly (fig. 12/pos. 2).
Remove handle (fig. 12/pos. 2), check filter condition
(fig. 12/pos. 1). Remove any contaminants.
Clogged foaming insert or nozzle
on the lance tip (fig. 10/pos. 1).
Unscrew the lance tip and remove the foaming insert
and the nozzle (fig. 10/pos. 1).
Clean and reassemble.
Irregular foam stream from the
nozzle (fig. 10/pos. 1).
Clogged foaming insert or nozzle
on the lance tip (fig. 10/pos. 1).
Unscrew the lance tip and remove the foaming insert
and the nozzle (fig. 10/pos. 1).
Clean and reassemble.
Pressure drop in the tank
(fig. 1/pos. 8), spray liquid appears
in the pump cylinder (fig. 1/pos. 5).
Damaged head seal on the end
of the cylinder pump (fig. 13a/pos. 3).
Depressurise the tank with the safety valve (fig. 1/pos. 6).
Remove pump (fig. 1/pos. 5). Check the condition
of the head seal. Replace if damaged.
No pressure in the tank
(fig. 1/pos. 8) when pumping.
Damaged seal (fig. 13a/pos. 2) on the
pump piston rod (fig. 1/pos. 5).
Depressurise the tank with the safety valve (fig. 1/pos. 6).
Remove pump (fig. 1/pos. 5). Slide the piston rod out
of the cylinder as far as possible. Holding the cylinder,
turn the piston handle counterclockwise, which will
undo the guides and allow you to remove the piston
from the cylinder. Check the condition of the piston
seal (fig. 13a/pos. 2). Replace if damaged. Apply
a small amount of silicone oil (included). Reassemble
by following the procedure backwards.
Safety valve (fig. 1/pos. 6)
does not close or open.
Pressure in tank is decreasing
(fig. 1/pos. 8)
Damaged safety valve.
Lubricate safety valve (fig. 1/pos. 6). With the safety
valve open, apply a few drops of silicone oil inside and
operate it back and forth a little. If the problem persists,
replace the valve.
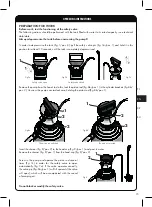
No foam stream.
Suction tube fell off the hose.
Depressurise the foamer with the safety valve
(fig. 1/pos. 6). Remove the hose and properly insert
the suction tube as far as possible applying a turning
motion, then reconnect the hose to the foamer head.
EN
PL
19
RU
DE


