background image

42    |    kvm-tec

kvm-tec    |    43

3. EXTENDER SETTINGS

3. EXTENDER  SETTINGS

3.7.9 MONITOR SYNC STRENGTH

The frame start of the monitor is synchronized with the graphic card.

Some monitors are very sensible regarding frequency changes. Therefore the changes should be 

done slow and the synchronization takes a bit more time 
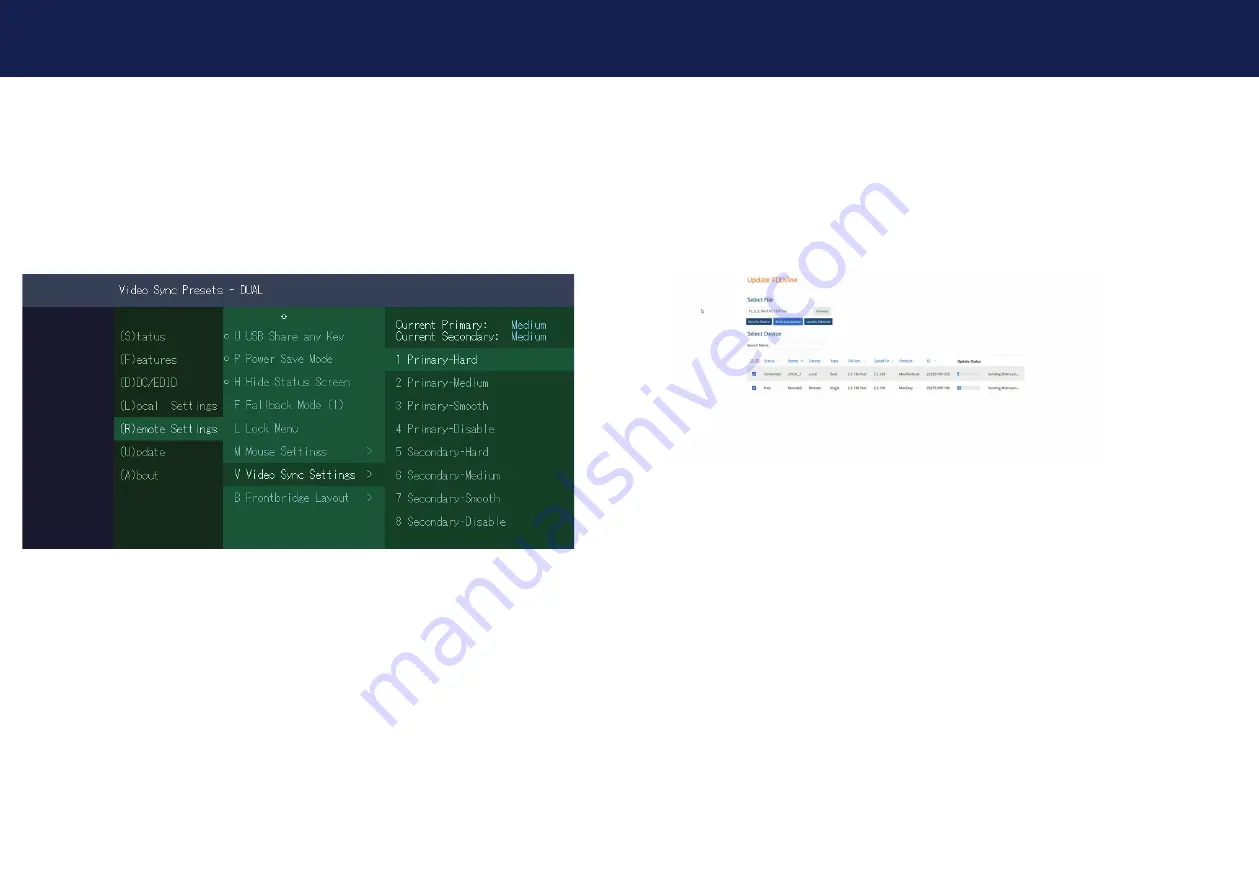
The monitor sync strength can be adjusted between 0-3. - Hard/Medium/Smooth/Disable 

(Standard-Medium)
The monitor sync strength can be adjusted by pressing the 

V

 button.

3.8 UPDATE
3.8.1 FIRMWARE UPDATE WITH SWITCHING MANAGER WEB 

DEMOVERSION

The update management can be done comfortably via a Switching Manager WEB demo version. 
The Switching Manager WEB software can be found on the website in the support area

https://www.kvm-tec.com/en/support/fi rmware-download/

In the Switching Manager WEB under the item Update -> FlexLine, all EasyLine extenders are 

displayed.

To update the extenders, the fi rmware must fi rst be uploaded with the 

„Select Option“

 fi le. 

All extenders for which an update is to be performed are selected by a check mark.
By clicking the button 

Send and Update

 the update will be started.

You can see the progress by a blue bar and if a green check mark appears on the right side, the 

update was successful.

Summary of Contents for EASYLINE smartEasy

Page 1: ...t Easy FULL HD KVM EXTENDER OVER IP Tune in the easy KVM World Tune in the easy KVM World Check out our Installation Channel MANUAL EASYLINE smartEasy Single in copper Dual in copper www kvm tec com V102022 ...

Page 2: ...essed uncompressed uncompressed redundant redundant redundant stand alone uncompressed uncompressed redundant uncompressed redundant uncompressed Simultaneous downscaling Mouse glide switch Scalableline Scalableline Remote Remote 16 sources Zoom work Cut it out Picture in Picture Videowall function Scalableline Scalableline Frontbridging Backbridging Easy Cross Move Full HD Mix Full HD 4K Multivie...

Page 3: ...itor sync strength 42 3 8 Update 43 3 8 1 Firmware update with Switching Manager WEB Demoversion 43 3 8 2 Firmware update with USB stick 44 3 9 Unlock an upgrade 45 3 9 1 Enable or Disable USB Memory upgrade 45 3 10 About this device 46 4 Network settings 47 4 1 Display Switching list 47 4 1 1 Switching Status 47 4 2 Switching features menu 49 4 2 1 Point to Point 50 4 2 2 Matrix Switching Mode 50...

Page 4: ...e product may only be used in accordance with the instructions described in this manual Any use other than that described in this manual is considered improper We reserve the right to make changes in the course of technical progress In these operating instructions the smartEASY is referred to as the product or extender smartEASY Single The SE1 PC is referred to as the Local Unit CPU and the SE1 Mo...

Page 5: ...diately and stop using the product If the product is not installed and used in accordance with this manual it may cause disruptive interference with radio or television reception or affect other electronic products in residential areas Use shielded cables only to connect the components in order to avoid such interference Non compliance invalidates the permission to operate this product Only the ma...

Page 6: ...igkeit max 80 non condensing Humidity for storage max 80 non condensing Housing material anodized aluminum Dimension 109 x 43 x 107 5 mm 4 29 x 1 69 x 4 23 inch Weight 295 g 0 65 lb Local CPU 295g 0 65 lb Remote CON Shipment weight 1005g 2 21 lb per set single 1895 g 4 17 lb Dual MTBF 82 820 calculated hours 10 years 1 4 ABOUT THE PRODUCT SMARTEASY SINGLE Remote CON Extender Nr Name Function 1 dvi...

Page 7: ... 6 7 cable 5 kvm link Connection for CAT5 6 7 cable 6 dc Connection power supply 12V1A LED STATUS red no active connection yellow no video signal green everything works 4 1 2 5 3 6 Local CPU Extender Nr Name Function 1 DVI out DVI to monitor 2 DVI in DVi from PC 2 USB USB to PC 4 kvm link Conenction for CAT5 6 7 cable 5 dc connection power supply 12V1A LED STATUS red no active connection yellow no...

Page 8: ...set Button for reset 4 1 2 Local CPU Extender Nr Name Function 1 dvi in second DVI connection from PC 2 dvi in main DVI connection to PC 3 USB USB to PC 4 kvm link Connection for CAT5 6 7 cable 5 kvm link Connection for CAT5 6 7 cable 6 dc Conenction 12V1A power supply LED STATUS red no active connection yellow no video signal green everything works 1 2 3 4 5 6 ...

Page 9: ...EU plug or Int plug 1 x DVI DVI cable 1 8m 5 9ft 1 x USB cable 1 8m 5 9ft 4 x rubber feet Remote CON Unit 1 x SE1 remote CON 1 x wall power supply unit 12 V 1A EU plug or Int plug 4 x rubber feet smartEASY Dual Local CPU Unit 1 x SE2 local CPU 1 x wall power supply unit 12 V 1A EU plug or Int plug 1 x DVI DVI cable 1 8m 5 9ft 1 x USB cable 1 8m 5 9ft 4 x rubber feet Remote CON Unit 1 x SE2 remote ...

Page 10: ...eplate and a power supply For 4 Single or dual Extender in one Rack Under table mounting kit Part Nr 6231 UMK EASY The Under Desk Mounting kit is for underdesk mounting of the MX extender Din Rail mounting Part Nr 6235 DINMK EASY The DIN rail mounting is used for space saving installation in control cabinets or on DIN rails The attachment to the smartEASY Extenders is possible in several ways Vesa...

Page 11: ...o Monitor 2 2 QUICKINSTALLATION SMARTEASY SINGLE 2 3 QUICKINSTALLATION SMARTEASY DUAL Power plug 12V 1A Power plug 12V 1A USB to PC DVI in 1 from PC DVI in 2 from PC DVI to M onitor 1 DVI to Monitor 2 USB from Keyboard and mouse Quick Installation smartEASY Dual local CPU remote CON 1 Connect the CON Remote and the CPU Local Unit to the included 12V 1A power supply 2 Now connect the USB cable to a...

Page 12: ...an earthed wall socket Both extenders will start an initialisation process The red status LED blinks a few seconds After a few seconds the status LED lights green The monitor will displays your computer s desktop or any open applications 2 5 REMOVING A CATX CABLE To remove a CATx cable Press the latch down and slowly pull the cable out 2 INSTALLATION OF THE EXTENDER 2 INSTALLATION OF THE EXTENDER ...

Page 13: ...24 kvm tec kvm tec 25 2 INSTALLATION OF THE EXTENDER 2 INSTALLATION OF THE EXTENDER ...

Page 14: ...tus Overview Menu Status current status U Update Flash FW Firmware update F Features Overview Overview all Features D DDC Option DDC Option Fixe Setting 1920 x 1080 L Local Settings Setting local R Remote Settings Setting remote A About Overview Overview Extender With ESC Close the OSD 3 2 VIEWING THE CURRENT FIRMWARE VERSION Make sure that the main menu is open Under A About the currently install...

Page 15: ...nits Another feature is the cable test As soon as a connection to the partner has been established the test can be started with the Enter key or the arrow key on the right After a valid synchronization process the test is started and the test run time and errors are displayed The test can be ended at any time by pressing the Enter or key If no error has occurred the status reports Test OK If error...

Page 16: ...the main menu is open 2 Press the D key then the DDC option menu will be displayed Press 1 to use the DDC information of the monitor connected to the remote CON extender Press 2 to save the current DDC information The system uses the same settings after rebooting the extender Press 3 to 8 to use a predefined resolution which will be saved 3 Press ESC to return to the main menu 3 5 1 DDC MAIN SINGL...

Page 17: ...TINGS View the local or remote Extender settings Press the L button to display the Local Setting menu C USB Compatibility Mode Disabled Enabled W USB Remote Wakeup Disabled Enabled L Compatibility with Linux Disabled Enabled B Bandwidth Reduction 3 6 2 USB COMPATIBILITY MODE Some PC s require a USB FullSpeed USB 1 1 connection at startup However since our extenders are normally detected as USB 2 0...

Page 18: ...ibility mode 3 6 5 BANDWIDTH REDUCTION Here the bandwidth can be reduced The basic setting is 0 You can change the bandwidth with or u d 3 7 REMOTE SETTINGS Press the R button to display the Remote Setting menu K Keyboard Locale S Keyboard Shortcuts U USB Share any Key P Power Save Mode H Hide Status Screen F Fallback Mode L Lock Menu M Mouse Settings V Video Sync Settings R Easy Manager Sampling ...

Page 19: ...G A KEYBOARD LAYOUT The Keyboard Local menu lets you switch between keyboard layouts for navigating the on screen display menu OSD You can choose between French FR English EN and German DE Selecting a keyboard layout 1 Press S in the Extender Settings menu The Remote Settings menu appears 2 Press the K key The Keyboard Layout will be changed 3 7 4 ENERGIESPARMODUS VERWENDEN In power save mode the ...

Page 20: ...d In the disconnected state the PC screen therefore remains dark 3 7 6 CHANGE KEYBOARD FALLBACK MODUS By pressing the F key you can change the keyboard fallback mode To use the OSD menu the keyboard must be identified on the remote device For most keyboards use the 0 setting When using USB some mice behave like a keyboard In this case select fallback mode 1 or 2 ...

Page 21: ...you can choose between Password OSD can only be activated by password timer disabled 1min 5min 10min 15min 30min 60min 3 7 8 MOUSE SPEED Can be used in USB Emultation mode With this function the horizontal and vertical speed can be adjusted It can be chosen between 0 50 Standard 30 The mouse speed can be adjusted by pressing the M button ...

Page 22: ...TH SWITCHING MANAGER WEB DEMOVERSION The update management can be done comfortably via a Switching Manager WEB demo version The Switching Manager WEB software can be found on the website in the support area https www kvm tec com en support firmware download In the Switching Manager WEB under the item Update FlexLine all EasyLine extenders are displayed To update the extenders the firmware must fir...

Page 23: ...ng the 9 digit device ID and the serial number of the KVM Extender 4 Enter the unlock code from the supplier 5 The extender will automatically reboot 6 To confirm that the option has been unlocked return to the Unlock Features menu and verify that the corresponding option is now displayed under Unlocked Features 3 9 1 ENABLE OR DISABLE USB MEMORY UPGRADE The USB memory option allows the user to en...

Page 24: ... SWITCHING LIST 4 1 1 SWITCHING STATUS The Status Menu displays the current status of the extender connection The menu shows the information about the connection the resolution of the video channel and the USB status The link status shows if a connection is possible Connected shows if the kvm data can currently be transferred Video and USB show whether data is currently being transferred single du...

Page 25: ... enter the Features menu Features Menu P Point to Point Mode Enabled Disabled Point to Point excludes itself with Matrix mode M Matrix Switching Mode Disabled Enabled S USB Save Feature mass storage usable Disabled Enabled D Freeze last Image Disabled Disabled Enabled E USB Emulation Mode Disabled Disabled Enabled X Easy Manager B Easy Back Bridge U Unlock Features ...

Page 26: ...e the freeze last Image function 1 from the main menu press the F key The Features Settings menu is displayed 2 Press D to enable or disable the function 3 Press ESC to return to the main menu 4 2 4 USB EMULATION MODE When this mode is set the local extender emulates a keyboard and mouse that are always con nected to the PC The result is switching from one PC to another PC without any switching de...

Page 27: ...d the slaves send their inform requests For efficiency The larger the network the higher the rate must be For stability The larger the network the lower the rate must be As soon as every device in the network is detected it is advisable to reduce the sampling rate F5 in the switch list with Easyline Manager sends a broadcast to request ALL devices at once 4 2 10 ALL IN ONE EASY MANAGER EASYLINE EXTE...

Page 28: ...een When moving over the edge of the screen it is possible to switch between the Local Units in Emulation Mode With only one screen the key combination 5x Left Control must be moved In frontbridging one or two monitors can simultaneously display the contents of the PCs with different images and can be operated either right or left FRONTBRIDGING Frontbridging setting in the features menu Features M...

Page 29: ...ion and the USB status The link status indicates whether a connection is possible Connected shows if the kvm datas can be transferred currently Video and USB shows if data is currently being transferred dual 4 2 14 CHANGE THE FRONTBRIDGING LAYOUT Features Menu Make sure that you are in the main menu Pressing the R key will take you to the Remote Settings and then you can use the B Frontbridge Layo...

Page 30: ... Remote Single Extenders via Point To Point using this function Since there is only one USB socket on the Local device only one remote can access the PC at a time In backbridging it is possible to share from one dual local extender to two single remote extender For all applications that require monitoring at different locations BACKBRIDGING ...

Page 31: ...menu 4 2 16 SYSTEM STATUS BACKBRIDGING The Status Menu displays the current status of the Extender connection The menu displays the information about the connection the video channel resolution and the USB status The link status indicates whether a connection is possible Connected shows if the kvm datas can be transferred currently Video and USB shows if data is currently being transferred single ...

Page 32: ...nd one keyboard 2 local Units 1 dual remote Unit Easy Cross Move with 1 keyboard 1 mouse both PCs can be operated with one mouse and one keyboard 2 local Units 1 dual remote Unit Easy Cross Move with 1 keyboard 1 mouse EASY CROSS MOVE 4 NETWORK SETTINGS 4 3 PUSH GET LIST Display of all extenders that can be shared The current image of the workstation can be shared with other remote units via this ...

Page 33: ...tic IP In Static IP mode the IP addresses can be assigned via the OSD It is necessary to be connec ted to a local partner to be able to transmit IP addresses The values displayed in blue show the currently assigned IP addresses With the arrow keys up down you can overwrite the respective IP address By entering a valid 12 digit number the addresses can be overwritten E g for the IP address 10 0 0 1...

Page 34: ...n correctly Check if the PC is sending a Image by plugging in a monitor on the local out of the local Unit Check if the DDC is set correctly in menu under point O Check if both Units have the correct firmware No Video Contact kvm tec support Check if all cables are plug ged in correctly Check if the PC is sending a Image by plugging in a monitor on the local out of the local Unit Check if local an...

Page 35: ...health that could otherwise be caused by improper treatment of waste equipment The recycling of materials contributes to the conservation of natural resources Therefore do not dispose of your old electrical and electronic equipment with the unsorted municipal waste The packaging is made of environmentally friendly materials which may be disposed through your local recycling facilities By disposing...

Page 36: ...stem requires its own separate network For security reasons it cannot be integrated into an existing corporate network The network switch must meet the following specifications 1 Gigabit switch with a port to port transfer rate of 1 Gigabit second Layer3 Network requirements Matrix System UDP Version The KVM TEC Matrix Switching System communicates via IP between the individual endpoints local CPU...

Page 37: ...tps www kvm tec com en support overview support 10 ADDRESS PHONE EMAIL 11 NOTES KVM TEC Gewerbepark Mitterfeld 1 A 2523 Tattendorf Austria www kvm tec com IHSE USA LLC 1 Corp Dr Suite Cranburry NJ 08512 USA www ihseusa com IHSE GMBH Asia 158Kallang Way 07 13A 349245 Singapore www ihse com IHSE China Co Ltd Room 814 Building 3 Kezhu Road Guangzhou PRC www ihse com cn IHSE GmbH Benzstr 1 88094 Obert...

Reviews: