

Achtung:
Nehmen Sie keine Eingriffe oder Veränderungen
am Lötgerät vor. Reparaturen dürfen nur von
Ersa oder autorisierten Kundendienststellen
vorgenommen werden.
Die Geräte beinhalten strom- und spannungs-
führende Teile.
Bei unsachgemäßen Eingriffen besteht Lebens-
gefahr.
Warning:
Do not make any repairs or alterations to the
soldering tool.
Repairs are only to be carried out by Ersa or
authorized and qualified service stations.
The equipment incorporates parts under current
and voltage. Inexpert handling can cause death
by shock.
Attention:
Vous ne devez en aucun cas intervenir
sur le pistolet soudeur ou y apporter des modi-
fications.
Les réparations doivent être effectuées par Ersa
ou des électriciens qualifiés et autorisés. Les
appareils contiennent des pièces conductrices
du courant ou sous tension. Danger de mort en
cas d’intervention inadéquate.
Ersa-Lötgeräte werden nach den Sicherheitsvor-
schriften der VDE 0700 gefertigt und geprüft.
Ersa soldering tools are manufactured and tested
according to the German Engineering Regulations
VDE 0700.
Les appareils de soudage Ersa sont fabriqués
et contrôlés d’après les prescriptions de sécurité
VDE 0700.
Lötspitzenwechsel
Replacement of soldering tips
La panne du fer à souder doit être changée
lorsqu’elle est usée ou lorsqu’une forme dif-
férente est souhaitée (voir les caractéristiques
techniques générales).
1. Soulever le mousqueton hors du trou de la
panne (pos. 1 / ill. 3a) et tirer cette dernière à
l’aide d’une pince plate (pos. 2 / ill. 3a).
2. Poser la panne du fer à souder chaude sur
un support incombustible.
3. Fixer une autre panne (ill. 3b). En l’enfilant
jusqu’à la butée, veiller à ce que le nop page
de l’élément thermique se trouve dans la
fente de la tige de celui-ci. La panne du
fer à souder est alors positionnée et une
protection contre la torsion garantie.
4. Ancrer à nouveau le mousqueton dans le
trou de la panne à l’aide de la pince plate.
Afin de maintenir une bonne conductibilité
électrique et thermique, on retirera occasionnel-
lement la panne du fer à souder et on nettoiera
la tige de l’élément thermique avec une petite
brosse en laiton.
Changement de la panne à souder
Die Lötspitze muss bei Verschleiß, oder wenn
eine andere Lötspitzenform gewünscht wird,
(siehe Technische Daten) gewechselt wer-
den.
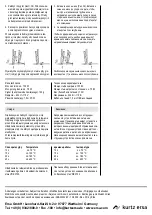
1. Den Federhaken aus der Spitzenbohrung
heben (Pos. 1 / Abb. 3a) und die Spitze mit
einer Flachzange abziehen (Pos. 2 / Abb. 3a).
2. Die Lötspitze (falls noch heiß) auf einer
warm- und brandfesten Unterlage ablegen.
3. Andere Spitze aufstecken (Abb. 3b). Beim
Aufschieben bis zum Anschlag beachten,
dass der Noppen des Metallrohrs im
Heizkörperbereich im Schlitz des Lötspit-
zenschafts liegt. Dadurch wird die Lötspitze
positioniert und eine Verdrehsicherung
gewährleistet.
4. Den Federhaken wieder mit der Flachzange in
die Lötspitzenbohrung einhängen.
Um die gute elektrische und Wärmeleitfähigkeit
zu erhalten, sollte die Lötspitze gelegentlich abge-
nommen und der Heizkörperschaft mit einem
Messingbürstchen gereinigt werden.
The soldering tip must be changed in the event
of wear or if another shape of soldering tip is
desired (see Technical data).
1. To do this, unhook the spring hook from
the hole (No. 1 / fig. 3a) and pull the tip off
with flat pliers (No. 2 / fig. 3a).
2. Deposit hot tip on heat and fire resistant
support.
3. Attach other tip (fig. 3b).
Please note, when sliding the tip over the
heating element, that the slit on the tip shaft
slides directly over the nose on the heating
element‘s metal tube. This positions the
soldering tip and ensures that no twisting
is possible.
4. Fix spring hook again with flat pliers into the
hole of the tip.
In order to obtain good electrical and heat con-
ductivity, the soldering tip should be taken off on
occasion and the heating element cleaned with
a brass brush.
Federhaken aus Spitzenbohrung heben (1) und
Spitze mit Flachzange abziehen (2).
Unhook spring hook from the hole (1)
and pull tip off with flat pliers (2).
Mousqueton hors du trou de panne (1) et tirer
cette dernière à l’aide d’une pince plate (2).
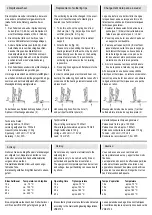
Technische Daten:
Leistung kalt: ca. 150 Watt
Leistung aufgeheizt: ca. 75 Watt
Gewicht (ohne Zuleitung): 100 g
Spannung: ~230 Volt / ~115 Volt
Zuleitung: 1,5 m PVC
Technical Data:
Power rating cold: aprox. 150 Watt
Power rating when warmed up: aprox. 75 Watt
Weight without lead: 100 g
Voltage: ~230 Volt / ~115 Volt
Lead: 1.5 m PVC
Caractéristiques techniques générales:
Puissance à froid: aprox. 150 Watt
Puissance à chaud: aprox. 75 Watt
Poids sans conduite de raccordement: 100 g
Tension: ~230 Volt / ~115 Volt
Conduite de raccordement: 1,5 m PVC
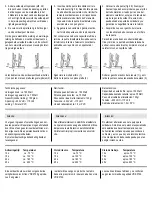
Einschaltdauer Temperatur an Lötspitze
10 s
ca. 70 °C
15 s
ca. 130 °C
20 s
ca. 160 °C
45 s
ca. 400 °C
Operating time Tip temperature
10 s
aprox. 70 °C
15 s
aprox. 130 °C
20 s
aprox. 160 °C
45 s
aprox. 400 °C
Temps d’opération
Température
10 s
aprox. 70 °C
15 s
aprox. 130 °C
20 s
aprox. 160 °C
45 s
aprox. 400 °C


