EN
44
Use and
Maintenance
User instructions of the
Touch Control
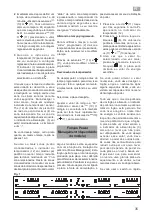
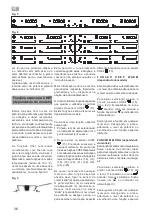
HANDLING ELEMENTS
¿J
൬
*HQHUDORQRႇVHQVRU
2 Cursor slider for controlling power.
൮
Power and/or residual heat
indicator*.
൯
Decimal dot of power and/of
residual heat indicator.
൰
Direct access to “Power” function.
൱
Activation sensor for “Block”
function.
൲
Pilot indicator light “Block”
function activated*.
൳
Activation sensor for “Stop&Go”
function.
൴
Pilot indicator light “Stop&Go”
function activated*.
൬൫
“Minus” sensor for timer.
൬൬
“Plus” sensor for timer.
12
Timer indicator.
൬൮
Decimal dot of the timer.*
൬൯
Activation sensor for “Flex Zone”
function ;(depending on model).
൬൰
Activation sensor for “Chef”
functions; (depending on model).
൬൱
Pilot indicator light “Keep Warm”
function activated*; (depending
on model).
൬൲
Pilot indicator light” Melting”
IXQFWLRQ DFWLYDWHG GHSHQGLQJ
on model).
൬൳
Pilot indicator light “Simmering”
function activated*; (depending
on model).
൬൴
Pilot indicator light “Quick Boiling”
function activated*; (depending
on model).
൭൫
Pilot indicator light “Slide Cooking”
function activated*; (depending on
model).
൭൬
Pilot indicator light “Grilling”
function activated* (depending
on model).
൭൭
Pilot indicator light “Pan Frying”
function activated* (depending
on model).
൭൮
Pilot indicator light “Deep Frying”
function activated* (depending
on model).
൭൯
3LORWLQGLFDWRUOLJKW³&RQ¿W´IXQFWLRQ
activated*; (depending on model).
൭൰
Pilot indicator light “Poaching”
function activated*; (depending on
model).
* Only visible while running.
The manoeuvres are done by means
of the touch keys. You do not need
to exert force on the desired touch
NH\ \RX RQO\ QHHG WR WRXFK LW ZLWK
\RXU¿QJHUWLSWRDFWLYDWHWKHUHTXLUHG
function
(DFKDFWLRQLVYHUL¿HGE\DEHHS
Use the cursor slider (2) to adjust
power levels (0 - 9) by sliding your
¿QJHURYHULW6OLGLQJWRZDUGVWKHULJKW
LQFUHDVHVWKHYDOXHZKHUHDVVOLGLQJ
towards the left decreases it.
It’s also possible to directly select a
power level by placing your finger
directly on a desired point of the cursor
slider (2)
In order to select a plate on
these models, directly touch the
cursor slider (
2
).
SWITCHING ON THE DEVICE
1
Touch the On touch key
(1) for at
least one second. The touch control
ZLOOEHFRPHDFWLYHDEHHSZLOOEH
heard and the indicators (3) will light
up displaying a “-”. If any cooking
DUHDLVKRWWKHUHODWHGLQGLFDWRUZLOO
ÀDVKDQ+
If you do not take any action in the
next 10 seconds the touch control will
VZLWFKRႇDXWRPDWLFDOO\
:KHQWKHWRXFKFRQWUROLVDFWLYDWHG
you can disconnect it at any time by
touching the touch button
HYHQ
if it has been locked (lock function
activated). The touch button
(1)
always has priority to disconnect the
touch control.
ACTIVATING PLATES
Once the Touch Control is activated
with sensor
DQ\SODWHFDQEH
turned on by following these steps:
1
Slide the finger or touch in any
position of one of the cursors
“slider” (2). The zone has been
selected and simultaneuously the
power level will be set between 0
and 9. That power value will be
shown on the corresponding power
indicator and its decimal dot (4) will
keep light up during 10 seconds.
2
Use the cursor slider (2) to choose
a new cooking level between 0 and
9.
$V ORQJ DV WKH SODWH LV VHOHFWHG LQ
RWKHU ZRUGV ZLWK WKH GHFLPDO
GRW OLJKW XS LWV SRZHU OHYHO FDQ EH
PRGL¿HG
TURNING OFF A PLATE
Using the touch slider key (2) lower
the power to level 0. The hotplate will
VZLWFKRႇ
:KHQDKRWSODWHLVVZLWFKHGRႇDQ
H will appear in its power indicator
LIWKHJODVVVXUIDFHRIWKHUHODWHG
cooking area is hot and there is a risk
RIEXUQV:KHQWKHWHPSHUDWXUHGURSV
WKHLQGLFDWRUVZLWFKHVRႇLIWKHKRE
LVGLVFRQQHFWHGRURWKHUZLVHD³´ZLOO
light up if the hob is still connected.
TURNING ALL PLATES OFF
All plates can be simultaneously
disconnected by using the general on/
RႇVHQVRU
(1). All plate indicators (3)
ZLOOWXUQRႇ,IWKHKHDWLQJ]RQHWXUQHG
RႇLVKRWLWVLQGLFDWRU
Pan detector
Induction cooking zones have a built-in
SDQGHWHFWRU7KLVZD\WKHSODWHZLOO
stop working if there is no pan present
or if the pan is not suitable.
The power indicator (3) will show a
symbol to designate “there is no pan
´LIZKLOHWKH]RQHLVRQQRSDQLV
detected or the pan is not suitable
,IDSDQLVWDNHQRႇWKH]RQHZKLOHLW
LVUXQQLQJWKHSODWHZLOODXWRPDWLFDOO\
stop supplying energy and it will
show the symbol for “there is no pan”.
When a pan is once again placed
Summary of Contents for KI6343.0SR
Page 139: ......


