background image

35

РУССКИЙ

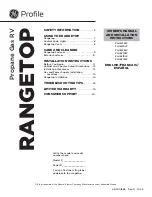
ПАСПОРТ ТЕХНИЧЕСКОГО ИЗДЕЛИЯ

Варочные панели

Данный  прибор  должен  быть 

встро- ен в шкаф кухонного гарнитура 

или столешницу шириной 300мм, при 

этом должны быть соблюдены требо

-

вания в отношении минимальных рас

-

стояний:


Â

Расстояние между краями ва-

рочной панели и боковой или зад

-

ней стенкой должно составлять не ме

-

нее 110-85 мм.


Â

Расстояние между самой вы- со

-

кой  точкой  варочной  панели  (вклю- 

чая  конфорки)  и  нижней  стороной 

любой  горизонтальной  поверхности, 

расположенной 

непосредственно 

над ней, должно составлять не менее 

700 мм. 

РАЗМЕЩЕНИЕ ПРИБОРА


Â

Расстояние  между  столешни

-

цей, в которую установлена варочная 

панель,  и  нижней  горизонтальной 

поверхностью  шкафа  кухонного  гар

-

нитура  должно  со-  ставлять  не  ме

-

нее 400 мм, при условии, что нижняя 

сторона  располагается  па-  раллельно 

внешнему  краю  варочной  па-  нели. 

Если расстояние до нижней сторо- ны 

горизонтальной  поверхности  меньше 

400 мм, то она должна быть смещена 

не  менее  чем  на  50  мм  в  сторону  от 

внешне- го края варочной панели.


Â

Вокруг прибора и между ва- роч

-

ной  панелью  и  любыми  горючими  ма

-

териалами должно быть оставлено рас

-

стояние не менее 50 мм.

Summary of Contents for FQ 601

Page 1: ...TECHNICAL PASSPORT GAS HOB FQ 601 FQ 602 FQ 62 FQ 63 TS 63...

Page 2: ...NG AND SERVICE 6 ENVIRONMENTAL INFORMATION 6 DESCRIPTION OF THE APPLIANCE 7 HOW TO USE THE APPLIANCE 7 SAFETY AND ENERGY SAVING ADVICE 9 CLEANING AND MAINTENANCE 10 USINGINSTRUCTIONS 12 POSITIONING 13...

Page 3: ...s of the products themselves The appliance is designed for a domestic environment and not a commercial one SAFETY INSTRUCTIONS Please take the time to read this Instruction Manual before installing or...

Page 4: ...85 C above the ambient temperature of the room it is located in whilst in use In the event of burner flames being accidentally extinguished turn off the burner control and do not attempt to re ignite...

Page 5: ...e materials in the storage drawer near this appliance Perishable food plastic items and aerosols may be affected by heat and should not stored aboye or below the appliance Do not spray aerosols in the...

Page 6: ...agents or serviced by an authorised Service Engineer and only genuine approved spare parts should be used Caution Before attempting to clean the appliance it should be disconnected from the mains and...

Page 7: ...602 FQ 62 FQ 63 B FQ 63 W TS 63 X HOW TO USE THE APPLIANCE The following symbols will appear on the control panel next to each control handle Black circle gas off Large flame maximum setting Small fl...

Page 8: ...d down the control knob for 15 seconds after the flame on the burner has lit If after 15s the burner has not lit stop operating the device and open the compartment door and or wait at least 1 min befo...

Page 9: ...urner as it could tip over Always place the cook ware right over the burners not to one side Do not use cookware with a large diameter on the burners near the controls which when placed on the middle...

Page 10: ...ol handles with a damp cloth washing up liquid and warm water For smbbon soiling soak beforehand Dry everything with a clean soft cloth Top plate Regularly wipe over the top plate using a soil cloth w...

Page 11: ...supervision device extend through their respective holes in the flame spreader The flame spreader must click into place correctly 2 Position the burner lid 1 2 3 ontothe flame speader 4 so that the re...

Page 12: ...any parts of the appliance which may become hot Gas pipe or connector shouldn t be bent or blocked by any other appliances Check the dimensions of the appliance as well as the dimensions of the gap to...

Page 13: ...t of the hob surface including the burners and the underside of any horizontal surface directly above it 400 mm between the hob surfaces providing that the underside of the horizontal surface is in li...

Page 14: ...ealing agent or overlap the thickness Sponge The thickness of the sponge is 3 mm The width of the sponge is 10 mm Caution Do not use a silicon sealant to seal the appliance against the aperture This w...

Page 15: ...l Female coupler 11 5 LPG NG The gas rail seal Female coupler G1 2 It is the law that all gas appliances are installed by competent persons in accordance with the current edition of the Gas Safety Ins...

Page 16: ...ted to a 220 240V 50Hz 60Hz AC electricity supply The wires in the mains lead are coloured in accordance with the following code Green yellow Earth Blue Neutral Brown Live Must Do The wire which is co...

Page 17: ...ly screwed in Refit the control knob Make sure that the flame does not go out by quickly turning from maximum flow to minimum flow If it does then remove the control knob and make further adjustments...

Page 18: ...the burners lids carefully The holes in the flame spreader are clogged Clean the flame spreader Noise made when combusted and ignited The burner lid is badly assem bled Assemble the burner lid correc...

Page 19: ...NUMBER CHART Month Year XXXXXXXXXXX Manufacturers Br Dizayn Mobilya n aat ve Is tma ve So utma Sistemleri A S 75 Yil OSB Mah Ibrahim enlik i Cad No 15 Odunpazar Eski ehir T rkiye Importers LLC MG Rus...

Page 20: ...20 TECHNICAL PASSPORT ENGLISH Gas hob NOTES...

Page 21: ...21 ENGLISH TECHNICAL PASSPORT Gas hob NOTES...

Page 22: ...22 23 23 24 25 25 27 28 28 29 30 31 34 35 36 37 38 38 38 40...

Page 23: ...23 1 2 3...

Page 24: ...24 1 1000 85...

Page 25: ...25...

Page 26: ...26 0...

Page 27: ...27...

Page 28: ...28 520 590 G1 2 220 240 50 60 1 2 1 1 2 1 1 2 1 Qn 7 00 8 30 8 10 FQ 601 FQ 602 FQ 62 FQ 63 B FQ 63 W TS 63 X 4 2 1 4 2...

Page 29: ...29 15 15 15...

Page 30: ...30 140 160 160 180 180 200...

Page 31: ...31 1 2 1 2 3 4 5 6...

Page 32: ...32...

Page 33: ...33 1 4 5 2 1 2 3 4 WOK...

Page 34: ...34...

Page 35: ...35 300 110 85 700 400 400 50 50...

Page 36: ...36 A C B 25 74 1 2 3 3 10 1 2 3...

Page 37: ...37 11 5 G1 2 Gas Safe Register BS 6172...

Page 38: ...38 WOK WOK WOK G20 20 G30 29 1 73 2 124 2 5 167 3 6 238 3 8 254 220 240 50 60...

Page 39: ...39 7 1 2 3 3 4 4 V...

Page 40: ...40...

Page 41: ...41 XXXXXXXXXXX 75 15 141400 4...

Page 42: ...42 NOTES...

Page 43: ...43 NOTES...

Page 44: ...44 NOTES...

Page 45: ...45 NOTES...

Page 46: ...46 7 495 236 90 67 Kuppersberg 8 800 250 17 18 9 00 18 00 Kuppersberg http kuppersberg ru 1 2 Kuppersberg 10 2 3 4 5 6 7 19 2...

Page 47: ...47 8 15 1 2 3 4 5 6 7 8 9 10 11 12 13 1 2 3 4 1 Kuppersberg 2 3 4...

Page 48: ...Kuppersberg www kuppersberg ru info kuppersberg ru...

Reviews: