background image

11

1.0 General information 

1.1. Liability and warranty

All information and details given in this instruction manual were compiled in con-

sideration of applicable regulations and our long-term insight and experience.

The manual was translated to the best of our knowledge. However, we will not 

take  liability  for  any  translation  errors.  The  enclosed  German  version  of  this 

manual overrides any translation.

In case of special versions, utilization of additional ordering options or newest 

technical modifications, the actual scope of delivery may differ from the product 

explained and illustrated in this document. If you have any questions, please 

contact the manufacturer.

1.2. Copyright

This instruction manual is a confidential document. It is intended exclusively for 

individuals working on or with the device. The manual must not be disclosed 

to third parties without prior agreement by the manufacturer in writing. If such 

agreement is required, please contact the manufacturer.

         Please note:

This instruction manual is to be read carefully before taking up any work on 

or with the device, particularly before initial setup! The manufacturer is not 

liable for damage or malfunction resulting from the nonobservance of this 

instruction manual.

We reserve the right to make technical modifications to the product within 

the scope of  improved usage properties and enhancements.

         Please note:

The list of contents, texts, drawings, photos and other illustrations are 

protected by copyright and subject to further industrial property rights. Any 

improper use is liable to prosecution.

Any type and form of copying, including excerpts, as well as the use and/or 

disclosure of the contents, is prohibited without the manufacturer‘s written 

certificate of release. Noncompliance will result in severe penalties. Further 

claims are reserved.

Summary of Contents for K-50

Page 1: ...Bedienungsanleitung Instruction Manual K 50 Farbkamera Colour Camera Art 11054 ...

Page 2: ... 8 8 Technische Daten Kamera Seite 9 9 Technische Daten Aal H M50 Seite 9 10 Hilfe bei Störungen Seite10 Contents 1 General information page11 2 Safety page12 3 Camera description page14 4 Initial operation page14 5 Mounting dismounting camera page15 6 Working with the camera page15 7 Instructions for care page16 8 Technical data camera page17 9 Technical data push rod H M50 page17 10 Troubleshoot...

Page 3: ...tigten Personen bestimmt Die Überlassung der Bedienungsanleitung an Dritte ohne schriftliche Zustimmung des Herstel lers ist unzulässig Bei Erfordernis wenden Sie sich bitte an den Hersteller HINWEIS Diese Bedienungsanleitung ist vor Beginn aller Arbeiten am und mit dem Gerät insbesondere vor der Inbetriebnahme sorgfältig durchzulesen Für Schäden und Störungen die sich aus der Nichtbeachtung der B...

Page 4: ...r im stromlosen Zustand durchführen Den Kamerakopf komplett in die Verbindung einschrauben dass Dichtung gewährleistet wird Die Kamera vor Gebrauch auf Schmutz und Beschädigungen prüfen Die Kamera NICHT mit einem Hochdruckstrahler reinigen Beschädi gung der Dichtung wahrscheinlich Zur Reinigung KEINE aggressiven Reinigungsmittel verwenden ACHTUNG Elektroschrott Elektronikkomponenten Schmier und an...

Page 5: ...Bereich in dem der Aal geführt wird absperren ACHTUNG Verletzungsgefahr durch Aal Der Aal ist eine glasfaserverstärkte Kunststoffstange Durch die darin ge speicherte Energie ist ein plötzliches Umherschlagen des Aals möglich z B wenn er sich verklemmt hat Daher den Aal außerhalb des zu untersuchenden Rohres möglichst kurz führen und nach Gebrauch unmittelbar wieder aufrol len ACHTUNG Blendgefahr B...

Page 6: ...ließen der Kamera an den Aal ist darauf zu achten dass die Stecker frei von Schmutz und Feuchtigkeit sind Gegebenenfalls müssen die Stecker gereinigt werden Weiterhin sind die O Ringe auf Beschädigungen wie Risse oder Porosität zu prüfen um die Dichtheit der Steckverbindung zu gewährleisten Alle Kameras und Aale der Kummert CamMobile Serie sind untereinander kompatibel Um jedoch eine optimale Schi...

Page 7: ... werden Abb 4 Demontage Zur Demontage der Kamera in der umge kehrten Reihenfolge verfahren 6 Arbeiten mit der Kamera Der maximal ausleuchtbare Rohrdurchmesser richtet sich im wesentlichen nach dem Reflexionsgrad der Rohroberfläche Generell gilt dass dunkle Ober flächen das Licht schlucken helle und nasse Oberflächen das Licht stärker reflektieren In größeren Rohrdimensionen unterstützt eine stärke...

Page 8: ... die Verwendung von aggressiven Reinigungsmitteln ist nicht zu empfeh len Aal Der Aal muss bereits beim Einholen mit einem feuchten sauberen Tuch gerei nigt werden Aal Haspel und Grundgerät Es dürfen weder Schmutz noch Feuchtigkeit in die Anschlüsse gelangen Tau chen Sie niemals die gesamte Haspel insbesondere die Achse unter Wasser sonst kann an dieser Stelle Feuchtigkeit eindringen und Schaden v...

Page 9: ... Betriebstemperatur 0 bis 50 C Ausleuchtbare Rohrdimensionen PVC max 200 mm Ton max 150 mm Beton max 200 mm Schärfebereich 3 cm bis 30 cm Besonderheit automatischer Horizontalausgleich 9 Technische Daten Aal H M50 Gewicht 6 kg Korbdurchmesser 46 cm Abmessung Durchmesser 7 mm Länge 50 m Meterzählung Reflexlichtschranken und Mikrocontroller Bremse regulierbare Freilaufbremse Haspelsperre Lagertemper...

Page 10: ...mmenes Bild Scheibe säubern Kein Bild System einschalten Stromversorgung kontrollieren Steckverbindungen überprüfen Schlechte Beleuchtung Beleuchtungskuppel säubern Andere Störungen Bitte kontaktieren Sie unsere Serviceabteilung Tel 49 0 9382 9727 710 ...

Page 11: ... The manual must not be disclosed to third parties without prior agreement by the manufacturer in writing If such agreement is required please contact the manufacturer Please note This instruction manual is to be read carefully before taking up any work on or with the device particularly before initial setup The manufacturer is not liable for damage or malfunction resulting from the nonobservance ...

Page 12: ...itched off Screw the camera head into the connection completely to ensure that the seal is watertight Please check the camera for dirt and or damage prior to use Never clean the camera with a high pressure washer Damage of the seals may occur Do not use harsh detergents for cleaning the camera Caution Electrical waste electronic components lubricants and other substances must be treated as hazardo...

Page 13: ...ary mark the rod or block off the area which the rod will be operated in Caution Risk of injury from GRP rod The push rod is a glass fibre reinforced plastic rod By reason of energy stored in the rod it may suddenly lash out e g when the rod has got stuck There fore Keep the rod as short as possible outside of the pipe to be inspected and reel it in immediately after use Caution Risk of blinding W...

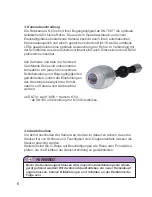
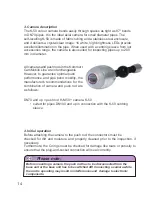
Page 14: ...ve 4 Initial operation Before attaching the camera to the push rod the connectors must be checked for dirt and moisture and properly cleaned prior to the inspection if necessary Furthermore the O rings must be checked for damage like tears or porosity to ensure that the plug and socket connection will seal correctly All cameras and push rods in the Kummert CamMobile Line are interchangeable Howeve...

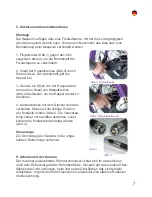
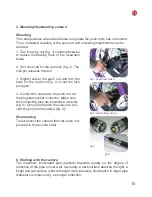
Page 15: ...n releases the reel 3 Slightly unreel the push rod and turn the knob for the reel lock fig 2 to set the lock pin again 4 Connect the camera to the push rod via the plug and socket connector Make sure the connecting pins are positioned correctly fig 3 Only hand tighten the sleeve to pre vent the pins from breaking fig 4 Dismounting To disconnect the camera from the push rod proceed in the reverse o...

Page 16: ...ed The use of harsh detergents is not recommended Push rod The push rod must be cleaned with a moist clean cloth as soon as the reeling in starts Push rod reel and base unit Be sure that no dirt or moisture get into the connection Never fully immerse the entire reel and the axle in particular in water as moisture could penetrate and cause damage Clean the base unit with a moist cloth Please note D...

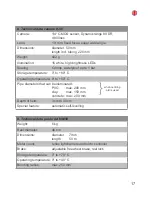
Page 17: ... Operating temperature 0 to 50 C Pipe diameters that can be illuminated PVC max 200 mm clay max 150 mm concrete max 200 mm Depth of field 3 cm to 30 cm Special feature automatic self levelling 9 Technical data push rod H M50 Weight 6 kg Reel diameter 46 cm Dimensions diameter 7 mm length 50 m Meter count reflex light barriers and micro controller Brake adjustable freewheel brake reel lock Storage ...

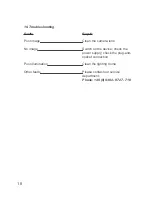
Page 18: ...oor image Clean the camera lens No image Switch on the device check the power supply check the plug and socket connection Poor illumination Clean the lighting dome Other faults Please contact our service department Phone 49 0 9382 9727 710 ...

Page 19: ...19 Notizen Notes ...

Page 20: ...0 Vertrieb durch Distributor Hersteller Manufacturer Kummert GmbH Albert Einstein Straße 8 D 97447 Gerolzhofen Tel 49 0 9382 97 27 0 Fax 49 0 9382 97 27 900 info kummert de www kummert de Firmenstempel Company stamp ...

Reviews: