background image

AFTER SALES SUPPORT

1300 886 649

[email protected]

AUS

MODEL: 419401   PRODUCT CODE: 48103   12/2014

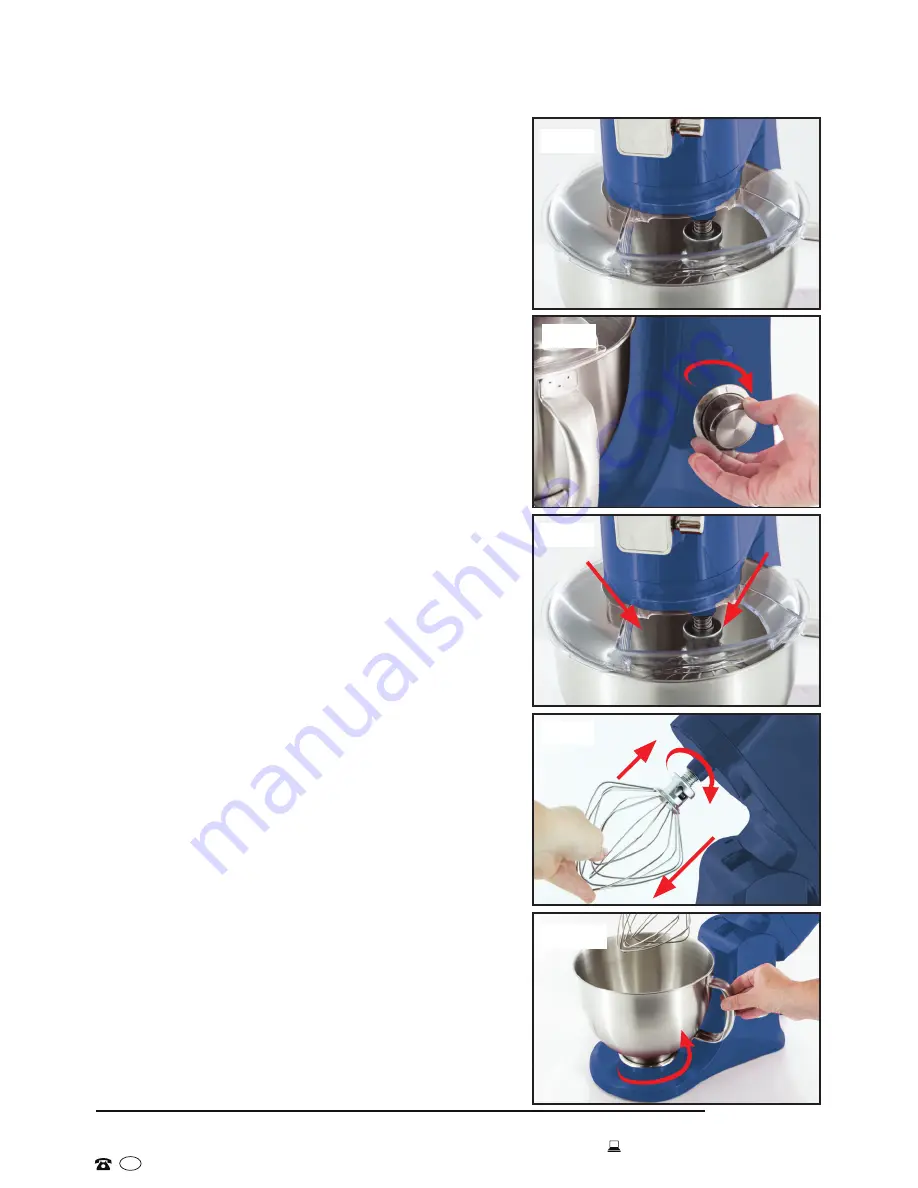
Fig. 7

Fig. 8

Fig. 6

Fig. 9

Fig. 10

11

Instructions (Cont.)

7.  Turn the rotary speed control clock-

wise


to select a suitable speed level, 

from 1 to 10 (Fig. 7). 
Speeds 1–3 are best for slow stirring, 
kneading and mashing, at the start 
of the mixing process. Speeds 4–6 
are for faster mixing, creaming and 
kneading. Speeds 7–10 are for fast 
mixing, whipping and beating. 
Once a speed level has been set, 
the working light at the underside 
of the mixer head switches on and 
illuminates the contents of the bowl. 

8.  During mixing, add ingredients as 

required through the pouring shield 
(Fig. 8). 

9.  Once mixing is complete, switch 

the mixer off by moving the rotary 
speed control dial to the OFF [ 0 ] 
position. The working light will stay 
on and switch off automatically after 
approximately 3 minutes.
Slide and hold the tilt head release 
lever towards the UNLOCK position 
and slightly tilt the mixer head 
upwards, remove the splash guard, 
then continue to tilt upwards until the 
mixer head locks into place. 

10. Gently push the mixing tool upwards 

and turn it clockwise until the lug on 
the retainer is located at the recess of 
the mixing tool; it will slowly release 
and the mixing tool can now be 
removed (Fig. 9).

11. Turn the bowl anticlockwise and take 

it off the base (Fig. 10).

12. After use, unplug the power cord from 

the wall outlet and wash the parts as 
described on page 14.

Summary of Contents for 419401

Page 1: ...AFTER SALES SUPPORT 1300 886 649 info tempo org AUS MODEL 419401 PRODUCT CODE 48103 12 2014 INSTRUCTION MANUAL Model Number 419401 Stand Mixer N13275 ...

Page 2: ...n choosing to buy a Kuchef product All products brought to you by Kuchef are manufactured to the highest standards of performance and safety and as part of our philosophy of customer service and satisfaction are backed by our comprehensive 3 Year Warranty We hope you will enjoy using your purchase for many years to come ...

Page 3: ...19401 PRODUCT CODE 48103 12 2014 3 Contents 02 Welcome 04 Warranty Details 05 General Safety Instructions 07 Product Overview 09 Getting Started 10 Instructions 13 Troubleshooting Guide 14 Other Useful Information 19 Repair and Refurbished Goods or Parts Notice ...

Page 4: ...o charge for parts and labour The benefits conferred by this warranty are in addition to all rights and remedies in respect of the product that the consumer has under the Competition and Consumer Act 2010 and similar state and territory laws Our goods come with guarantees that cannot be excluded under the Australian Consumer Law You are entitled to a replacement or refund for a major failure and t...

Page 5: ...ARNING To reduce the risk of electrocution never operate this product with wet hands Never submerge the device the mains plug and or the power cord in water or other liquid Power cord Do not kink squash or damage the power cord and protect it from sharp edges and heat Do not let the cord hang over the edge of a table or benchtop do not let it touch hot surfaces Extension cord We recommend you do n...

Page 6: ...ave the appliance unattended during operation Accessories The use of accessory attachments other than those recommended in this manual may result in fire electric shock and or injury Installation Improper installation may result in the risk of fire electric shock and or personal injury We accept no liability for any damage due to improper use or incorrect handling Work surface Place the appliance ...

Page 7: ...UCT CODE 48103 12 2014 7 Product Overview 1 Tilting mixer head 2 Shaft 3 Tilt head release lever 4 Rotary speed control 5 Mixing bowl 6 Mixer base with bowl locking recess 1 2 3 4 5 6 NOTE The mixing tools and accessories are pictured and explained on the following pages ...

Page 8: ...t beater use for mixing normal to lighter cake and biscuit dough pancake batter or for stirring ingredients 9 Dough hook use on a low speed setting for mixing and kneading heavier e g yeast cake bread pizza and pasta dough or for mixing raw minced meat 10 Splash guard with pouring shield use to pour ingredients into the bowl during mixing and prevent spillage 11 Scraper use after the tools have st...

Page 9: ...s on the previous pages Wash the mixing bowl splash guard scraper and the three mixing tools with a soft cloth or sponge in warm water and a little dish detergent to remove any dust from transport or other remnants from the manufacturing process Rinse with clean water and dry thoroughly Your new Stand Mixer is now ready for use CAUTION 5 minutes on 15 minutes off You can use the mixer for up to 5 ...

Page 10: ... sure that the lug on the shaft is passed through the slot on the mixing tool Push the mixing tool up and turn it anticlockwise until the lug is positioned in the recess provided on the mixing attachment Fig 3 4 Place the mixing bowl into place on the base of the mixer Turn the bowl clockwise until it is correctly and securely locked in place Fig 4 Place the ingredients into the bowl in accordance...

Page 11: ...as required through the pouring shield Fig 8 9 Once mixing is complete switch the mixer off by moving the rotary speed control dial to the OFF 0 position The working light will stay on and switch off automatically after approximately 3 minutes Slide and hold the tilt head release lever towards the UNLOCK position and slightly tilt the mixer head upwards remove the splash guard then continue to til...

Page 12: ... drier mixtures it may be necessary to switch off the appliance occasionally and when the tools have stopped moving scrape the mixture with the supplied plastic scraper from the walls of the bowl back into the centre of the bowl CAUTION 5 minutes on 15 minutes off You can use the mixer for up to 5 minutes without stopping Then let it cool down for at least 15 minutes For heavy mixing tasks such as...

Page 13: ...all outlet and that power is switched on at the outlet Make sure that the power outlet is not defective check it with another appliance or use a different outlet Check and ensure that the rotary speed control is set to the appropriate mixing speed between position 1 and 10 Turning the rotary speed control has no effect Make sure the mixer head has been lowered properly The appliance will not work ...

Page 14: ...r on the upper rack or by hand using warm water and mild detergent rinse and dry thoroughly If necessary soak the mixing tools in warm soapy water to soften stubborn remnants of dough for easy removal Do not use any caustic or abrasive cleaning agents to clean any part of the appliance as these can damage the surface coating Storage Store the appliance in a dry clean place that is not accessible t...

Page 15: ...eel mixing bowl Transparent plastic splash guard with pouring shield Plastic scraper Responsible disposal At the end of its working life do not throw this appliance out with your household rubbish Electrical and electronic products contain substances that can have a detrimental effect on the environment and human health if disposed of inappropriately Observe any local regulations regarding the dis...

Page 16: ...AFTER SALES SUPPORT 1300 886 649 info tempo org AUS MODEL 419401 PRODUCT CODE 48103 12 2014 16 This page has been left blank intentionally ...

Page 17: ...AFTER SALES SUPPORT 1300 886 649 info tempo org AUS MODEL 419401 PRODUCT CODE 48103 12 2014 17 This page has been left blank intentionally ...

Page 18: ...AFTER SALES SUPPORT 1300 886 649 info tempo org AUS MODEL 419401 PRODUCT CODE 48103 12 2014 18 This page has been left blank intentionally ...

Page 19: ... be lost We recommend you save this data elsewhere prior to sending the product for repair You should also be aware that rather than repairing goods we may replace them with refurbished goods of the same type or use refurbished parts in the repair process Please be assured though refurbished parts or replacements are only used where they meet ALDI s stringent quality specifications If at any time ...

Page 20: ...ason need to return this product for a warranty claim make sure to include all accessories with the product Product does not work If you encounter problems with this product or if it fails to perform to your expectations make sure to contact our After Sales Support Centre on 1300 886 649 before returning it to the store for a refund ...

Reviews: