background image

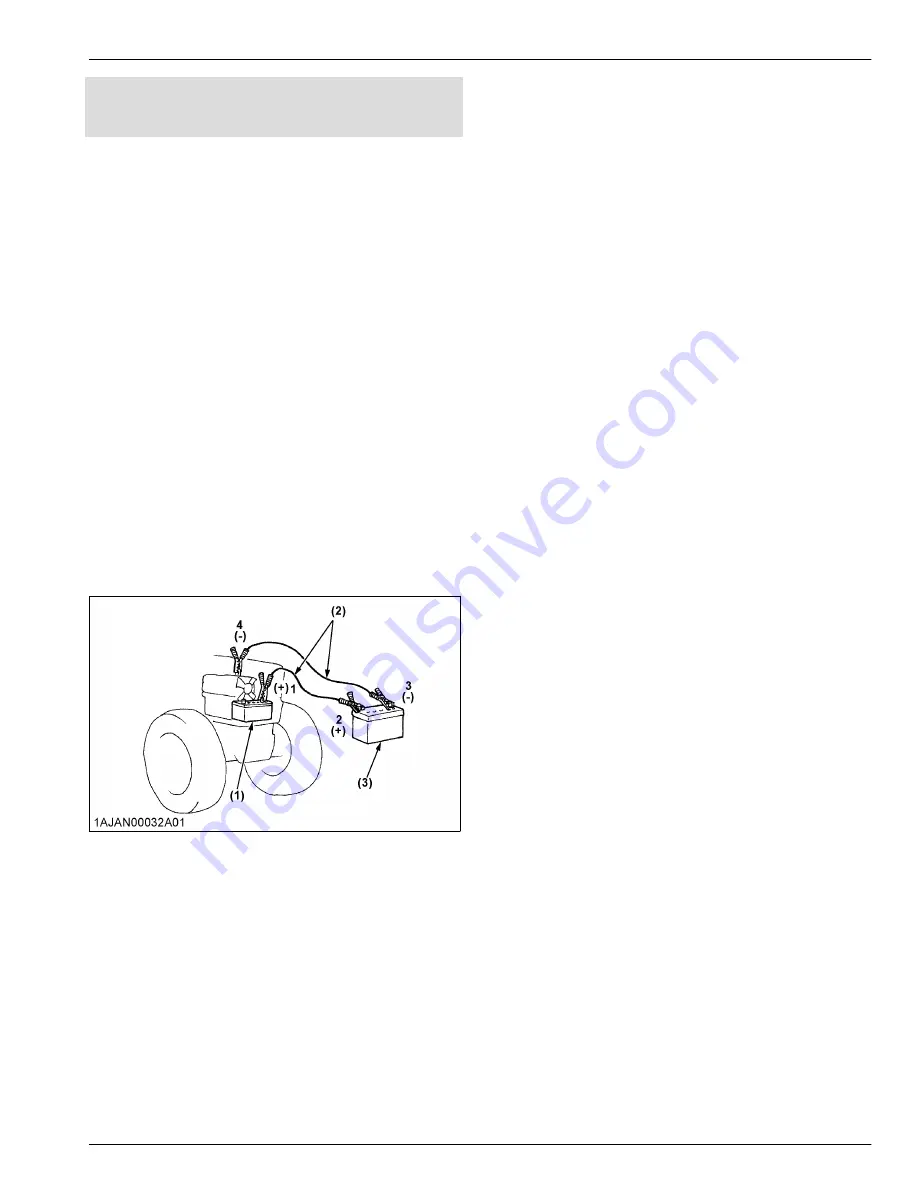
• Do not connect the other end of the negative (-)

jumper  cable  to  the  negative  (-)  terminal  of  the
tractor battery.

When  jump  starting  the  engine,  follow  the  instructions
in this section to safely start the engine.

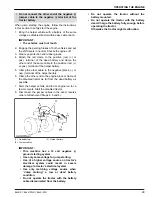
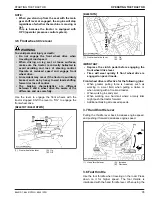
1. Bring the helper vehicle with a battery of the same

voltage as disabled tractor within easy cable reach.

IMPORTANT :

• The vehicles must not touch.

2. Engage the parking brakes of both vehicles and put

the shift levers in neutral. Shut both engines off.

3. Wear eye protection and rubber gloves.
4. Attach  the  red  clamp  to  the  positive  (red,  (+)  or

pos.)  terminal  of  the  dead  battery  and  clamp  the
other end of the same cable to the positive (red, (+)
or pos.) terminal of the helper battery.

5. Clamp the other cable to the negative (black, (-) or

neg.) terminal of the helper battery.

6. Clamp the other end to the engine block or frame of

the disabled tractor as far from the dead battery as
possible.

7. Start the helper vehicle and let its engine run for a

few moments. Start the disabled tractor.

8. Disconnect  the  jumper  cables  in  the  exact  reverse

order of attachment (Steps 6, 5 and 4).

(1) Dead battery
(2) Jumper cables

(3) Helper battery

IMPORTANT :

• This  machine  has  a  12  volt  negative  (-)

ground starting system.

• Use only same voltage for jump starting.
• Use  of  a  higher  voltage  source  on  tractor's

electrical  system  could  result  in  severe
damage to tractor's electrical system.

• Use  only  matching  voltage  source  when

“Jump  starting”  a  low  or  dead  battery
condition.

• Do  not  operate  the  tractor  with  the  battery

cable disconnected from the battery.

• Do  not  operate  the  tractor  without  the

battery mounted.

• Do  not  operate  the  tractor  with  the  battery

dead. Charge the battery fully enough before
operating the tractor.
Otherwise the tractor might malfunction.

 OPERATING THE ENGINE

B2401DT, B2401DTWO, B2401DTN

29

Summary of Contents for B2401DT

Page 1: ...ran Suban Sun ai Pena a Industrial Park 47500 Suban Jaya Telephone 60 3 7890 3533 Philippines KUBOTA PHILIPPINES INC 232 Quirino Hi hway Baesa Quezon City 1106 Philippines Telephone 63 2 422 3500 Taiw...

Page 2: ...um Institute American Society of Agricultural and Biological Engineers USA American Society of Testing and Materials USA Deutsches Institut fur Normung GERMANY Dual Traction 4WD Feet Per Minute Glide...

Page 3: ...Engine Oil Pressure Turn Signal Engine Stop Engine Run Diesel Preheat Glow Plugs Low Temperature Start Aid Starter Control Power Take Off Clutch Control Off Position Power Take Off Clutch Control On P...

Page 4: ...It will give you long satisfactory service To obtain the best use of your tractor please read this manual carefully It will help you become familiar with the operation of the tractor and contains man...

Page 5: ...marks or registered trademarks of their respective owners In the text those names are not accompanied by trademark symbols ABOUT TRADEMARKS Trademark Owner AdBlue AdBlue is a registered trademark of t...

Page 6: ......

Page 7: ...he tractor at full speed for the first 50 hours 30 2 Changing lubricating oil for new tractors 30 BOARDING AND LEAVING THE TRACTOR 30 OPERATING THE FOLDABLE ROPS 30 1 Folding the ROPS 30 2 Raising the...

Page 8: ...ts 43 2 1 Lifting rod right 43 2 2 Top link 43 2 3 Telescopic stabilizers 43 DRAWBAR 44 1 Adjusting drawbar length 44 HYDRAULIC UNIT 45 3 POINT HITCH CONTROL SYSTEM 45 1 Position control 45 2 3 point...

Page 9: ...engine start system 69 3 Checking wheel bolt torque 69 4 Checking dust covers tie rod drag link 70 5 Checking lower link set bolt 70 EVERY 100 HOURS 70 1 Battery 70 2 Cleaning air cleaner primary elem...

Page 10: ...lacing the intake air line 81 SERVICE AS REQUIRED 81 1 Bleeding fuel system 81 2 Draining clutch housing water 81 3 Replacing fuse 81 4 Replacing light bulb 82 5 Replacing radiator hose water pipes 82...

Page 11: ...se and trash build up may contribute to fires and lead to personal injury Use only implements meeting the specifications listed under IMPLEMENT LIMITATIONS on page 21 or implements approved by KUBOTA...

Page 12: ...t belt if the tractor has a CAB or a foldable ROPS in the upright and locked position Do not start engine by shorting across starter terminals or bypassing the safety start switch Machine may start in...

Page 13: ...n air monitoring or training programs offered by the employer Be aware of and use optional equipment controls such as water sprays local exhaust ventilation and enclosed CABs with positive pressure ai...

Page 14: ...ign is clean and visible Use hazard lights and turn signals as required 1 SMV emblem 2 Bracket Observe all local traffic and safety regulations Turn the headlights on Dim them when meeting another veh...

Page 15: ...the proper counterbalance weight on the front of the tractor When transporting on the road set the implement lowering speed knob in the LOCK position to hold the implement in the raised position 1 3 p...

Page 16: ...ll residual pressure Before applying pressure to the hydraulic system make sure that all connections are tight and that all lines pipes and hoses are free of damage Fluid escaping from pinholes may be...

Page 17: ...SAFETY LABELS SAFE OPERATION B2401DT B2401DTWO B2401DTN 11...

Page 18: ...SAFE OPERATION 12 B2401DT B2401DTWO B2401DTN...

Page 19: ...SAFE OPERATION B2401DT B2401DTWO B2401DTN 13...

Page 20: ...SAFE OPERATION 14 B2401DT B2401DTWO B2401DTN...

Page 21: ...SAFE OPERATION B2401DT B2401DTWO B2401DTN 15...

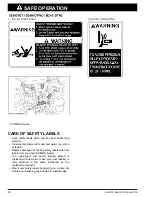
Page 22: ...sing safety labels with new labels from your local KUBOTA Dealer If a component with safety label s affixed is replaced with new part make sure new label s is are attached in the same location s as th...

Page 23: ...parts be prepared to give your dealer the product identification number PIN and the CAB ROPS and engine serial numbers Locate the PIN and serial numbers now and record them in the space provided Date...

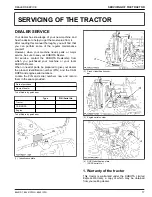
Page 24: ...the warranty period 2 Scrapping the tractor and its procedure To put the tractor out of service correctly follow the local rules and regulations of the country or territory where you scrap it If ther...

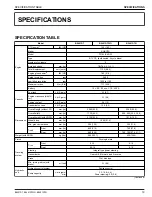
Page 25: ...als 12 5 3 3 Dimensions Overall length without 3P mm in 2385 93 9 2360 92 9 Overall width mm in 1125 44 3 900 990 35 4 39 0 Overall height with ROPS mm in 2130 83 9 1910 75 2 Wheel base mm in 1560 61...

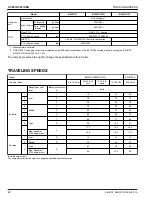
Page 26: ...he right to change the specification without notice TRAVELING SPEEDS Model B2401DT B2401DTWO B2401DTN Tire size Rear 9 5 16 Farm 33x12 5 15 Turf 12 16 5 In dusty 12 16 5 R14 8 16 Farm Range gear shift...

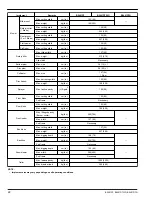
Page 27: ...tires Lower link end max loading weight W0 Front Rear B2401DTN 705 mm 27 8 in 700 mm 27 6 in 790 mm 31 1 in 300 kg 660 lbs B2401DT 800 mm 31 5 in 900 mm 35 4 in B2401DTWO Actual figures B2401DTN B2401...

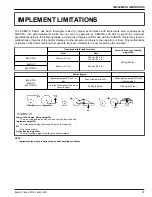
Page 28: ...isc harrow Max harrowing width cm in 152 60 Max weight kg lbs 190 420 Sprayer Max tank capacity L U S gals 190 50 Front blade Max cutting width cm in 152 60 Sub frame Necessary Rear blade Max cutting...

Page 29: ...light switch 32 2 Coolant temperature gauge 37 3 Hazard light switch 32 4 Turn signal light switch 32 5 Head light switch 32 6 Hourmeter tachometer 37 7 Easy Checker 36 8 Fuel gauge 36 9 Key switch 2...

Page 30: ...Range gear shift lever L M H 34 7 Electrical outlet 39 8 Cup holder 9 Hand throttle lever 35 10 Foot throttle 35 11 Brake pedals 33 12 Loader remote control valve lever B2401DT only 47 13 Main gear sh...

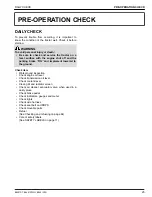
Page 31: ...ent lowered to the ground Check item Walk around inspection Check engine oil level Check transmission oil level Check coolant level Clean grill and radiator screen Check air cleaner evacuator valve wh...

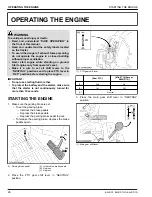
Page 32: ...use starting fluid or ether To protect the battery and the starter make sure that the starter is not continuously turned for more than 10 seconds STARTING THE ENGINE 1 Make sure the parking brake is s...

Page 33: ...Preheat D Start Check Easy Checker lamps When the key is turned ON lamps 3 4 should come on If trouble should occur at any location while the engine is running the warning lamp corresponding to that...

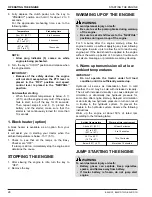
Page 34: ...he parking brake during warmup of the engine Be sure to set all shift levers to the NEUTRAL positions during warm up of the engine For 5 minutes after the engine start up allow the engine to warm up w...

Page 35: ...to the engine block or frame of the disabled tractor as far from the dead battery as possible 7 Start the helper vehicle and let its engine run for a few moments Start the disabled tractor 8 Disconnec...

Page 36: ...tractors The lubricating oil is especially important in the case of a new tractor The various parts are not broken in and are not accustomed to each other Small metal grit may develop during the oper...

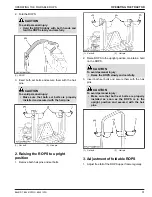
Page 37: ...ir pins and set bolts 1 Set bolt 2 Hair pin 2 Raise ROPS to the upright position maintain a hold on the ROPS CAUTION To avoid personal injury Raise the ROPS slowly and carefully 3 Insert both set bolt...

Page 38: ...e seat belt if a foldable ROPS is down or there is no ROPS Adjust the seat belt for proper fit and connect to the buckle The seat belt is auto locking retractable type 1 Seat belt 2 Operator presence...

Page 39: ...ight turn signal is activated without the hazard lights the indicated turning light will flash and the other will stay on NOTE The hazard light switch is operative when the key switch is in either the...

Page 40: ...eath Sudden release of the clutch may cause the tractor to lunge in an unexpected manner The clutch is disengaged when the clutch pedal is fully pressed down 1 Clutch pedal IMPORTANT To help prevent p...

Page 41: ...d Shift the lever to ON to engage the front wheel drive B2401DT B2401DTWO 1 Front wheel drive lever A On B Off B2401DTN 1 Front wheel drive lever A On B Off IMPORTANT Depress the clutch pedal before e...

Page 42: ...le 1 Easy Checker Engine oil pressure If the oil pressure in the engine goes below the prescribed level the warn ing lamp in the Easy Checker will come on If this should happen during opera tion and i...

Page 43: ...e dial PTO 1 The hourmeter indicates the hours that the tractor has been used in 5 digits and the last digit indicates 1 10 of an hour 1 Engine revolution 2 Hours used A PTO 540 rpm PTO 1 PARKING 1 Pa...

Page 44: ...ement attached be sure to have sufficient front weight on the tractor to maintain steering ability See Front ballast on page 54 Rear ballast on page 55 Towed equipment without brake must not exceed 1...

Page 45: ...lve is activated Do not hold the steering wheel in this position for a long period of time Avoid turning the steering wheel while the tractor is stopped or tires may wear out sooner The power steering...

Page 46: ...id shock loads to the PTO reduce engine speed when engine the PTO then open the throttle to the recommended speed Replace restricting plate to C position after use of the 2nd PTO speed To avoid damage...

Page 47: ...TO system for chipper or pump for example start the PTO system in the following steps 1 Apply the parking brakes and place blocks at the tires 2 Make sure the shift levers are at NEUTRAL and start the...

Page 48: ...3 POINT HITCH AND DRAWBAR 1 Top link 2 Top link holder 3 Lifting rod left 4 Telescopic stabilizers 5 Lower link 6 Lifting rod right 7 Drawbar 3 POINT HITCH AND DRAWBAR 42 B2401DT B2401DTWO B2401DTN...
Page 49: ...tor and implement on a firm flat and level surface Whenever an implement or other attachment is connected to the tractor 3 point hitch check full range of operation for interference binding or PTO dri...

Page 50: ...personal injury or death Never pull from the top link the rear axle or any point above the drawbar Doing so could cause the tractor to tip over rearward causing personal injury or death 1 Adjusting dr...

Page 51: ...vated the hydraulic mechanism is not adjusted properly Unless corrected the unit will be damaged Contact your KUBOTA Dealer for adjustment 2 3 point hitch lowering speed WARNING To avoid personal inju...

Page 52: ...third line return to tank for the operation of hydraulic block NOTE The tank port flow from implement valve should be connected to the port located on the right hand side of transmission case 1 Return...

Page 53: ...let ports of second segment Lever Right Left Port 3 Out Pressure In Returning 4 In Returning Out Pressure IMPORTANT To avoid damage of the attachments Do not connect attachments through the hydraulic...

Page 54: ...e is high at position R1 and low at position R2 Move the lever to position R1 or R2 depending on the attachment in use 3 Valve lock WARNING To avoid personal injury or death from crushing Do not utili...

Page 55: ...e1 Position control Yes no Loose Insert the set pin through the slot on the outer tube that align with one of the holes on the inner bar For implements with gauge wheels low er the implements to the g...

Page 56: ...Rear 8 16 4PR 160 kPa 1 6 kgf cm2 23 psi 8 3 16 6PR 150 kPa 1 5 kgf cm2 22 psi 9 5 16 4PR 140 kPa 1 4 kgf cm2 20 psi 12 16 5 4PR 270 kPa 2 7 kgf cm2 40 psi 31 15 5 15 4PR 140 kPa 1 4 kgf cm2 20 psi 3...

Page 57: ...rsonal injury or death Before jacking up the tractor park it on a firm and level ground and chock the rear wheels Fix the front axle to keep it from pivoting Select jacks that withstand the machine we...

Page 58: ...B2401DTWO a 835 mm 32 9 in 2 Rear wheels WARNING To avoid personal injury or death Before jacking up the tractor park it on a firm and level ground and chock the front wheels Fix the front axle to kee...

Page 59: ...900 mm 35 4 in 33 12 5 15 Turf a 950 mm 37 4 in 31 15 5 15 Bar a 950 mm 37 4 in 12 16 5 Ind 12 16 5 R14 a 950 mm 37 4 in IMPORTANT If not attached as illustrated transmission parts may be damaged When...

Page 60: ...ill be needed for transporting heavy implements When the implement is raised drive slowly over rough ground regardless of how much ballast is used Do not fill the front wheels with liquid 1 Front ball...

Page 61: ...4 L 1 gal of water 35 kg 77 lbs 54 kg 119 lbs Slush free at 24 11 Solid at 47 52 Approx 1 5 kg 3 5 lbs CaCl2 per 4 L 1 gal of water 37 kg 82 lbs 57 kg 126 lbs Slush free at 47 52 Solid at 52 62 Approx...

Page 62: ...he rear wheels for increased stability 1 Rear wheel weights IMPORTANT Do not overload tires Add no more weight than indicated in chart Maximum weight per wheel 32 kg 1 piece 71 lbs TIRES WHEELS AND BA...

Page 63: ...r 78 3 Secondary element Replace Every 1000 Hr or 1 year 78 3 13 Fuel filter element Check Every 100 Hr 72 Replace Every 400 Hr 77 14 Fan belt Adjust Every 100 Hr 73 15 Clutch Adjust Every 100 Hr 73 1...

Page 64: ...ine according to the above instruction Please see Warranty Statement in detail When using biodiesel be sure to check the maintenance requirements of biodiesel fuel as the intervals will change in some...

Page 65: ...he Operator s Manual depending on countries or territories Consult your KUBOTA Dealer for further details Engine oil Oil used in the engine should have an American Petroleum Institute API service clas...

Page 66: ...recommend Super UDT 2 to be used instead of standard hydraulic transmission fluid Super UDT 2 is a proprietary KUBOTA formulation that delivers superior performance and protection in all operating con...

Page 67: ...may cause fuel line corrosion or reduce fuel filter flow earlier than expected 4 BDF inherently absorbs moisture which may cause degradation of the fuel earlier than expected To avoid this drain the...

Page 68: ...machine longer than 1 month drain the fuel from the tanks and replace with light mineral oil diesel fuel Subsequently run the engine at least 30 minutes to remove all of the Biodiesel from the fuel li...

Page 69: ...eans Waste products such as used oil fuel coolant hydraulic fluid aqueous urea solution DEF AdBlue refrigerant solvent filters rubber batteries and harmful substances can harm the environment people p...

Page 70: ...wing precautions when checking the tractor Park the machine on firm and level ground Set the parking brake Lower the implement to the ground All residual pressure of the hydraulic system released Stop...

Page 71: ...RNING To avoid personal injury or death Be sure to stop the engine before checking the oil level 1 Park the machine on a flat surface 2 Check engine oil before starting the engine or 5 minutes or more...

Page 72: ...between the FULL and LOW marks of recovery tank 2 When the coolant level drops due to evaporation add soft water only up to the full level In case of leakage add antifreeze and soft water in the speci...

Page 73: ...se blows soon after replacement do not use a larger than recommended fuse or bypass the fuse system Many wiring connections are protected by waterproof plugs plug and unplug these connections carefull...

Page 74: ...nditions lubricate grease fittings more often 1 Grease fitting range gear shift lever 1 Grease fitting brake pedal 1 Grease fitting clutch pedal B2401DTN only 1 Grease fitting brake pedal shaft All mo...

Page 75: ...shift lever 1 Fully depress the clutch pedal 2 Shift the main gear shift lever to NEUTRAL position 3 Shift the PTO gear shift lever to ON engaged position 4 Turn the key to START position 5 The engin...

Page 76: ...gf m 31 7 lbf ft to 34 7 lbf ft EVERY 100 HOURS 1 Battery DANGER To avoid the possibility of battery explosion For the refillable type battery follow the following instructions Do not use or charge th...

Page 77: ...ary add distilled water in a wellventilated area 1 Battery A Upper level B Lower level The water in the electrolyte evaporates during recharging Liquid shortage damages the battery Excessive liquid sp...

Page 78: ...moved Be sure to refit the cover with the arrow on the rear of cover upright If the cover is improperly fitted evacuator valve will not function and dust will adhere to the element Do not touch the se...

Page 79: ...the belt span with a force of 10 kgf and adjust the deflection to 7 mm to 9 mm 0 28 in to 0 35 in 1 Stop the engine and remove the key 2 Apply moderate thumb pressure to belt between pulleys 3 If ten...

Page 80: ...Brake pedal A Free travel 1 Lock nut 2 Turnbuckle EVERY 200 HOURS 1 Replacing engine oil filter WARNING To avoid personal injury or death Be sure to stop the engine before changing the oil filter car...

Page 81: ...the oil completely into the oil pan 2 After draining reinstall the drain plug 3 Fill with the new oil up to the upper notch on the dipstick See LUBRICANTS FUEL AND COOLANT on page 59 NOTE In adding e...

Page 82: ...and can burn 1 To drain the used oil remove the drain plug at the bottom of the transmission case and drain the oil completely into the oil pan 2 After draining reinstall the drain plug 1 Drain plug E...

Page 83: ...er changing the transmission fluid Run the engine at medium speed for a few minutes to prevent damage to the transmission 3 Replacing the fuel filter element See Cleaning fuel filter on page 72 4 Chan...

Page 84: ...g once every 2000 hours or biennially whichever comes first 1 Flushing cooling system and changing coolant WARNING To avoid personal injury or death Do not remove radiator cap while coolant is hot Whe...

Page 85: ...mix of long life coolant and clean soft water in KUBOTA engines Consult your local KUBOTA Dealer concerning coolant for extreme conditions NOTE The following data represent industry standards that ne...

Page 86: ...or cracked Replace hoses and hose clamps every 4 years or earlier if checked and found that hoses are swollen hardened or cracked 1 Radiator hoses 2 Hose clamps Precaution at overheating Take the foll...

Page 87: ...fuel tank with fuel 2 Start the engine and run for about 30 seconds and then stop the engine 2 Draining clutch housing water The tractor is equipped with a drain plug under the clutch housing After op...

Page 88: ...t 12 V 1 7 W Replace the following parts if any deterioration crack hardening scar or deformation or damage occurred However must be replaced every 4 years regardless of the condition 5 Replacing radi...

Page 89: ...nside and adversely affected The crawlers tires oil seals and other rubberbased components the decorative covers and other plastic based components and the windows and other glass based components may...

Page 90: ...edures See Battery on page 70 9 Keep the tractor in a dry place where the tractor is sheltered from the elements Cover the tractor 10 Store the tractor indoors in a dry area that is protected from sun...

Page 91: ...ractor only when the tractor is going to be used Insufficient engine power Insufficient or dirty fuel The air cleaner is clogged Check the fuel system Clean or replace the element Engine stops suddenl...

Page 92: ...OPTIONS Consult your local KUBOTA Dealer for further detail Front end weights For front ballast Mounting kit front end weights To mount front end weights OPTIONS 86 B2401DT B2401DTWO B2401DTN...

Page 93: ...cking level 66 coolant table 59 coolant temperature gauge function 37 cooling system flushing 78 D daily check 25 dealer service 17 differential lock function 38 drawbar 42 adjusting length 44 functio...

Page 94: ...ecking 67 hazard light switch function 32 head light checking 67 head signal light switch function 32 holes of lifting rod selecting 43 hood closing 64 opening 63 hose clamp checking 80 hourmeter func...

Page 95: ...h 23 T tachometer function 37 telescopic stabilizer function 43 tire inflation pressure 50 top link adjusting 43 top link mounting hole selecting 43 tractor before operating 5 changing lubricating oil...

Reviews: