Data
YYMMDD
1234567
123456789012345
ktEgg_123
moda12345
- Later on, after connection is completed, execute the
Web browser to verify the internet connection.
MSIP-CRM-MDJ-KMR200
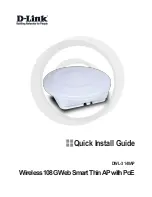
Front
Side
Rear
Side
1
2
4
5
Micro USB port
(for charging main body)
8
Initialization Button
6
USIM Cover
9
Nano
USIM Slot
7
a
LTE signal strength
b
Message Display
Window
c
No of WiFi connections
The accessories can be changed without notice due to performance enhancement or other reasons.
Please be careful not to damage on the metal
area of USIM when inserting or releasing.
Inserting a USIM card with wet hands
may cause a damage in USIM.
Using other accessories except the supplied items may cause failure in product,
please use the supplied items.
Memo
●Power On
-Pressing & holding [Power(OK)] button for more than 3 sec displays
on LCD screen.
-After LCD On, it takes approximately 20~30 seconds to complete a booting.
●Window 7
-Select [Start
▶
Control Panel
▶
Network & Sharing Center]
-Select [Network Connection]
-Select the [ktEgg_xxx] among WiFi names shown in [Wireless
Network Connection] and then click [Connect] Button.
※ “xxx” refers to the terminal number or the
unique number of English characters .
- Open the USIM cover in main body and copy ‘KEY’
(WiFi Password) value on the attached label, then input the
value to a window “Network Security Key Input”.
●Power Off
-Pressing & holding [Power(OK)] button at the side of product for more than
3 seconds results in Off state of LCD in the product.
-Power goes Off right after LCD Off.
●Entering Power Saving Mode
-To enter Power Saving Mode, press & hold [Power Saving(Next)]
button for 3 seconds causes LCD Off.
-Power Saving Mode display automatically goes off after 20-40 seconds.
●Releasing Power Saving Mode
-Pressing & holding [Power Saving(Next)] button for 3 seconds in Power Saving Mode
results in LCD On.
-Power Saving Mode is released after LCD On.
Power Saving / Next Button
●
Press & Hold: Entering/Releasing Power Saving Mode
●
Press: Move to next menu
Power / OK Button
●
Press & Hold: Power On/Off
●
Press: Menu Selection
●
This product requires separate circuit contract with a specified service provider, KT.
●
The pictures and images in this user guide may be different from real product.
●
The software version of this product can vary depending on the conditions of the service provider,
and can be changed without a notice.
Ver 1.0
6. Procedures for Charging
7. Power On/Off and Entering/Releasing Sleep Mode 8. WiFi Connection
●
Charging with a charger
Frequently Asked Questions
Warranty
Ver 1.0
FAQ
KMR200
Function
f. Bluetooth
(loss prevention)
Loss Prevention Function in
operation
Loss Prevention Function Off
USB Tethering Function On
USB Tethering Function Off
Battery Remains (100~80%)
Battery Remains (79~60%)
Battery Remains (59~40%)
Battery Remains (39~20%)
Battery Remains (19~1%)
Battery Remains (below 1%)
Battery Charging in Progress (5 levels)
Battery Charging completed
Data Usage Display (GB)
Data Usage Display (MB)
g. USB Tethering
h.Battery Remains
i.Data Usage
Name
Name
Function
LTE signal strength (very strong)
LTE signal strength (strong)
a. LTE signal
LTE signal strength (moderate)
LTE signal strength (relative weak)
LTE signal strength (weak)
LTE signal strength (no signal)
b. Message
Display of Terminal status,
Display Window
Current time, Functional Menu
c. No of WiFi
Display of the number of
WiFi connections
In use of 2.4GHz WiFi Frequency
USB
port
Charger
Power outlet
Mcro USB
port
Mcro USB
port
Ver 1.0
KMR2 00
User Guide
This user guide describes the methods for using this product.
Please read this user guide carefully for correct use before using this device.
This product is a portable wireless port sharing device that offers wireless internet
service connection to a variety of terminals by altering LTE or WiBro signals into WiFi or
USB. In addition, this product allows users to enjoy in various ways in a car or indoors
by connecting an USB cable supplied as an accessory and users can use this product
simply and conveniently through its dedicated App (my URoad).
This product offers various specialized functions other than wireless internet functions
so that users can use. Please smartly use this product by utilizing those functions.
Use in various environments with USB cable
Main Body
User Guide
LCD Display
Charger
Power Saving Button
(Next)
Power On Button(OK)
USB port (external battery output)
Charging Status LED
USB cable
USB
cable strap
FAQ
(Frequently Asked Questions)/
Warranty
Pouch
This product can be connected to the battery charger in a car, adapters or PCs /Mac via USB cable.
1. Major Functions
3. Name of Each Part
4. LCD Status Display
5. Procedures to
Insert USIM card
2. Accessories included
External battery power function
This product can charge other devices using USB cable.
Loss Prevention
When a Smart Phone or a tablet is away certain distance from this product(egg), or location of
this product(egg) is unknown, the mobile App (my URoad) in Smart Devices informs the location of
egg or alarms user for distance away of egg so that a loss of egg can be prevented.
-Connect USB cable to a charger
-Connect the micro connector of USB cable
to the micro connector of a main body
of KMR200
-Connect a charger to AC power outlet
●
Charging with USB cable
(via PC connection)
-Connect USB cable to USB port in PC
-Micro connector of USB cable to the micro
connector of a main body of KMR200
3.
Close the USIM cover.
3
f
Bluetooth (loss prevention)
g
USB Tethering
h
Battery Remains
i
Data Usage
e
Easy Share
d
WiFi Frequency
strength
connections
Expression
Expression
d.WiFi Frequency
e. Easy Share
Easy Share (Guest WiFi) in operation
OFF Easy Share (Guest WiFi) Off
In use of 5GHz WiFi Frequency
OFF
OFF
1.
Open the USIM cover located at the side.
YYMMDD
1234567
123456789012345
ktEgg_123
moda12345
2.
Place the metal face of
USIM up and push the
USIM insert into a slot
until hearing clicking
sound.
Charging Status LED lights on Red and turns to
Green after fully charged
Charging status of battery can be checked
through LCD display during charging
When charging the product, please make sure
to use specified charger and USB cable.
Unauthorized chargers or USB cables may
cause a failure of product.
In Power Saving Mode, pressing either [Power Saving(Next)] button or [Power(OK)] button can check the status.
It is very convenient to use the product, since a “reserved power saving” function in my URoad
[mobile App] or Web setting screen allows to enter or release Power Saving Mode automatically
as predetermined settings.
PC connection via USB cable for charging
the product requires more time than using
AC power with a charger.
Press and hold the
[Power Saving(Next)]
button for about
3 seconds
Press and hold the
[Power (OK)] button
for about 3 seconds
Data
Data
Name Function
①
LCD Display
Display of operational status and functional menu
Press & Hold (for over 3 sec): entering/releasing power saving mode
②
Power Saving Button (Next)
Short Press: Menu selection (Next)
③
Charging Status LED
LED for displaying charging status (Charge in progress: Red / Charge completed: Green)
Press & Hold (for over 3 sec): Power On/Off
④
Power On Button(OK)
Short Press: Menu selection (OK)
⑤
USB port (External Battery output)
USB port for external battery function (charging other devices)
Short Press: Restart
⑥
nitialization Button
Press & Hold (for over 10 sec): Initialization
⑦
Nano USIM Slot
Slot for USIM installation
⑧
Micro USB port
USB port for either charging main body or data communication
⑨
USIM Cover
Product Protection (product label, Initialization button, Nano USIM slot)