background image

MEGACHEM

1

2

3

4

5

8D

1M2

7S

6D

3M

13D

13E

1M1

7E

Outlet

Inlet

10S

Outlet

10E

Inlet

2

on to the pump. The nominal sizes of the pipelines should be
at least equal to the nominal sizes of the pump nozzles (fig.5a,
5d).

We recommend the incorporation of check valves or non-return
valves and isolating valves in the system, depending on the
type of installation and pump.

Any thermal expansion of the type of piping (due to high
temperatures) must be compensated by suitable means, so
as not to impose any additional load on the pump.

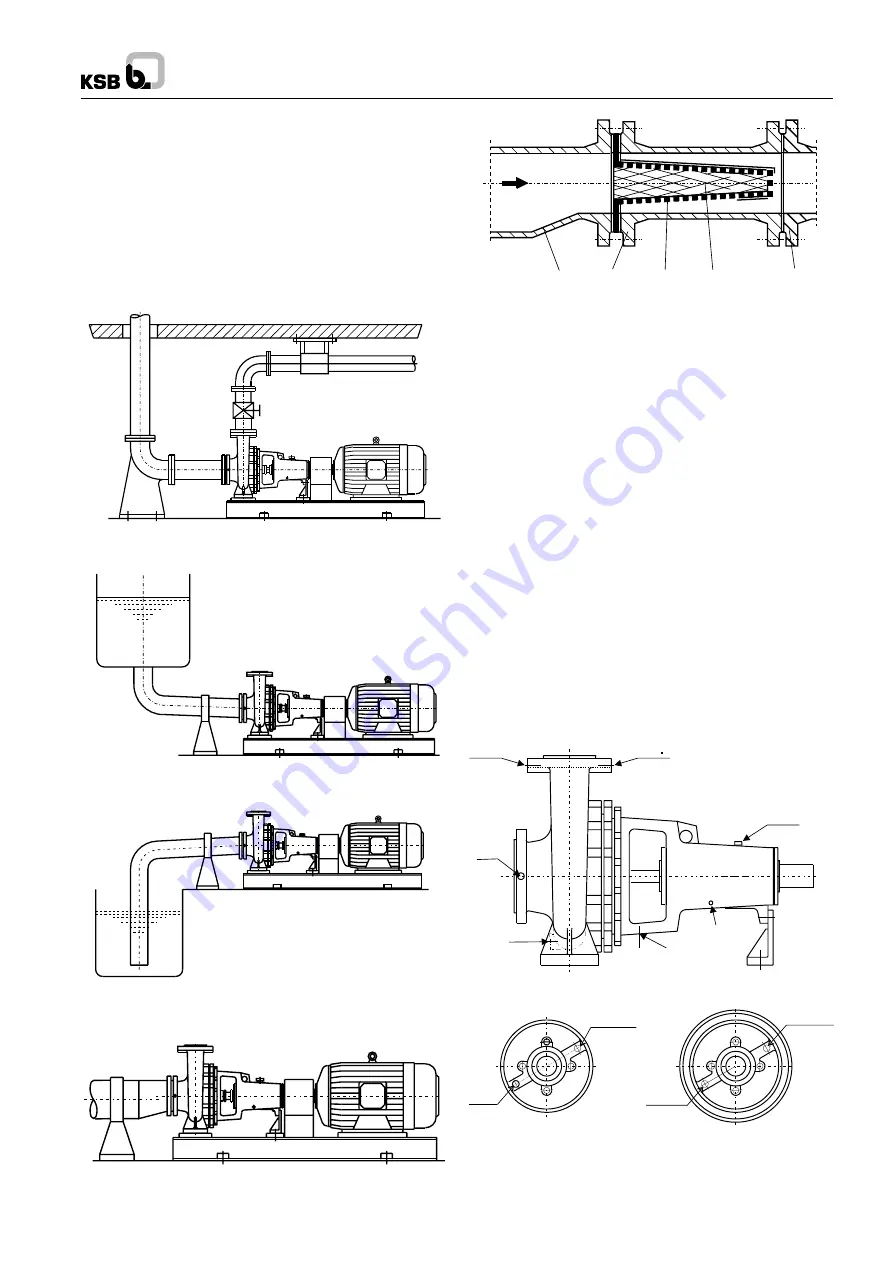
Fig. no. 5a : Piping & supporting of piping

Fig. no. 5b : Suction pit above the pump

Fig. no. 5c: Suction pit below the pump

Fig. no. 5d : Suction pipe connections

1  Suction line

4  Coarse strainer

2  Strainer holder

5  Pump nozzle

3  Fine strainer

Fig. no. 6 : Conical strainer for suction line

Before commissioning a new installation, thoroughly clean,
flush and blow through all vessels, piping & connections.
Welding beads, scale and other impurities frequently only
become dislodged after a certain period of time; it is necessary
to fit a strainer in the suction line to prevent these entering the
pump. The total cross section of the holes in the strainer should
be three times the cross section of the piping in order to avoid
excessive pressure loss across the strainer due to clogging.

The conical strainer consists of a coarse strainer fronted by a
fine strainer with a 2.0 mm mesh and 0.5 mm diameter wire,
made of corrosion resistant material, (i.e. Stainless Steel).

Attention : For recommended suction & discharge pipe
sizes, refer to performance curves.

2.4.1 Auxiliary connections

The size and location of all auxiliary connections for suction /
discharge pressure gauge, cooling and leakage liquid are
shown in the fig. No. 7 & table no.1

Fig. no.7 : Auxiliary connections of pump

Summary of Contents for MEGACHEM

Page 1: ...Shutdown 3 3 1 Preparations 3 3 1 1 Procedure 3 3 1 2 Shaft seal 3 3 1 3 Priming associated checks 3 3 1 4 Checking the direction of rotation 3 3 2 Start up 4 3 3 Shutdown 4 4 Maintenance Lubrication 4 4 1 Supervision Operation 4 4 2 Lubrication lubricant change 4 4 2 1 Grease change 4 4 2 2 Oil change 4 5 Dismantling 4 5 1 General 4 5 2 Dismantling 4 5 3 Dismantling the bearing unit 5 5 4 Removal...

Page 2: ...Always fit shims to the left and right of the anchor bolts between the baseplate foundation frame and the foundation If the shims are more than 800 mm apart position extra shims equidistant between them All shims must seat perfectly flush with the baseplate frame Fig no 3 Fitting shims Uniformly tighten up securing means Baseplate have to be grouted with non shrinking mortar up to the upper edge o...

Page 3: ...uction line Before commissioning a new installation thoroughly clean flush and blow through all vessels piping connections Welding beads scale and other impurities frequently only become dislodged after a certain period of time it is necessary to fit a strainer in the suction line to prevent these entering the pump The total cross section of the holes in the strainer should be three times the cros...

Page 4: ... nut III Unscrew and remove the reservoir from its position IV Unscrew the vent plug on the bearing bracket and fill oil until it appears in vertical portion of the elbow V Fill oil in the reservoir of oiler and screw it back in the elbow in upright position VI Replace the vent plug on the bearing bracket VII Check after some time whether the oil level in the reservoir is dropped or not It is impo...

Page 5: ...uld be filled with oil of any one of the following types and specifications for quantity refer table no 3 5 Dismantling 5 1 General Before dismantling make sure the motor is disconnected from the power supply and can not be switched on accidentally The suction and discharge shut off valves must be closed The pump casing must have cooled down to ambient temperature The pump casing must be empty and...

Page 6: ...r side Max 0 6 0 6 Min 0 5 0 5 5 4 Removing of Mechanical seal To replace the mechanical seal it is necessary to dismantle the pump After removing the discharge cover 525 draw the mchanical seal out from discharge cover by removing seal cover 6 Reassembly 6 1 Pump Reassembly in accordance with standard engineering practice Coat the fits and screw connections with graphite or similar before reassem...

Page 7: ... parallelism in relation to the discharge cover The surface of the shaft protection sleeve must be absolutely clean and smooth and mounting edge of the sleeve must be chamfered Before final mounting in the pump the rubbing faces of the mechanical seal should be wetted with a drop or two of silicon oil Fig no 15 Mechanical seal 6 3 1 Deep groove ball bearings lubricant fill Table no 5 6 4 Stuffing ...

Page 8: ...1 1 1 1 1 1 1 50 160 8 1 1 3 1 8 1 1 1 1 1 1 1 1 1 1 1 1 1 1 1 1 1 1 1 1 1 1 50 200 9 2 1 3 1 9 1 1 1 1 1 1 1 1 1 1 1 1 1 1 1 1 1 1 1 1 1 1 65 125 10 1 1 3 1 10 1 1 1 1 1 1 1 1 1 1 1 1 1 1 1 1 1 1 1 1 1 1 32 250 11 3 2 4 2 11 2 2 2 2 2 2 2 2 2 2 2 2 2 2 2 2 2 2 2 1 2 2 40 250 12 3 2 4 2 12 2 2 2 2 2 2 2 2 2 2 2 2 2 2 2 2 2 2 2 1 2 2 40 315 13 8 2 6 2 13 2 2 2 2 2 2 2 2 2 2 2 2 2 2 2 2 2 2 2 1 2 2 ...

Page 9: ...10 Sectional drawing list of component 10 1 Sandwiched discharge cover cooling cover details Sandwiched dishcage Covers are applicable for sizes 32 125 160 40 160 50 160 65 125 160 80 160 Cooling cover details 8 ...

Page 10: ...1 01 06 Hex Head bolt 210 Shaft 421 01 02 Oil seal 902 Stud 230 Impeller 452 Gland 903 01 10 Hex Head plug 321 01 02 Deep groove ball bearing 458 Lantern ring 913 Vent plug 330 Bearing bracket 461 Packing 920 Hex nut 360 01 02 Bearing cover 507 Splash ring 940 01 02 Key Fig no 10 102 554 230 400 02 400 03 903 04 903 05 08 452 165 901 01 550 507 901 04 421 01 321 01 210 913 321 02 400 05 360 02 901...

Page 11: ...avaliable is too low on positive suction head installations Check the liquid level Mount the pump at lower level Open isolating valve in the suction line fully Alter suction line if the losses in the suction line are excessive Ingress of air on shaft seal Sealing liquid passage is clogged clean it out If necessary arrange a sealing liquid supply from an outside source or increase sealing liquid pr...

Page 12: ...n pressure at the pump suction nozzle Pump set misaligned Rectify The pump is warped or resonance vibrations in the piping Check the piping connections and pump fixing bolts Reduce the gap between the pipe supports if necessary Support piping using anti vibration material Excessive axial thrust 2 Clean the balance holes in impeller Too much or too little or unsuitable lubricant quality Reduce quan...

Reviews: