


n
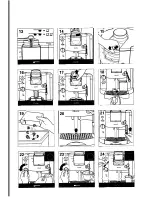
Hold a container under the steam nozzle,
turn the steam knob to
and then the
pump switch to
As soon as water runs out of the steam
nozzle, move the pump switch to 0 and
then return the steam knob to
of
n
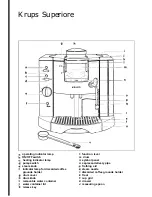
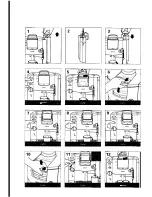
Fill the water container and insert it (l-31.
n
Switch on the appliance, whereby the red
operating indicator lamp and the yellow
heating indicator lamp will both light
up
As soon as the yellow lamp goes out, the
temperature necessary for making espresso
has been reached.
For further espresso preparations, no notice
need be taken of the yellow lamp.
Warm the espresso cups by holding them
under the steam nozzle, then turning the
steam knob to
and lastly the pump
switch to
Fill the cups with hot water,
then move the pump switch to G and
return the steam knob to 0.
Empty the prewarmed cup or cups and
place them beneath the espresso delivery
nozzle.
Press the release key on the function lever
and then pull the lever upwards to the stop.
Turn the drum counterclockwise until the
measuring spoon symbol
appears in
the symbol panel. A click will be heard
when the correct position has been
reached
Put in the coffee grounds
for one cup = 1 level measuring
spoonful
for two cups = 2 level measuring
spoonfuls
NOTE: If more than two level measuring
spoonfuls are put in, the excess will be
automatically thrown out into the discarded
coffee grounds holder during the ensuing
operation. If you are making a single cup,
however, a little more coffee meal can be
added if it suits your taste.
Turn the drum counterclockwise to the
position. A click will be heard
when the correct position is reached (14).
Pull the release key on the function lever
forwards and then press the lever
downwards until there is a
resistance.
The distance it can be pushed down
depends upon the amount of coffee meal
present.
n
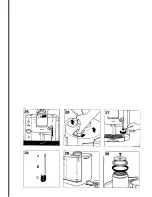
When preparing two cups of espresso,
the function lever must be depressed at
least as far as the
symbol
n
Set the pump switch to the
position
As soon as the required quantity of
espresso has run through, return the pump
switch to the 0 position.
n
Pull the release key forwards and then
pull the function lever upwards to the
stop
Turn the drum counterclockwise to the
original
position again (12).
This will automatically cause the used
coffee to be thrown into the discarded
coffee holder and the brewing chamber to
be emptied, whereby a little water will run
into the drawer.
As soon as the red lamp indicating that
the discarded coffee holder is full lights
up, it is essential to empty the holder
immediately
Pull the drawer out of the appliance, take
out the discarded coffee holder and
empty it (19).
The red lamp indicating that the discarded
coffee holder is full will continue to glow
until the drawer is reinserted.
n
The red float in the drawer indicates
when the drawer contains too much
water and must be emptied
Summary of Contents for SUPERIORE
Page 1: ...KR Superiore u PS Model 894 Instructions for Use Warranty Guarantee of Performance...
Page 5: ...2...
Page 6: ...I I I I...
Page 7: ...28 p A B C c...


