background image

23

8.6.1 DAILY OPERATIONS

Disassemble and check the brushes or the scraper

disks (with the abrasive disks mounted).

Check that there are no foreign bodies that may impede

the movement or efficiency of all cleaning parts.

Check the squeegee: clean the blades and check their

condition/wear.

8.6.2 WEEKLY OPERATIONS

Check and, if necessary, replace or adjust the height

of the splash guard.

Carefully check the profile of the squeegee blades and

replace them, if necessary.

Check that the suction hoses and conduits are not

clogged.

Check that the brushes are flat as they work on the

surface (check for any irregular wear on the brushes

or on the abrasive disks).

If necessary, adjust the slant of the action on the floor.

Thoroughly clean the solution and recovery tanks.

8.6.3 OPERATIONS AT EXTENDED INTERVALS

Even though the machine was built with great precision

and conforms to the most severe quality tests, the

electrical and mechanical parts will inevitably be subjected

to wear and aging after extended periods of use.

For safe and problem-free operation, your machine

should be carefully checked every year by our authorised

technical service centre (or by a specialist in the sector

in this manual).

This type of work may have to be carried out more

frequently if the machine operates in particular/difficult

situations  and/or  if  required  maintenance  was  not

performed.

 8.7 RECOMMENDED SPARE PARTS

You’ll always be able to use your machine as efficiently

as possible by maintaining a stock of the most common

consumable materials and by scheduling routine and

extraordinary maintenance. Contact your dealer for a

list of these spare parts.

9 OPERATING CHECKS

9.1 THE MACHINE DOESN’T WORK

 It isn’t connected with the electric power.

 Connect to electric power and verify the tension.

 General switch is OFF.

 Put ON the general switch.

9.2 THE MACHINE DOESN’T MOVE FORWARD

 The floor slope is too steep.

 Manually push the machine to the new level.

9.3 THE BRUSHES DON’T ROTATE

 The brush motor switch is not selected.

 Press the button to activate the brushes.

 The transmission belt is broken.

 Replace it.

 The brush motor is broken.

 Replace it.

9.4 NOT ENOUGH OR TOO MUCH DETERGENT

 The detergent solution tank is empty.

 Fill the detergent solution tank after having emptied

the recovery tank.

 The flow adjustment lever is closed or almost closed.

 Adjust/increase the detergent solution outlet flow 

as required.

 The detergent feed conduit is clogged in some point

 Clean out the conduit by removing the dirt.

9.5 NO SUCTION

 The suction hose is not connected to the squeegee.

 Connect it correctly.

 The suction hose or the squeegee conduit are clogged

 Clean out and remove any obstructions from the 

conduits.

 The suction motor is turned off.

 Activate it.

 The recovery tank is full.

 Empty it.

 The suction motor is not receiving electric power 

or is burned.

 Check the connections and, for the latter case, 

replace the motor.

9.6 INSUFFICIENT SUCTION

 The recovery tank cover was not correctly tightened.

 Tighten it correctly.

 The recovery tank drain hose plug is not perfectly closed

 Close it correctly.

 The suction hose, the squeegee conduit or the 

inspection compartment is clogged.

 Clean out and remove any obstructions from the 

conduits.

9.7 THE BRUSH MOTOR OR THE SUCTION MOTOR

DOESN’T STOP

 Stop the machine, cutting off the main power supply

and contact the technical service centre.

9.8 THE  SQUEEGEE  DOESN’T  CLEAN  OR  DRY

EFFICIENTLY

 The squeegee blades are worn or are dragging solid

dirt.

 Replace or clean them.

 The squeegee adjustment is not correct; the 

advancement must be exactly perpendicular to the

running direction.

 Adjust the squeegee.

 The suction hose or the squeegee conduit are 

clogged.

 Clean out and remove any obstructions from the 

conduits.familiar  with  all  the  pertinent  safety

regulations contained

Summary of Contents for KF50E

Page 1: ... TA M E N T E L A S A D V E R T E N C I A S A N T E S E L U S O D E A PA R A D O WA R N I N G R E A D T H E I N S T R U C T I O N S C A R E F U L LY B E F O R E U S E KF50E KF50E FREGADORA SECADORA DE PAVIMENTOS FLOOR SCRUBBER DRIER GB E ...

Page 2: ...FOTOGRAFIAS pag 3 PICTURES ESPANOL pag 7 ENGLISH pag 16 2 GB E ...

Page 3: ...3 A ...

Page 4: ...4 B ...

Page 5: ...5 C ...

Page 6: ...D 6 ...

Page 7: ...ÓN DEL SQUEEGEE 7 1 6 MONTAJE DESMONTAJE Y REGULACIÓN DEL PROTECTOR CONTRA SALPICADURAS 7 2 MONTAJE DESMONTAJE Y REGULACIÓN DE LOS ACCESORIOS CEPILLOS ARRASTRADORES Y DISCOS ABRASIVOS 7 3 LLENADO Y DESCARGA DEL DEPÓSITO DE LA SOLUCIÓN LIMPIADORA 7 4 VACIADO DEL DEPÓSITO DE RECUPERACIÓN 7 5 CONDUCCIÓN DE LA MÁQUINA 7 6 MÉTODO DE TRABAJO 7 6 1 PREPARACIÓN Y ADVERTENCIAS 7 6 2 MANDOS DE FUNCIONAMIENT...

Page 8: ...USO AL QUE ESTÁ DESTINADO LA MÁQUINA La máquina descrita en el presente manual es una fregadora secadora de suelos debe utilizarse para la limpieza y aspiración de líquidos de suelos planos rígidos horizontales lisos o poco rugosos uniformes y sin obstáculos en locales tanto civiles como industriales Está prohibido cualquier otro uso que no sea los arriba indicados Le rogamos lea detenidamente las...

Page 9: ...tos y aténgase a las prescripciones indicadas en las diferentes fichas de seguridad Aconsejamos conservar los detergentes en un lugar inaccesible a los niños En caso de contacto accidental con los ojos lave inmediata y abundantemente con agua y en caso de ingestión llame inmediatamente a un médico Asegúrese de que las tomas de corriente para la alimentación estén conectadas a una adecuada red de t...

Page 10: ...peraciones Vacíe el depósito de recuperación y el depósito de la solución Desmonte el squeegee y los cepillos o los arrastradores Coloque la máquina en el pallet original o en uno equivalente que soporte el peso y que sea adecuado a las dimensiones de la máquina para ello utilice una plataforma inclinada Fije fuertemente la máquina y el squeegee al pallet con abrazaderas metálicas u otros elemento...

Page 11: ...no estén excesivamente desgastadas FOTO D Compruebe que el depósito de recuperación esté vacío si no lo estuviera vacíelo completamente FOTO B 11 Compruebe y cierre completamente el mando de liberación de la solución limpiadora FOTO B 10 Llene el depósito de la solución a través le tapon anterior FOTO A 3 con agua limpia y detergente no espumoso en la adecuada proporción Deje un desnivel de 2 cm e...

Page 12: ...los o los discos guía debajo del plato gírelos en el sentido de rotación seguidamente bájelos para liberarlos del plato guía 7 3 LLENADO Y DESCARGA DEL DEPÓSITO DE LA SOLUCIÓN LIMPIADORA La temperatura del agua o del detergente introducido no debe ser superior a 50 C Antes de llenar el depósito de la solución limpiadora hay que vaciar por completo del depósito de recuperación FOTO B11 Para el llen...

Page 13: ... Interruptor cepillo para encender el motor de rotación de los cepillos FOTO C 19 Pedal para bajar levantar el grupo cepillos sobre del pavimento FOTO B 14 Interruptor aspiración para encender el motor de aspiración FOTO C 18 Palanca de regulación del flujo de la solución para regular la cantidad máxima hacia abajo mínima hacia arriba de solución limpiadora deseada en el suelo FOTO B 10 7 6 3 LAVA...

Page 14: ...s nuevas 8 4 ACCESORIOS Quite y limpie los cepillos o los discos arrastradores Compruebe atentamente que no estén encastrados cuerpos extraños como por ejemplo partes metálicas tornillos virutas cuerdas o similares para evitar dañar el suelo y la máquina Compruebe la planitud de trabajo de los cepillos compruebe si se ha verificado un desgaste irregular de los cepillos o de los discos abrasivos Si...

Page 15: ...lución después de haber vaciado el depósito de recuperación La palanca de regulación del flujo está cerrada o casi cerrada Regular aumentar el flujo de salida de la solución según se desee El conducto de suministro del detergente está obstruido en algún punto Liberar el conducto eliminando la suciedad 9 5 FALTA ASPIRACIÓN El tubo de aspiración no está conectado al squeegee Conectarlo correctamente...

Page 16: ...SSEMBLY AND ADJUSTMENT 7 2 ACCESSORYASSEMBLY DISASSEMBLYAND REGULATION BRUSHES SCRAPERS AND ABRASIVE DISKS 7 3 FILLING AND DRAINING THE DETERGENT SOLUTION TANK 7 4 DRAINING THE RECOVERY TANK 7 5 DRIVING THE MACHINE 7 6 WORK METHOD 7 6 1 PREPARATION AND WARNINGS 7 6 2 OPERATING CONTROLS 7 6 3 DIRECT SCRUBBING OR FOR SLIGHTLY DIRTY SURFACES 7 6 4 INDIRECT SCRUBBING OR FOR VERY DIRTY SURFACES 7 6 5 P...

Page 17: ...m floors that are free from obstacles in both civic and industrial environments Any other use is prohibited Please refer very carefully to the safety information reported in this manual The scrubber drier distributes a quantity of a water and detergent solution adjustable on the surface to be cleaned while the brushes remove any dirt on the ground The machine s suction system using a ground squeeg...

Page 18: ...res All maintenance or accessory replacement operations must be carried out in environments with adequate lighting and only after having disconnected the machine from the electric power supply All work on the electrical system and all maintenance and repair operations especially those not explicitly described in this manual should be carried out only by authorised service centres or by specialised...

Page 19: ...ring transport 5 TECHNICAL INFORMATION 5 1 GENERAL DESCRIPTION 5 1 1 MACHINE We can summarise the machine s main features as follows The form of the squeegee the air flows and the specially designed rubber blades produce excellent drying results even on tiled floors Thanks to the particular balanced shape of the machine frame and the squeegee support no water residues are left behind in a curve an...

Page 20: ...ole in the squeegee body PHOTO D 26 7 1 2 SQUEEGEE DISASSEMBLY Lower the lifting system to avoid having to keep the body raised while completing connections PHOTO B 16 Unscrew the two knobs placed on the squegee PHOTO D 24 into the special hoses situated on the squeegee support Disconnect the suction hose from the squeegee body PHOTO D 26 Now free the squeegee from its support PHOTO D 7 1 3 7 1 4 ...

Page 21: ...whenever required and even during intermediate phases of the work cycle The recovery tank volume is higher than the detergent solution volume therefore a potentially dangerous situation for the suction motor should never occur In any case a safety float turns off the suction motor if the dirty liquid level is too high If water or foam starts leaking from under the tanks for any reason immediately ...

Page 22: ...st performances and extended machine service life 8 1 TANKS Drain the two tanks as described in the relative sections Remove any solid dirt by filling and draining the tanks until all dirt has been eliminated use a washing hose or similar tool to do this Water hotter than 50 a high pressure cleaner or excessively powerful sprays may damage the tanks and the machine Leave the plugs of the tanks ope...

Page 23: ...tch is OFF Put ON the general switch 9 2 THE MACHINE DOESN T MOVE FORWARD The floor slope is too steep Manually push the machine to the new level 9 3 THE BRUSHES DON T ROTATE The brush motor switch is not selected Press the button to activate the brushes The transmission belt is broken Replace it The brush motor is broken Replace it 9 4 NOT ENOUGH OR TOO MUCH DETERGENT The detergent solution tank ...

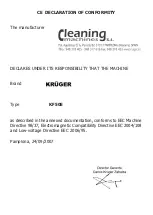
Page 24: ...EXCLUSIVA RESPONSABILIDAD QUE LA MÁQUINA Tipo KF50E Come se describe en la documentación adjunta es conforme a la Di rectiva Máquinas CEE 98 37 Directiva Compatibilidad Electromagné tica CEE 2004 108 y Directiva BajaTensión CEE 2006 95 Pamplona 24 09 2007 Marca ...

Page 25: ...ES UNDER ITS RESPONSIBILITY THAT THE MACHINE Type KF50E as described in the annexed documentation conforms to EEC Machine Directive 98 37 Electromagnetic Compatibility Directive EEC 2004 108 and Low voltage Directive EEC 2006 95 Pamplona 24 09 2007 Brand ...

Page 26: ... conforme con las indicaciones del manual o por un uso imperfecto del aparato Conditions of Warranty All our appliances are subjected to rigorous tests and are covered by warranty against material or manufacturing defects for a period of 12 months The warranty comes into effect from the date of purchase The date of purchase is the date indicated on the receipt issued by the Reseller when the appli...

Page 27: ... eines elektrischen oder elektron ischen Gerätes ist es Ihnen gesetzlich unter sagt gemäß EU Richtlinie 2002 96 EG vom 27 Januar 2003 über Elektro und Elektronik Altgeräte sowie gemäß nationalen Länderge setzgebungen der EU Mitgliedstaaten in denen diese Richtlinie umgesetzt wird dieses Produkt oder seine elektrischen elektronis chen Zubehörteile unsortiert in den Haushaltsmüll zu geben Bitte benu...

Page 28: ...cod 7 504 0136 01 2009 ...

Reviews: