3
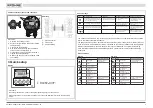
Cable connections (sensor and converter)
Procedure
1 Unscrew the housing cover
1
2 Put the electrical cable/s through the related
cable gland/s
4
3 Connect the conductors
2
4 Run the twisted sink wires and the braided
screen under the earth clamp
3
5 Fix the clamp in place using the two screws
6 Tighten the cable gland/s
4
7 Replace the housing cover and tighten it with
your hand
5
1
Signal converter
2
Flow sensor
3
Cable shielding
4
Shielding
Display
Converter keys
3 Quick setup
1
Display (ER1.0.x shown)
2
Optical operating keys
Procedure:
Touch the glass directly in front of the optical operating keys to access menus.
If the optical keys are not used for a period of 5 minutes, the display will return to the measuring
mode.
2
1
Zero calibration
ER 1.0.x
ER 2.x.x
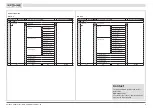
The menus shown below are only for the quick setup of the meter. For a complete list of menus please
refer to the relevant converter Handbook.
The quick setup menus shown here are for electronic revision (ER)1.x and electronic revision (ER) 2.x.x
If you are not sure which electronics revision is installed on the converter, please check the nameplate.
Details of standard HART menus are shown in the converter Handbook. For information regarding
menu structures for additional communication protocols, please refer to the relevant Supplementary
Instructions.
Key
Measuring mode
Menu mode
Submenu or function mode
Parameter and data mode
Switch from measuring mode to menu
mode. Press Optical key for 2.5s display
shows “A0.0.0.0 Quick Setup”
Access to display menu, and
then 1st submenu is displayed.
Access to displayed submenu
or function
For numerical values, move
cursor (highlighted in blue) one
position to the right
Reset display. "Quick Access" function
Return to measuring mode
Press 1 to 3 times, return to
menu mode, data saved
Return to submenu or function,
data saved
Switch between display pages: measured
value 1 + 2, trend page and status page
Select menu
Select submenu or function
Use cursor to change number,
unit, property and to move the
decimal point
Return to menu mode without
acceptance of data
Return to submenu or function
without acceptance of data
or
Esc
]
[
+
Key
Screen
Description and setting
A
Quick Setup
Press and hold for 2.5 s,
then release key
2 x
C
Setup
3 x
C1.1.1
Zero Calibration
Calibrate Zero?
Automatic
Please wait
Countdown from 40s
Calibrate zero
Passed
Zero Calibration
+XX.XXX%
Display of measured zero
calibration in %
5 x
Save Con
fi
guration?
Yes
Display page
Key
Screen
Description and setting
A0.0.0
Quick Setup
Press and hold for 2.5 s,
then release key
2 x
C0.0.0
Setup
3 x
C1.1.1
Zero Calibration
Calibrate Zero?
Automatic
Please wait
Countdown from 40s
Calibrate zero
Passed
Zero Calibration
+XX.XXX%
Display of measured zero
calibration in %
5 x
Save Con
fi
guration?
Yes
Display page
04/2020 - 4008121701- QS-OPTIMASS 1400-R01- en


