background image

AFFIX THE iPOD-DEVICE SUPPORT
TO THE KID TOP COVER

IMPORTANT:

Affix the iPod-device support before inserting the
iPod-device into the dock connector (4).

1. Remove the iPod-device support (1) from its 

bubble wrap package.

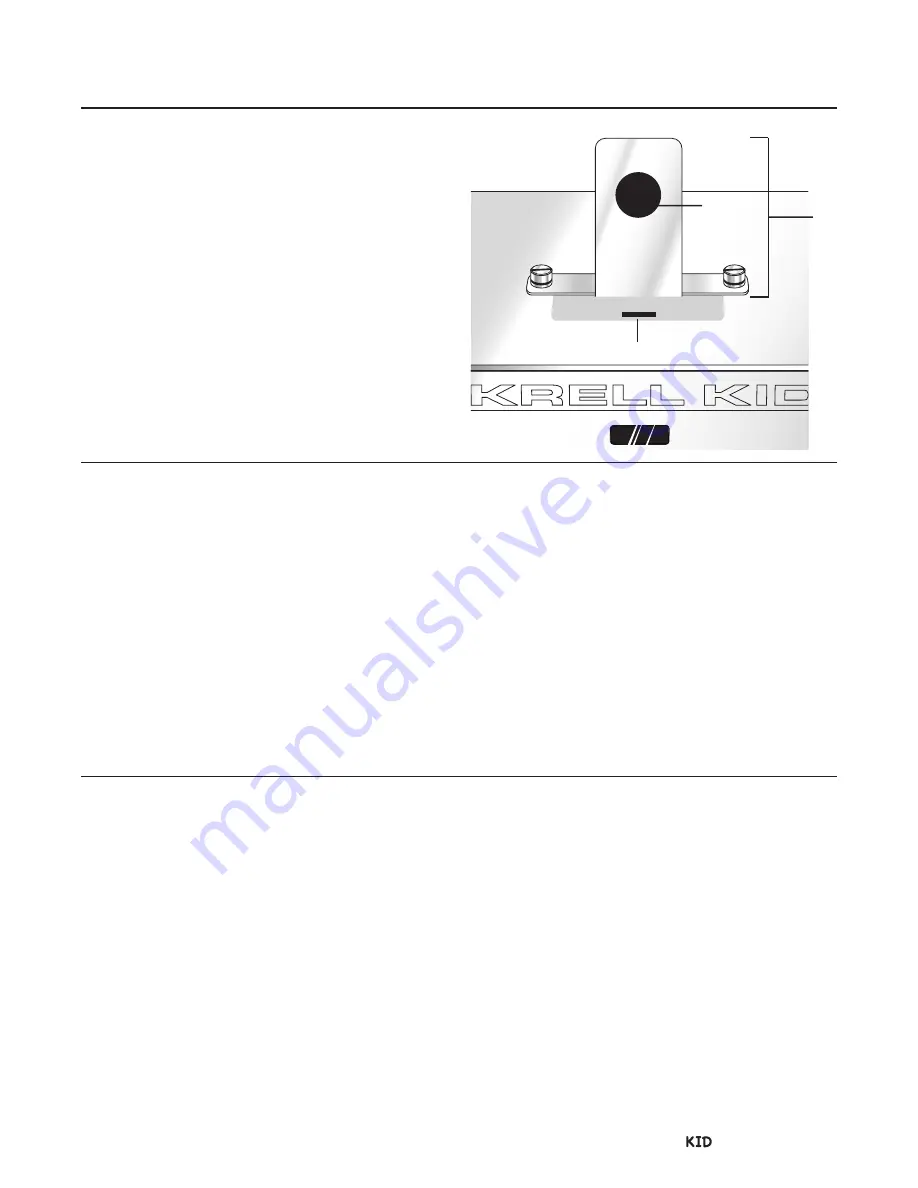
2. The bracket bar has two thumbscrews (2). 

Position these screws over the thumbscrew 
holes in the KID top cover. 

Orientation:

The round black rubber pad (3) 

on the iPod-device support faces the front of 
the chassis (5).

4. Screw the iPod-device support thumbscrews 

into the thumbscrew holes by hand. 

Affix the iPod-device Support to the KID Top Cover 
Install the Battery in the KID Remote
Placement Considerations

Krell        / Papa Dock    5

The KID remote control uses one CR2025 lithium
battery which is included with the shipment. 

To open the battery compartment on the back of
the remote control:

1. Place the remote face down on the table.

2. Use your thumbnail or a small jeweler’s or eye-

glass screwdriver to move the small tab
toward the center of the remote, while using
your index fingernail or screwdriver to pull
down gently on the slot to the right of the tab.
The battery compartment slides out.

Before installing the KID or the Papa Dock into
your system, please review the following guide-
lines for the proper location of the components.
This will facilitate a clean, trouble-free installation. 

Positioning the components 
in the listening area

Place the KID and the Papa Dock on a firm, level
surface, away from excessive heat, humidity, or
moisture. These components do not require a
special rack or cabinet for installation.

Place the Papa Dock as close to the loudspeakers
as possible and keep the loudspeaker cable   

length to a minimum. Loudspeaker cable adds
impedance to the load that the amplifier must
drive, regardless of the cable's gauge. Krell ampli-
fiers drive the lowest impedances with ease, but
long loudspeaker cables reduce the maximum
power that is delivered to the loudspeakers.

Component Ventilation

The KID requires ventilation clearance:
— at least eight inches (20 cm) above (to accom-

modate the iPod-device)

— the ventilation grids on the bottom of the KID 

chassis must be unobstructed.

3. Place the battery plus side up in the battery tray.

4. Slide battery compartment back into the

remote until you hear a click.

The remote control is ready for operation.

Notes. 

Do not use a knife or other sharp objects to

open the battery compartment; to avoid scratching
the remote control finish.

Replace batteries when the remote control functions
becomes intermittent. Remove batteries if the remote
control is not to be used for a long period of time.
Battery leakage can damage the remote control.

INSTALL THE BATTERY 
IN THE KID REMOTE

PLACEMENT CONSIDERATIONS

1

2

2

3

4

5

2

4

3

FIGURE 1  The iPod-device Support

Summary of Contents for KID

Page 1: ...Owner s Reference Krell Interface Dock Papa Dock POWER POWER BASS TREBLE VOLUME AUX INPUT ...

Page 2: ... has been dropped 10 The KID and the Papa Dock must be placed on a firm level surface where it is not exposed to drip ping or splashing 11 The ventilation grids on the bottom of the KID and the ventilation grids on the top and bottom of the Papa Dock must be unobstructed at all times during operation Do not place flammable materi al above or beneath the KID or the Papa Dock 12 Before making connec...

Page 3: ...d specifically by Krell for use with the KID KID The KID is designed to deliver maximum sonic performance from an iPod device and is the first product of its kind to utilize the fully differential out put of the internal DAC for iPod devices Additional features include opto isolated digital con nections between the iPod device and the KID and balanced differential Class A circuitry Ultra low noise...

Page 4: ... the Papa Dock 5 Lift the Papa Dock with the foam inserts straight out of the box 6 Place the Papa Dock on a safe clean work surface on its side resting on a foam insert 7 Remove the other foam insert 8 Reposition the Papa Dock on the work sur face with the remaining attached foam insert tilted up 9 Remove the second foam insert 10 Remove the foam wrapper from the component 12 Position the Papa Do...

Page 5: ...facilitate a clean trouble free installation Positioning the components in the listening area Place the KID and the Papa Dock on a firm level surface away from excessive heat humidity or moisture These components do not require a special rack or cabinet for installation Place the Papa Dock as close to the loudspeakers as possible and keep the loudspeaker cable length to a minimum Loudspeaker cable...

Page 6: ...g toward you 3 Lift the KID up and position it over the con nection well 6 in the Papa Dock 4 Lower the KID gently but firmly onto the Papa Dock docking connector 7 The air space between the chassis and shelf must be unobstructed The Papa Dock requires ventilation clearance at least two inches 5 cm above below and on each side PLACEMENT CONSIDERATIONS continued THE KID PAPA DOCK CONNECTION To disc...

Page 7: ... video output The Papa Dock is a 150 W amplifier specifically designed by Krell for use with the KID Maintain the correct left right orientation balanced outputs use three pin XLR connectors Single ended outputs use RCA connectors 1 Connect the balanced 12 or single ended 11 analog audio outputs to the corresponding inputs on the preamplifer or processor or to the Papa Dock or other amplifier in y...

Page 8: ...power cord Connect the Papa Dock to Your System With the KID docked onto the Papa Dock 1 Connect the loudspeaker cables to the Papa Dock amplifier channel output binding posts 16 located on the back panel The binding post terminals accept spade lugs bare wire or pins Use the red terminal for the positive connection and the black terminal for the negative connection IMPORTANT Tighten loudspeaker bi...

Page 9: ... music When the KID is con nected to the Papa Dock and an iPod device is inserted into the KID dock connector the KID pow ers on the Papa Dock 1 Press the play key 33 on the remote 2 Adjust the volume 27 using the buttons on the KID front panel or the keys on the remote Numerical values indicating the volume level appear in the display window 3 Adjust the bass tone control 25 using the buttons on ...

Page 10: ...key 31 Down directional keys iPod device down arrow key 32 Left and right directional keys Track keys These keys correspond to iPod device Previous and Next keys 33 Play Resume key 34 Stop key 35 Repeat key 36 Shuffle key 37 Pause key 38 Mute key 39 Search keys 40 Album keys 41 Playlist keys FIGURE 6 KID Front Panel Docking station inset Inset shows iPOD device support affixed to the top cover of ...

Page 11: ...evice pause function 38 Mute Key Performs the iPod device mute function 39 Search Up Down Keys Press and hold these keys to perform the iPod device search function 40 Album Up Down Keys Perform the iPod device album up and down functions 41 Playlist Up Down Keys Perform the iPod device playlist up and down functions REMOTE ONLY 24 Power Button Press the power button or key to take the KID in and o...

Page 12: ...number is KID SPECIFICATIONS PAPA DOCK SPECIFICATIONS All operational features functions specifications and policies are subject to change without notification P N 301038 v 08 0 Frequency Response 20 Hz to 20 kHz 0 0 15 dB 0 2 Hz to 110 kHz 0 dB 3 dB Signal to noise Ratio Wideband unweighted referred to full power output 108 dB A weighted 116 dB Gain 26 2 dB Total Harmonic Distortion THD 0 03 1 kH...

Reviews: