background image

14

Foundation 4K UHD Processor

Software Version

Press the Enter button to view currently operating Foundation 4K UHD software

Software Update 

Press the Enter button to display the Software Update sub menu. Press the Up or Down button to select the method 
for updating the software. Press the Enter button to select and then the Enter button again to confirm.

Choose the USB option if the Foundation 4K UHD is not connected to the internet and software updates are to be 
performed by connecting a USB drive to the USB input on the rear panel of the Foundation 4K UHD.

Choose the Network option if the Foundation 4K UHD is connected to the internet. The Foundation 4K UHD will 
check the Krell update server to determine if a new software update is available.

Display Setup

Backlight Timeout
Backlight Timeout turns off the front panel display after a period of inactivity. The default time setting is Disabled 

which keeps the display always illuminated. Timeout can be set between 15 and 120 seconds. 

Contrast Setup
Three contrast levels are available with level 2 being the default. Press the Enter button to activate the level setting 

and then use the up or down button to adjust. Press the Enter button to confirm the desired choice. 

On Screen Display (OSD) Setup

OSD Operation
The default for OSD operation is ON. To turn OSD operation off, Press the Enter button and use the Up or Down 
button to change the setting to OFF. Press the Enter button to confirm change.

OSD Timeout
The default timeout for OSD is 3 seconds. The range for OSD Timeout is 1 to 15 seconds. To change the OSD 
Timeout, press the Enter button to highlight the time field. Press the Up or Down to select a different seeting. Press 
the Enter button to confirm change.

CEC Operation

Consumer Electronics Control (CEC) is an HDMI feature designed to allow the user to control up-to 15 CEC-enabled 
devices, that are connected through HDMI, by using only one of their remote controls (for example by controlling 
a television set, set-top box, and DVD player using only the remote control of the TV). The default setting for CEC is 
Enabled.  In some installations, it desirable to have CEC operation disabled.

To disable CEC operation off, Press the Enter button and use the Up or Down button to change the setting to 
Disabled. Press the Enter button to confirm change.

Restore Settings

Restore Settings will return the Foundation 4K UHD to the original factory settings or to previously saved user 
settings. Press the Up or Down button to change to User. Press the Enter button to confirm selection.  Press the Enter 
button again to return to factory or user saved settings. The Foundation 4K UHD will display various messages and 
will eventually return to the standby mode.

Save Settings

Save Settings will save all configuration settings in non volatile memory. Press the Enter button to begin saving 
process.

Serial Number

Serial number displays the unit’s serial number and is not user editable.

Summary of Contents for Foundation 4K

Page 1: ...Foundation 4K UHD Processor OWNER S REFERENCE ...

Page 2: ...sure all cable terminations are of the highest quality free from frayed ends short circuits or cold solder joints CONTACT INFORMATION Krell Industries LLC 45 Connair Road Orange CT 06477 3650 USA TEL 203 799 9954 FAX 203 891 2028 E MAIL contact krellonline com WEBSITE http www krellonline com Krell is a registered trademark of Krell Industries LLC and is restricted for use by Krell Industries LLC ...

Page 3: ...Speaker Set up 10 Source Set up 11 Audio Operation 12 Network Set up 13 Diagnostic Mode 13 Software Version and Update 14 Display Setup 14 On Screen Display OSD Setup 14 CEC Operation 14 Restore Settings 14 Save Settings 14 Serial Number 14 Operating the Foundation 4K UHD 15 Foundation 4K UHD Processor Control 18 Foundation 4K UHD Processor RS 232 Feedback 20 Warranty 24 Service 25 Specifications ...

Page 4: ...mbination of circuitry and innovative software that optimizes HDMI operation Various parameters including the monitor s electronic ID and source video resolution are stored in non volatile memory All 10 source inputs are always active so source channel video resolution and audio format changes are instantaneous The Intelligent HDMI design provides the fastest signal recognition possible The Founda...

Page 5: ...e unit occupies the same space with other electronics that generate heat like power amplifiers Please consult an authorized KRELL dealer or KRELL industries to insure proper installation guidelines 1 Accessories included A 1 AC Power cord B 1 Handheld Remote control C 1 Trigger cable D 1 CD w Owner s reference E 1 Warranty registration card F 2 AAA Batteries G 1 T 10 torx wrench AC Power Guideline...

Page 6: ...igation Up Down Button 3 Left Right Navigation Button 4 Enter Button 5 Source Select Button s 6 Surround Mode Select Button 7 Menu Button 8 Front Panel HDMI Input 9 IR Receiver Window 10 ARES Microphone Input 11 Balance Button 12 Krell CD Transport Button 13 Dynamic Range Select Button 14 Channel Adjust Buttons 15 Zone Select Buttons 16 Mute Button ...

Page 7: ...USB 4 Optical Digital Inputs 5 Coaxial Digital Inputs 6 Main Power Switch 7 AC Power Cord Receptacle 8 Ethernet RJ 45 Jack 9 12v Trigger Input 10 12v Trigger Outputs 11 RS 232 Control Port 12 RC 5 Control Port 13 Balanced Audio Outputs 14 Single ended Audio Outputs 15 Zone 2 Analog Outputs 16 Balanced Analog Inputs 17 Single ended Analog Inputs 18 Component Video Inputs 19 Composite Video Inputs ...

Page 8: ...s to prevent hum or other unwanted noise from being introduced into the system The Foundation 4K UHD is equipped with balanced and single ended inputs Krell recommends using balanced interconnect cables Balanced interconnect cables not only can minimize sonic loss but also are immune to induced noise especially for installations using long cables Balanced connections have 6 dB more gain than singl...

Page 9: ...s to provide the ideal frequency curves for the speakers in the system Individual speaker setup parameters may be edited after the ARES system completes its initial calculations The ARES equalization process may be run again after the edits have been made All configuration options are selected using the front panel display or via a web enabled device such as a PC or tablet The Foundation 4K UHD an...

Page 10: ...ing at the Crossover field Press the Right button to move the cursor to the field to be edited Press the Up or Down button to change the value Press the Enter button to confirm any change and press the Left button to exit the Edit Settings menu Crossover frequency edits To edit the crossover frequency press the Right button while the cursor is blinking at the Full Range field Press the Up or Down ...

Page 11: ...he Up or Down button to select a different source to edit When finished press the Enter button and then the Left button to return the Source Setup sub menu Assign Triggers Note The default settings for the triggers is set to On Follow the procedure below to change any of the triggers settings Press the Enter button and the Trigger field will start flashing Press the Up or Down button to select tri...

Page 12: ... Dolby Pro Logic IIx decoding automatically Pressing the Mode button on the remote control until Dolby Pro Logic IIx mode is displayed is the only way to engage Dolby Pro Logic IIx decoding Press the enter button to confirm choice and then press the left button to return to the Audio operation menu 5 1 Surround Output For 7 1 systems playing back 5 1 encoded content the Foundation 4K UHD can dupli...

Page 13: ...ange the setting to Static Press the Enter button to display the IP address Press the Right button to move the cursor to number to be edited Press the Enter button again and the selected number of the IP Address will begin blinking Use the Up or Down button to edit the IP Address value Press the Enter button to confirm change Press the Left or Right button to move the cursor to another number in t...

Page 14: ...he Up or Down button to change the setting to OFF Press the Enter button to confirm change OSD Timeout The default timeout for OSD is 3 seconds The range for OSD Timeout is 1 to 15 seconds To change the OSD Timeout press the Enter button to highlight the time field Press the Up or Down to select a different seeting Press the Enter button to confirm change CEC Operation Consumer Electronics Control...

Page 15: ... Normal Auto uses any dynamic range information encoded into a source s bit stream Night On applies 22dB worth of compression to all incoming signals Press the Enter button to select the desired option and Press Enter to return to normal operation 9 To adjust left to right balance press the BAL button on the remote control The Left and Right channels will be displayed Press the Right button to shi...

Page 16: ...o digital signals through the left and right speakers If a crossover is set for the left and right speakers the Foundation will send frequencoes above the crossover point to the left and right speakers and frequencies below the crossover point to the subwoofer FULL RANGE SUB Select Full Range Sub to play two channel content using the left and right speakers plus the subwoofer This mode will ignore...

Page 17: ... of the house With the Foundation 4K UHD in operational or stand by mode you can activate the main zone only Or while the Foundation 4K UHD is still in stand by mode you can set up zone 2 operation so that when you switch to operational mode only zone 2 plays Play both zones with the Foundation 4K UHD in the stand by mode 1 Press the power button until the blue power LED illuminates 2 Press the in...

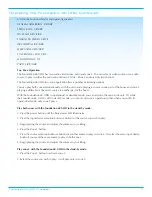
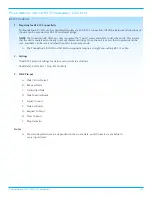
Page 18: ...edback can be received when the unit is in stand by mode A The Foundation 4K UHD and All Krell components require a straight non nulling RS 232 cable 2 Settings The RS 232 protocol settings for status and control are as follows 9600 Baud 8 Data Bits 1 Stop Bit No Parity 3 DB 9 Pin out A Data Carrier Detect B Received Data C Transmitted Data D Data Terminal Ready E Signal Ground F Data Set Ready G ...

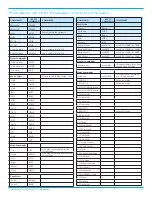
Page 19: ...NZ Zone Select Zone 1 MAINZ Zone 2 REMZ COMMAND RS 232 COMMAND COMMENTS Level Trims Center CENZ Surround SURZ Back BAKZ Sub SUBZ Balance BALZ Center Direct xxxCVLZ xxx 0 20 10dB to 10dB Surround Direct xxxSRLZ xxx 0 20 10dB to 10dB Back Direct xxxBVLZ xxx 0 20 10dB to 10dB Sub Direct xxxSVLZ xxx 0 20 10dB to 10dB Memory Commands Memory xxx xxxMEMZ Changes memory for current source xxx 001 003 Mode...

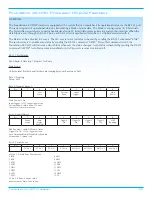
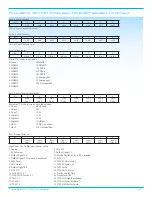
Page 20: ... by sending the RS 232 command ASTDZ Auto Status remains enabled until AC power is removed or turned off RS 232 Port Settings 9600 Baud 8 Data bits 1 Stop bit No Parity Data Format 18 bytes total first byte and last byte are framing bytes with a value of 0x55 Byte 1 Framing Value 0x55 Byte 2 General Status 1 Bit 7 6 5 4 3 2 1 0 User Mute Current Zone Input Trigger Main Power Main Power 1 On Input ...

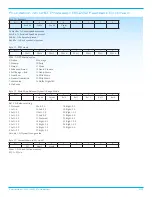
Page 21: ...Aud 4 Main Aud 3 Main Aud 2 Main Aud 1 Main Aud 0 Main Aud 7 0 Main zone audio input index 0 Coax1 8 Balanced 1 Coax2 9 S1 2 Coax3 10 S2 3 Optical1 11 S3 4 Optical2 12 S4 5 Optical3 13 HDMI 6 ARC1 14 DVI no audio 7 ARC2 256 Not specified Byte 9 Input Stream Bit 7 6 5 4 3 2 1 0 Input Strm 7 Input Strm 6 Input Strm 5 Input Strm 4 Input Strm 3 Input Strm 2 Input Strm 1 Input Strm 0 Input Strm 7 0 Aud...

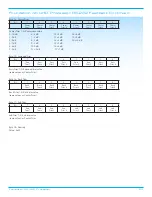
Page 22: ...3 Neo 6 Music 5 Front Row 14 PLIIx Movie 6 General Admission 15 PLIIx Music 7 Mezzanine 16 Dolby Digital EX 8 Orchestra Byte 12 Main Zone Balance Dynamic Range Mode Bit 7 6 5 4 3 2 1 0 Cmode 1 Cmode 0 Bal 4 Bal 3 Bal 2 Bal 1 Bal 0 Bal 4 0 Balance setting 0 Not used 9 Left 2 0 18 Right 2 5 1 Left 6 10 Left 1 5 19 Right 3 0 2 Left 5 5 11Left 1 0 20 Right 3 5 3 Left 5 0 12 Left 0 5 21 Right 4 0 4 Lef...

Page 23: ...B 11 1 dB 17 7 dB Byte 15 Surround Trim Bit 7 6 5 4 3 2 1 0 Surr Trim 7 Surr Trim 6 Surr Trim 5 Surr Trim 4 Surr Trim 3 Surr Trim 2 Surr Trim 1 Surr Trim 0 Surrr Trim 7 0 Surround trim value same values as Center Trim Byte 16 Back Trim Bit 7 6 5 4 3 2 1 0 Back Trim 7 Back Trim 6 Back Trim 5 Back Trim 4 Back Trim 3 Back Trim 2 Back Trim 1 Back Trim 0 Back Trim 7 0 Back trim value same values as Cen...

Page 24: ...onsibility Return freight within the United States U S A is included in the warranty If you have purchased your Krell product outside the U S A and wish to have it serviced at the factory all freight and associated charges to the factory are your responsibility Krell will pay return freight to the U S A based freight forwarder of your choice Freight and other charges to ship the unit from the frei...

Page 25: ...ay also be hand delivered if arrangements with the Service Department have been made in advance Proof of purchase will be required for warranty validation at the time of hand delivery NOTE Use the original packaging to ensure the safe transit of the product to the factory dealer or distributor Krell may at its discretion return a product in new packaging and bill the owner for such packaging if th...

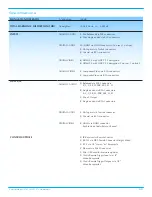
Page 26: ...ideo via RCA connectors 2 Composite Video via RCA connectors OUTPUTS ANALOG AUDIO 9 Balanced via XLR Connectors R L C SR SL SBR SBL S1 S2 9 Single ended via RCA Connectors R L C SR SL SBR SBL S1 S2 1 Zone 2 Output 2 Single ended via RCA Connectors DIGITAL AUDIO 1 EIAJ optical via TosLink connector 1 Coaxial via RCA connector DIGITAL VIDEO 2 HDMI via HDMI connector Both Include Audio Return Channel...

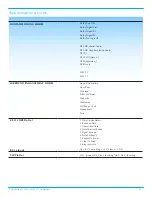
Page 27: ...6 1 DTS Neo 6 PCM 5 1 PCM 7 1 SURROUND ENHANCEMENT MODES General Admission Front Row On Stage Enhanced Stereo Orchestra Mezzanine Full Range Sub Monophonic Party RS 232 DB9 Pin Out 1 Data Carrier Detect 2 Received Data 3 Transmitted Data 4 Data Terminal Ready 5 Signal Ground 6 Data Set Ready 7 Request To Send 8 Clear To Send 9 Ring Indicator RC 5 pin out Tip RC 5 data Ring 5 V Sleeve GND XLR Pin O...

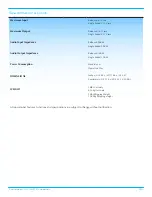
Page 28: ... 58K Ω Single Ended 58K Ω Audio Output Impedance Balanced 100 Ω Single Ended 100 Ω Power Consumption Stand by 2w Operation 59w DIMENSIONS Inches L 16 83 x W 17 06 x H 3 47 Centimeters L 42 76 x W 43 33 x H 88 1 WEIGHT 18lbs Unit only 8 16kg Unit only 24lbs Shipping Weight 10 89kg Shipping weight All operational features functions and specifications are subject to change without notification ...

Reviews: