background image

26

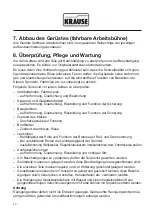
4.5 Montage des Stabilisierungs-Sets

Bei der Verwendung als Wandgerüst kann dieses mit dem Stabilisierungs-Set bestückt 
und an der Wand befestigt werden. Dies dient lediglich der weiteren Stabilisierung des 
Gerüstes (fahrbare Arbeitsbühne).

Der Einsatz des Stabilisierungs-Sets ersetzt auf keinen Fall die vorgeschriebenen  
Ballastgewichte und Ausleger (siehe Seite 27 – 31).

Für die Verankerung in der Wand sind Ringschrauben mit 12 mm Durchmesser zu  
verwenden. Die Dübel richten sich nach der Beschaffenheit des Untergrundes.

Bei der Verwendung der Stabilisierungs-Sets ist darauf zu achten, dass diese immer un-
terhalb der obersten Belagbühne angebracht werden.

Befestigung   
Stabilisierungs-Set 
– beispielhafte Abbildung

Stabilisierungs-Set mit 

Ringschraube

Summary of Contents for 731302

Page 1: ...use systems com DE FahrGer st fahrbare Arbeitsb hne Serie 10 GB Mobile scaffold mobile working platform series 10 Version 2 0 2019 KRAUSE Werk DE Aufbau und Verwendungsanleitung GB Instructions for as...

Page 2: ...Arbeitsb hne nach EN 1004 Ger stgruppe 3 GB EN 1298 IM de x en x ru EN 1004 3 8 12 XXXD Mobile Scaffold mobile working platform according to EN 1004 Scaffold Group 3 DE FahrGer st fahrbare Arbeitsb hn...

Page 3: ...im Verfahren des Ger stes fahrbare Arbeitsb hne 8 3 4 Verhalten bei Arbeiten an elektrischen Anlagen mit einem Ger st fahrbare Arbeitsb hne 9 3 5 Arbeiten in der N he von elektrischen Freileitungen 9...

Page 4: ...bt alle Module also auch optional erh ltliche Zubeh rteile die in dem Lieferumfang Ihres Systems eventuell nicht enthalten sind F r einige Anwendungsf lle ist es aus sicherheitstechnischen Aspekten je...

Page 5: ...aufgef hrten Regelwerke Richtlinien Verordnungen Gesetze etc f r eine sichere Handhabungeingehalten werden 1 2 Hersteller Hersteller des in der vorliegenden Dokumentation beschriebenen Arbeitsger ste...

Page 6: ...Verwendungsanleitung liegen beim Hersteller Jede Art der Vervielf ltigung auch auszugsweise ist nur mit Genehmigung des Herstellers gestattet Der Hersteller beh lt sich alle Rechte an Patenterteilunge...

Page 7: ...eingesetzt werden Eine Abweichung davon gilt als nicht bestimmungsm ige Verwendung im Sinne des ProdSG Produktsicherheitsgesetz vom 08 11 2011 Dies gilt ebenfalls f r die Missachtung der in dieser Au...

Page 8: ...bestehend aus Gel nderstreben Zwischenholmen und umlaufenden Bordbrettern einzusetzen Bei Zwischenbel gen die nur dem Auf Ab und Umbau und dem Aufstieg dienen kann auf umlaufende Bordbretter verzichte...

Page 9: ...dem beschriebenen Ger st fahrbare Arbeitsb hne Vor dem Arbeiten an elektrischen Anlagen mit einem Fahrger st fahrbare Arbeitsb hne ist darauf zu achten dass die Anlage freigeschaltet ist die Anlage g...

Page 10: ...fahrbare Arbeitsb hne darf erst erfolgen wenn die Angaben zum Produkt Abschnitt 2 und die Sicherheitsbestimmungen Abschnitt 3 vollst ndig durchgelesen wurden F r den Auf und Abbau sind mindestens 2 P...

Page 11: ...zum Verschieben des Ger stes fahrbare Arbeitsb hne ge ffnet werden Alle Steckverbin dungen m ssen mit Fallsteckern gesichert werden Alle Gel nder und Diagonalstreben m ssen unmittelbar nach dem Zusam...

Page 12: ...12 Kennzeichnung Das Typenschild ist an den Vertikalrahmen des STABILO Fahrger st Systems angebracht...

Page 13: ...Bezeichnung der Zubeh rteile Fahrtraverse Diagonalstrebe Basisstrebe Vertikalrahmen 2 m Fallstecker 8 mm L ngsbord Querbord Fahrrolle 150 mm h henverstellbar Fu platte Belagb hne mit Luke Ausleger Bal...

Page 14: ...versen Achten Sie darauf dass die Basis streben einen Abstand von ca 70 cm haben m ssen Die aufgesteckten Basisstreben verbinden die Traversen und gew hrleisten einen senkrechten Aufbau Schritt 2 Entf...

Page 15: ...n wie gezeigt in die Fahrtraversen ein geschoben und mit den Fl gel schrauben an diesen befestigt Stellen Sie die Fahrrollen in die hier gezeigte Stellung und bet tigen Sie die Bremsen durch Niederdr...

Page 16: ...n k nnen und sichern Sie die Verbindungen mit Fall steckern Ziehen Sie die Muttern der Basisstreben fest an Richten Sie im Anschluss das Ger st fahrbare Arbeits b hne sowohl ber die Quer als auch ber...

Page 17: ...se wie im Bild gezeigt entgegengesetzt diagonal ein Ver riegeln Sie auch diese Strebe Schritt 4 H ngen Sie die Diagonalstrebe von der ersten Sprosse des einen zur siebten Sprosse des gegen berliegen d...

Page 18: ...s Verriegeln Sie unbedingt die Haken sicherung unmittelbar nach der Montage Schritt 5 Lassen Sie sich die n chsten beiden 2 m Vertikalrahmen reichen und sichern Sie diese nach der Montage mit den Fall...

Page 19: ...nweis W hrend des Auf und Abbaus sind Hilfsebenen vorzusehen Die Hilfs ebenen sind nach Abschluss des Aufbaus wieder zu entfernen Nach DIN 4420 1 m ssen diese Bohlen eine Mindestbreite von 24 cm und e...

Page 20: ...ns ein Beachten Sie bitte die nebenstehende Abbildung f r die Ein baurichtung der Streben Verriegeln Sie die Diagonalstreben Schritt 8 Wenn Sie sicher stehen lassen Sie sich die Belagb hne anreichen N...

Page 21: ...kalrahmen anreichen und h ngen Sie diese zur Arbeitserleichterung wie hier im Bild zu sehen ber die Rohrver binder der 2 m Vertikalrahmen H ngen Sie dann die Belagb hne mit den daf r vorgesehenen ffnu...

Page 22: ...oben reichen um diese zu montieren und zu verriegeln Steigen Sie vorsichtig durch die Luke der Belagb hne nach oben Es ist noch kein Seitenschutz vorhanden Bauen Sie die oberen 1 m Vertikalrahmen ein...

Page 23: ...ontieren Sie zuerst die Querbords wie im linken Bild dargestellt Stecken Sie danach die L ngsbords von oben in die U Schiene ein siehe unteres Bild Schritt 11 Lassen Sie sich die beiden L ngs und Quer...

Page 24: ...24 Die Abbildung zeigt das fertig montierte Ger st fahrbare Arbeitsb hne mit einer Arbeitsh he von 6 40 m...

Page 25: ...en Die Ausleger werden in einem Winkel von ca 30 zum Fahrbalken montiert Aufbauvariante mit 4 Auslegern Die 4 F e der Ausleger m ssen immer fest auf dem Boden stehen Gegebe nenfalls sind bruchsichere...

Page 26: ...ets ersetzt auf keinen Fall die vorgeschriebenen Ballastgewichte und Ausleger siehe Seite 27 31 F r die Verankerung in der Wand sind Ringschrauben mit 12 mm Durchmesser zu verwenden Die D bel richten...

Page 27: ...sb hne abh ngig und kann aus den folgenden Tabellen entnommen werden Ballastierung der Traverse Einsatz im Freien Einsatz im geschlossenen Raum Feldl nge L 2 00 m Feldl nge L 2 50 m A B C D Standh he...

Page 28: ...4 4 0 0 x x x x x x x x 9 4 0 0 0 0 5 5 1 1 x x x x x x x x 10 4 1 1 1 1 6 6 1 1 x x x x x x x x 11 4 1 1 1 1 x x x x x x x x x x x x 12 4 2 2 2 2 x x x x x x x x x x x x x nicht m glich Ballastierung...

Page 29: ...A B C D A B C D 2 4 0 0 0 0 0 0 0 0 1 1 1 1 1 1 1 1 3 4 0 0 0 0 0 0 0 0 1 1 3 3 1 1 1 1 4 4 0 0 0 0 0 0 0 0 2 2 4 4 2 2 2 2 5 4 0 0 0 0 1 1 0 0 3 3 5 5 4 4 4 4 6 4 0 0 0 0 3 3 0 0 x x x x 5 5 5 5 7 4...

Page 30: ...1 1 1 1 4 4 0 0 0 0 0 0 0 0 1 1 4 4 2 2 2 2 5 4 0 0 0 0 0 0 0 0 1 1 5 5 3 3 3 3 6 4 0 0 0 0 1 1 0 0 2 2 6 6 4 4 4 4 7 4 0 0 0 0 2 2 0 0 x x x x 5 5 5 5 8 4 0 0 0 0 3 3 0 0 x x x x 6 6 6 6 9 4 0 0 0 0...

Page 31: ...A B C D A B C D 2 4 0 0 0 0 0 0 0 0 0 0 1 1 0 0 0 0 3 4 0 0 0 0 0 0 0 0 0 0 2 2 1 1 1 1 4 4 0 0 0 0 0 0 0 0 1 1 4 4 2 2 2 2 5 4 0 0 0 0 1 1 0 0 2 2 6 6 4 4 4 4 6 4 0 0 0 0 3 3 0 0 x x x x 6 6 6 6 7 4...

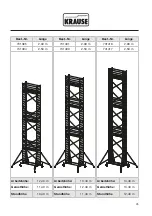
Page 32: ...ewichten verzichtet worden Best Nr L nge 731302 2 00 m 741301 2 50 m Arbeitsh he 3 00 m Ger sth he 2 30 m Standh he 1 00 m Best Nr L nge 731319 2 00 m 741318 2 50 m Arbeitsh he 4 40 m Ger sth he 3 40...

Page 33: ...Arbeitsh he 6 40 m Ger sth he 5 40 m Standh he 4 40 m Best Nr L nge 731340 2 00 m 741349 2 50 m Arbeitsh he 7 40 m Ger sth he 6 40 m Standh he 5 40 m Best Nr L nge 731357 2 00 m 741356 2 50 m Arbeitsh...

Page 34: ...beitsh he 9 40 m Ger sth he 8 40 m Standh he 7 40 m Best Nr L nge 731371 2 00 m 741370 2 50 m Arbeitsh he 10 40 m Ger sth he 9 40 m Standh he 8 40 m Best Nr L nge 731388 2 00 m 741387 2 50 m Arbeitsh...

Page 35: ...tsh he 12 40 m Ger sth he 11 40 m Standh he 10 40 m Best Nr L nge 731401 2 00 m 741400 2 50 m Arbeitsh he 13 40 m Ger sth he 12 40 m Standh he 11 40 m Best Nr L nge 731418 2 00 m 741417 2 50 m Arbeits...

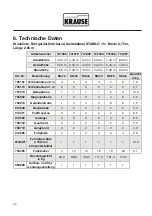
Page 36: ...rtikalrahmen 2 m 2 2 3 4 5 6 7 2 705174 Vertikalrahmen 1 m 0 2 2 2 2 2 3 7 701213 Belagb hne 1 1 1 1 2 2 14 0 702852 Diagonalstrebe 1 2 3 4 4 6 2 0 702210 Gel nderstrebe 1 4 4 4 8 8 1 5 912848 Basisst...

Page 37: ...40 m 10 40 m 11 40 m 12 40 m Art Nr Bezeichnung St ck St ck St ck St ck St ck St ck Gewicht in kg 705167 Vertikalrahmen 2m 7 8 9 10 11 12 7 2 705174 Vertikalrahmen 1m 2 2 2 2 2 2 3 7 701213 Belagb hne...

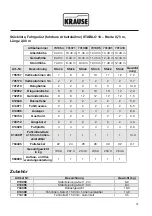
Page 38: ...1 1 1 1 2 2 17 0 702845 Diagonalstrebe 1 2 3 4 4 6 3 2 702203 Gel nderstrebe 1 4 4 4 8 8 2 0 912831 Basisstrebe 0 2 2 2 2 2 5 8 914071 Fahrtraverse 0 2 2 2 2 2 6 5 914095 Ausleger 0 0 0 0 2 2 8 0 7037...

Page 39: ...trebe 2 2 2 2 2 2 5 8 914071 Fahrtraverse 2 2 2 2 2 2 6 5 914095 Ausleger 4 4 4 4 4 4 8 0 703743 Querbord 2 2 2 2 2 2 2 0 703729 L ngsbord 2 2 2 2 2 2 5 0 914026 Fu platte 4 4 4 4 4 4 0 6 914309 Fahrr...

Page 40: ...Funktion der Sicherung Zustand des Holzes Durchstiegsluke auf Funktion Bordbretter Zustand des Holzes Risse Lenkrollen Rollf higkeit der Rolle und Funktion der Bremse auf Roll und Drehhemmung Bei vers...

Page 41: ...d tower mobile working platform 47 3 4 Instructions for working on electrical installations using the scaffold tower mobile working platform described in this document 47 3 5 Working near overhead pow...

Page 42: ...is modular and can be used with various optional accessories This manual contains descriptions of all of the system s different modules including these optional accessories which many not necessarily...

Page 43: ...ives ordinances laws etc concerning safe use listed in this Assembly and User Manual 1 2 Manufacturer The scaffold tower mobile working platform described in this manual has been manu factured by KRAU...

Page 44: ...Manual Copying the Assembly and User Manual including excerpts thereof is only permitted with the manufacturer s permission The manufacturer reserves all rights to patents and utility model registrati...

Page 45: ...onsidered improper use in terms of the German Product Safety Act ProdSG from 08 11 2011 The same applies to non compliance with the standards and guidelines listed in this Assembly and User Manual Imp...

Page 46: ...ke it noticeably more difficult to walk upright Working platforms must be secured with 3 component guard rails comprising a hand rail middle rails and toe boards all round Intermediate platforms that...

Page 47: ...s with a speed of less than force 6 45 km h Always make sure that all of the requisite safety precautions for protecting the scaffold tower mobile working platform from accidentally rolling away such...

Page 48: ...ons laid out in DGUV Information Sheet 203 004 formerly BGI 594 Use of electrical equipment in highly hazardous electrical locations 4 Structure 4 1 General information Personnel must read the product...

Page 49: ...be locked on at all times and only be unlocked in order to move the scaffold All of the plug connectors have to be secured with locking pins All guardrails and diagonal braces have to be locked immed...

Page 50: ...50 Type plate The type plate is attached to one of the vertical uprights of the mobile STABILO system scaffold tower...

Page 51: ...bile working platform components Mobile stabilisers Diagonal brace Base brace Vertical frame 2 m Locking pin 8 mm Front toe board Side toe board Castor 150 mm height adjustable Foot plate Platform wit...

Page 52: ...e mobile stabilisers as shown When doing so make sure that there is an approx 70 cm gap between the base braces Once in place the base braces are the link between the two stabilisers and make sure tha...

Page 53: ...sert the castors as shown into the mobile stabilisers and fasten by fully tightening the wing screws Move the castors into the position shown here and apply the brakes by pushing down the brake levers...

Page 54: ...e vertical frames can be attached onto them from above and lock the connections with locking pins Tighten the nuts on the base braces Next level the scaffold both diagonally and longitudinally using a...

Page 55: ...it on the opposite side at a diagonal as shown in the image and then lock it into place Step 4 Attach the first diagonal brace to the first rung on one of the vertical frames and the seventh rung on t...

Page 56: ...olutely essential to make sure to lock the hook lock immediately after fitting the braces Step 5 Have the next two 2 metre vertical frames passed to you and lock them into place with the locking pins...

Page 57: ...ote In order to assemble and disassemble the scaffold tower it is necessary to build a number of temporary platforms which need to be removed again once the scaffold has been fully erected In accordan...

Page 58: ...efer to the image opposite for information on the direc tion in which the braces need to be fitted Lock the diagonal braces into place Step 8 Make sure your footing is secure and have the top platform...

Page 59: ...mes passed up to you and suspend them from the pipe couplings on the 2 metre vertical frames as shown in the image for greater ease Next insert the platform into the top rungs of the vertical frame th...

Page 60: ...up to you and fit and secure them Climb onto the top platform through the platform hatch taking great care as there are not yet any guardrails in place Insert the top 1 metre vertical rails and secure...

Page 61: ...t the side toe boards first as shown in the image on the left Next insert the longitudinal boards from the top into the U tracks see bottom image Step 11 Have the two side and longitudinal toe boards...

Page 62: ...62 The image below shows a fully assembled scaffold tower with a working height of 6 40 metres...

Page 63: ...st be fitted at an approx 30 degree angle to the chassis beam Alternative configuration with 4 outriggers The 4 outrigger feet always have to be solidly resting on the floor If necessary place unbreak...

Page 64: ...able Using the wall spacer does by no means remove the need for the specified ballast weights and outriggers see page 66 69 The scaffold must be attached to the wall with 12 mm eye bolts The rawlplugs...

Page 65: ...r Attaching ballast to scaffolds without stabilisers outriggers with castors Ballast use for STABILO 10 width 0 75 m length 2 00 m and 2 50 m indoor and outdoor 4 6 Attaching the ballast Fee standing...

Page 66: ...3 3 0 0 x x x x 6 6 6 6 8 4 0 0 0 0 4 4 0 0 x x x x x x x x 9 4 0 0 0 0 5 5 1 1 x x x x x x x x 10 4 1 1 1 1 6 6 1 1 x x x x x x x x 11 4 1 1 1 1 x x x x x x x x x x x x 12 4 2 2 2 2 x x x x x x x x...

Page 67: ...tabilisers A B C D A B C D A B C D A B C D 2 4 0 0 0 0 0 0 0 0 1 1 1 1 1 1 1 1 3 4 0 0 0 0 0 0 0 0 1 1 3 3 1 1 1 1 4 4 0 0 0 0 0 0 0 0 2 2 4 4 2 2 2 2 5 4 0 0 0 0 1 1 0 0 3 3 5 5 4 4 4 4 6 4 0 0 0 0 3...

Page 68: ...0 0 0 3 4 0 0 0 0 0 0 0 0 0 0 2 2 1 1 1 1 4 4 0 0 0 0 0 0 0 0 1 1 4 4 2 2 2 2 5 4 0 0 0 0 0 0 0 0 1 1 5 5 3 3 3 3 6 4 0 0 0 0 1 1 0 0 2 2 6 6 4 4 4 4 7 4 0 0 0 0 2 2 0 0 x x x x 5 5 5 5 8 4 0 0 0 0 3...

Page 69: ...abilisers A B C D A B C D A B C D A B C D 2 4 0 0 0 0 0 0 0 0 0 0 1 1 0 0 0 0 3 4 0 0 0 0 0 0 0 0 0 0 2 2 1 1 1 1 4 4 0 0 0 0 0 0 0 0 1 1 4 4 2 2 2 2 5 4 0 0 0 0 1 1 0 0 2 2 6 6 4 4 4 4 6 4 0 0 0 0 3...

Page 70: ...ights Order No Length 731302 2 00 m 741301 2 50 m Working height 3 00 m Tower height 2 30 m Standing height 1 00 m Order No Length 731319 2 00 m 741318 2 50 m Working height 4 40 m Tower height 3 40 m...

Page 71: ...0 m Tower height 5 40 m Standing height 4 40 m Order No Length 731340 2 00 m 741349 2 50 m Working height 7 40 m Tower height 6 40 m Standing height 5 40 m Order No Length 731357 2 00 m 741356 2 50 m...

Page 72: ...m Tower height 8 40 m Standing height 7 40 m Order No Length 731371 2 00 m 741370 2 50 m Working height 10 40 m Tower height 9 40 m Standing height 8 40 m Order No Length 731388 2 00 m 741387 2 50 m...

Page 73: ...Tower height 11 40 m Standing height 10 40 m Order No Length 731401 2 00 m 741400 2 50 m Working height 13 40 m Tower height 12 40 m Standing height 11 40 m Order No Length 731418 2 00 m 741417 2 50...

Page 74: ...67 Vertical frame 2 m 2 2 3 4 5 6 7 2 705174 Vertical frame 1 m 0 2 2 2 2 2 3 7 701213 Platform 1 1 1 1 2 2 14 0 702852 Diagonal brace 1 2 3 4 4 6 2 0 702210 Rail brace 1 4 4 4 8 8 1 5 912848 Base bra...

Page 75: ...0 m 9 40 m 10 40 m 11 40 m 12 40 m Item no Designation Units Units Units Units Units Units Weight in kg 705167 Vertical frame 2m 7 8 9 10 11 12 7 2 705174 Vertical frame 1m 2 2 2 2 2 2 3 7 701213 Plat...

Page 76: ...1 1 2 2 17 0 702845 Diagonal brace 1 2 3 4 4 6 3 2 702203 Rail brace 1 4 4 4 8 8 2 0 912831 Base brace 0 2 2 2 2 2 5 8 914071 Mobile stabilisers 0 2 2 2 2 2 6 5 914095 Outrigger 0 0 0 0 2 2 8 0 70374...

Page 77: ...2 2 2 2 2 5 8 914071 Mobile stabilisers 2 2 2 2 2 2 6 5 914095 Outrigger 4 4 4 4 4 4 8 0 703743 Side toe board 2 2 2 2 2 2 2 0 703729 Front toe board 2 2 2 2 2 2 5 0 914026 Foot plate 4 4 4 4 4 4 0 6...

Page 78: ...deformations dents and cracks Diagonal braces and hand rails For deformations dents cracks and the proper working order of the locks Platforms inspect for deformation cracks an proper operation of the...

Page 79: ...of place from collisions or falling down etc The scaffold tower components can be cleaned with water and a conventional cleaning agent Paint stains can be removed using turpentine Caution Do not allo...

Page 80: ...3 D 36304 Alsfeld Telefon 06631 795 0 Telefax 06631 795 139 www krause systems com 560890 2020 by KRAUSE Printed in Germany We reserve the right to make technical changes and do not accept any liabili...

Reviews: