background image

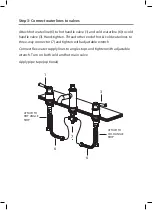
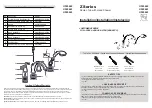
Step 3: Connect waterlines to valves

Attach hot waterline (6) to hot handle valve (1) and cold waterline (6) to cold 
handle valve (3). Hand-tighten. Thread other end of hot & cold waterlines to 
three-way connector (7) and tighten with adjustable wrench

Connect flex water supply lines to angle stops and tighten with adjustable 
wrench. Turn on both cold and hot main valve

Apply pipe tape (optional)

12

11

10

26

27

22

23 24

21

20

Step 1

Step 2

Step 3

Step5

Step4

1

2

5A
5B
5C
5D

3

1

2

3

5A
5B
5C
5D

ATTACH TO 

HOT ANGLE 

STOP

ATTACH TO 

COLD ANGLE 

STOP

6

7

7

7

1

3

6

13

14

15

16

17

18

25

19

Summary of Contents for KEF-15603

Page 1: ...INSTALLATION MANUAL www kraususa com I toll free 1 800 775 0703 I 2013 2014 Kraus USA Inc Solinder Double Handle Widespread Basin Faucet KEF 15603 ...

Page 2: ...lcome any questions or comments you may have and will be glad to assist you in the future For more information about Kraus products please visit our website at www kraususa com Please register your new Kraus product at the following web address in order to activate the warranty and receive the full benefit of customer support www kraususa com registration Sincerely Kraus Customer Service Departmen...

Page 3: ...any part is missing or damaged please contact Kraus Customer Service at 800 775 0703 for a replacement Turn off the hot and cold water lines at the angle stops and turn on the old faucet to release any built up pressure Pre drilled countertop hole size requirement 1 3 8 min Max countertop thickness 1 3 8 ...

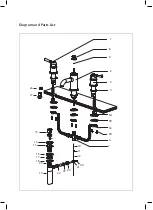
Page 4: ...Diagram and Parts List 12 11 7 6 5D 5A 5B 5C 4 3 2 1 8 9 10 22 23 24 21 20 13 14 15 16 17 18 25 19 26 27 ...

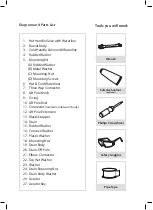
Page 5: ...Knob 9 O ring 10 Lift Pole Rod 11 Connector located inside faucet body 12 Lift Pole Extension 13 Waste Stopper 14 Drain 15 Rubber Washer 16 Concave Washer 17 Plastic Washer 18 Mounting Nut 19 Drain Body 20 Drain Off Pole 21 Elbow Connector 22 Top Hat Washer 23 Washer 24 Drain Retaining Nut 25 Drain Body Washer 26 Aerator 27 Aerator Key Tools you will need 1 12 13 2 3 4 5 6 7 8 Wrench Phillips Scre...

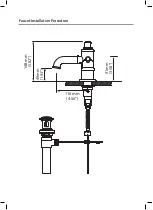
Page 6: ...Faucet Installation Procedure 116 mm 4 56 148 mm 5 82 49mm 1 93 91mm 3 58 2 M10 ...

Page 7: ...Faucet Installation Procedure Max30mm 1 18 2 M10X1 ...

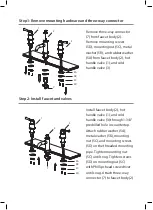
Page 8: ... HOT ANGLE STOP ATTACH TO COLD ANGLE STOP 6 7 7 7 1 3 6 13 14 15 16 17 18 25 19 Step 2 Step5 Step4 1 2 3 5A 5B 5C 5D 7 Step 2 Install faucet and valves Install faucet body 2 hot handle valve 1 and cold handle valve 3 through 1 3 8 predrilled hole in countertop Attach rubber washer 5A metal washer 5B mounting nut 5C and mounting screws 5D on the threaded mounting pipe Tighten mounting nut 5C until ...

Page 9: ...read other end of hot cold waterlines to three way connector 7 and tighten with adjustable wrench Connect flex water supply lines to angle stops and tighten with adjustable wrench Turn on both cold and hot main valve Apply pipe tape optional Step 3 5C 5D ATTACH TO HOT ANGLE STOP ATTACH TO COLD ANGLE STOP 6 7 7 1 3 6 13 14 15 16 17 18 25 19 ...
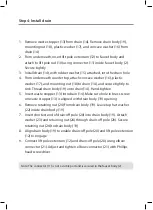
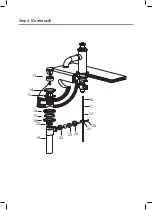
Page 10: ...nto drain 14 Hand tighten 5 Insert waste stopper 13 into drain 14 Make sure hole in brass screw on waste stopper 13 is aligned with drain body 19 opening 6 Remove retaining nut 24 from drain body 19 Leave top hat washer 22 inside drain body 19 7 Insert shortest end of drain off pole 20 into drain body 19 Attach washer 23 and retaining nut 24 through drain off pole 20 Secure retaining nut 24 to dra...

Page 11: ...12 11 10 22 23 24 21 20 Step4 TO NGLE 13 14 15 16 17 18 25 19 Step 4 Continued ...
Page 12: ...Step 5 Flush faucet After installing faucet remove aerator 26 with included aerator key 27 Turn water on for 30 seconds to remove any debris Reassemble aerator 26 26 27 Step5 ...

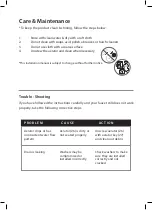
Page 13: ...t debris Drain is leaking Washers may be compromised or installed incorrectly Check washers to make sure they are installed correctly and not cracked Care Maintenance To keep the product clean shining follow the steps below 1 Rinse with clean water dry with a soft cloth 2 Do not clean with soaps acid polish abrasives or harsh cleaners 3 Do not use cloth with a coarse surface 4 Unscrew the aerator ...

Page 14: ...se service and maintenance If Kraus is unable to provide a replacement and repair is not practical or cannot be made in timely fashion Kraus may elect to refund the purchase price in exchange for the return of the product CONDITIONS AND EXCLUSIONS Like other home fixtures Kraus products will require light maintenance to ensure proper function We provide you with complete knowledge to perform this ...

Page 15: ...des freight costs cartridge replacement labor travel time lost profit home damages and other contingent liabilities and costs including without limitation costs associated with experts investigations analyses attorneys and other professionals and services The Kraus warranty is a comprehensive and explicit limit of liability and all items outside of it are not addressable by or the responsibility o...

Page 16: ...www kraususa com ...

Reviews: